
Justin Timberlake & Chris Stapleton – Say Something Guitar Lesson: Chords & Strumming
Learn how to play Say Something by Justin Timberlake and Chris Stapleton on guitar. Discover the chords, complete chord progression, and song structure. Practice the chord changes, strumming pattern, and timing to play along with the entire song from beginning to end.
What Chords Do You Need to Play Say Something by Justin Timberlake and Chris Stapleton?
To play Say Something by Justin Timberlake and Chris Stapleton on guitar, place a capo on the 3rd fret. Most of the song uses just four chord shapes: Am, C, G and D. This chord progression repeats throughout the verses and choruses. The bridge introduces a few additional chords.
1. Capo on the 3rd Fret
First, tune your guitar to standard tuning: E–A–D–G–B–E. Place the capo just behind the 3rd fret. Check the tuning again with the capo in place. The strings now sound as G–C–F–B♭–D–G. Make small tuning adjustments if necessary.
2. Guitar Chord Shapes
Start by practising the chord progression Am – C – G – D. Pay attention to your finger placement and look for common fingers or the smallest possible movements when changing between chords. Add the remaining chords only after you can play these four shapes smoothly.
3. Actual Sounding Chords
With the capo on the 3rd fret, the chord shapes Am – C – G – D actually sound as Cm – E♭ – B♭ – F. Without a capo, for example on piano, play these concert-pitch chords to produce the same harmony.
Remember: The most important part of playing Say Something is learning to move smoothly through the repeating chord progression while maintaining consistent timing and groove. Start with simple strums before trying to match the rhythmic pattern of the recording. Follow the song structure in the complete chord chart. For more advice on tuning your guitar when using a capo, read our guide on tuning a guitar with a capo.
Song Info – Say Something
Key: C minor
Time Signature: 4/4
Tempo: 97 BPM
Guitar: Acoustic
Tuning: E–A–D–G–B–E (standard)
Capo: 3rd fret
Capo Tuning: G–C–F–B♭ (or A♯)–D–G (with capo on the 3rd fret)
Tone/Effects: Clean, acoustic
Important: Check and adjust your tuning with the capo on the 3rd fret. The pressure from the capo can cause the strings to go slightly out of tune.
Say Something – Guitar Chords
To play Say Something with a capo on the 3rd fret, you'll mainly use the chord shapes Am, C, G and D/F#. The bridge also introduces F and G/B. Place your capo on the 3rd fret and use the chord diagrams below as a reference while practising. Pay particular attention to anchor fingers and the bass notes in the slash chords D/F# and G/B.
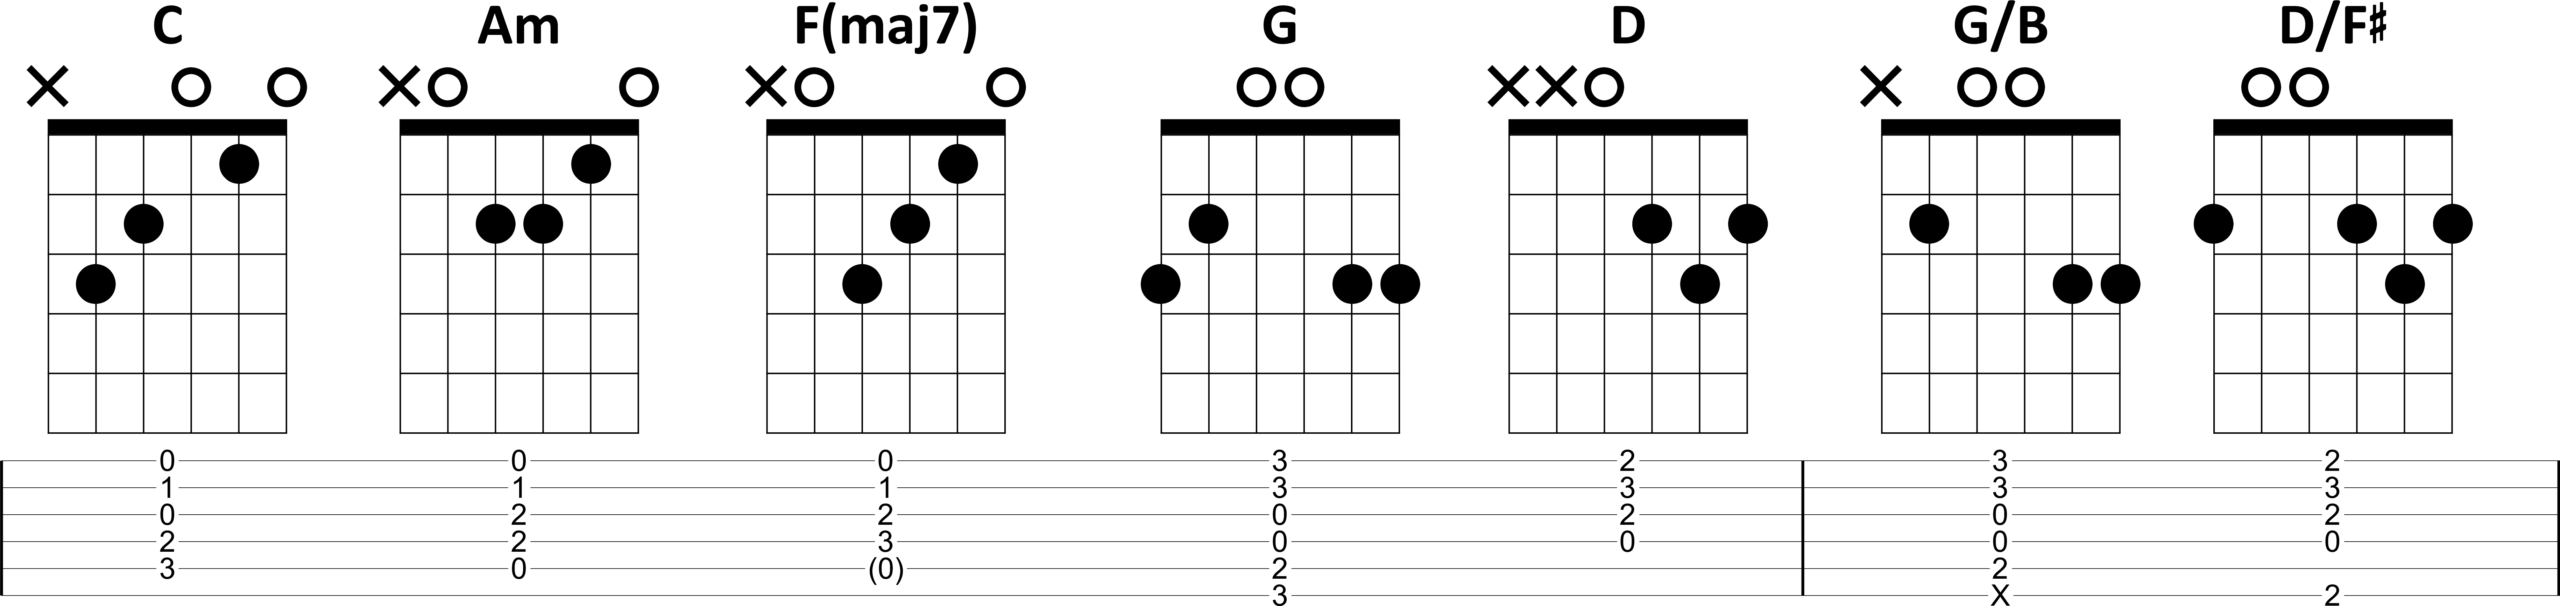
Say Something – Complete Guitar Chord Chart
Play Say Something by Justin Timberlake and Chris Stapleton with a capo on the 3rd fret, or switch to the actual sounding chords for piano or guitar without a capo.
Time Signature: 4/4
Tempo: 97 BPM
Learn more about tuning with a capo
How to Play Say Something on Guitar
Say Something by Justin Timberlake and Chris Stapleton is an excellent song for practising a steady groove, chord changes, and sixteenth-note strumming patterns. Most of the song uses the same four chord shapes. The main challenge lies in the rhythmic accompaniment and the chord changes in the bridge and final chorus.
Listen and Follow the Chord Chart
Start by listening to the original recording while following the complete chord chart without playing your guitar. Count aloud in groups of four and try to follow the song from the intro to the outro. Pay particular attention to the repetitions, the transition into the bridge, and the modified chord progression in the final chorus. Don't forget the one-bar BREAK after the bridge.
Practise Chord Changes and Slash Chords
Place your capo on the 3rd fret and start by practising the chord progression Am – C – G – D/F#. Look for fingers that can remain in the same position during each change, and avoid unnecessary movements. Then practise the additional chords F and G/B for the bridge and final chorus.
Slash chords are optional. The note after the slash indicates the intended bass note, which could also be played by a bass guitarist. For a simplified guitar accompaniment, you can therefore play D instead of D/F# and G instead of G/B. If you can include the bass notes, however, your accompaniment will sound more complete.
For D/F#, you can play the F# on the low E string using your thumb, at the 2nd fret relative to the capo. For G/B, simply play a G chord while avoiding the low E string. The B on the A string then becomes your lowest sounding note. It's that simple. For another practical approach to improving chord changes, see our guide on focused guitar practice and measurable progress.
Start With One Strum per Chord
Play the original recording and, for now, use only one downstroke per chord. In the main progression Am – C – G – D/F#, each chord lasts for one measure. Let the strings ring until the next chord change.
In the bridge and final chorus, some measures contain two chords, such as | F G | and | Am G/B |. Play the first chord on beat 1 and the second on beat 3. If necessary, reduce the playback speed on YouTube and try to play along with the entire song without stopping.
Learn the Strumming Pattern in Two Stages
The rhythmic accompaniment of Say Something includes sixteenth-note movements that can be quite challenging for beginners. That's why we'll start with a simple eighth-note strumming pattern before introducing sixteenth notes. This allows you to develop a steady groove without making the chord changes unnecessarily difficult.
Memorise each strumming pattern on open strings first, without holding any chord shapes. Your strumming hand should continue moving up and down, even when you're not hitting the strings. This movement acts like a metronome and helps maintain consistent timing and groove.
↓ = downstroke, ↑ = upstroke, – = no strum, but your strumming hand keeps moving.
Stage 1 – Simple Eighth-Note Strumming Pattern
Start with a steady eighth-note strumming pattern in 4/4. Your strumming hand makes eight movements per measure: four downstrokes and four upstrokes. This pattern already provides a solid basic groove without becoming too complicated.
Count:    1  +  2  +  3  +  4  +
Strokes:  ↓  –  ↓  ↑  ↓  –  ↓  ↑
Practise the pattern until you can repeat it automatically. Then play it using one open chord before adding the main chord progression. In measures containing two chords, you can initially simplify the rhythm to one downstroke on beat 1 and another on beat 3.
Stage 2 – Add More Groove With Sixteenth Notes
Once the eighth-note pattern feels natural, you can move on to sixteenth notes. Each beat is now divided into four equal parts: 1 – e – & – a. Your strumming hand therefore makes sixteen movements per measure. This creates more opportunities for syncopation and a livelier groove.
Start with this simplified sixteenth-note strumming pattern:
Count:    1 e & a   2 e & a   3 e & a   4 e & a
Strokes:  ↓ – – ↑   ↓ ↑ ↓ –   – ↑ ↓ ↑   ↓ – – –
The most important thing is to keep all sixteen hand movements evenly spaced. Start on open strings until you can repeat the pattern smoothly from memory. Then add one chord before introducing the chord changes.
In the bridge and final chorus, you can initially stick to simple downstrokes in measures containing two chords. Only when those changes feel effortless should you try to maintain the sixteenth-note strumming pattern throughout these sections.
These are deliberately simplified practice patterns for guitar accompaniment, not exact transcriptions of the recording. You can work on reproducing the original rhythm more accurately once your timing, chord changes, and strumming-hand movements are under control.
For more information and additional exercises, read our lesson on guitar picking and strumming technique.
Add Accents and Dynamics
Once you've mastered the chord progression and strumming pattern, you can focus on musical expression. Add intentional accents to your strumming and listen carefully to how the original recording develops. Play quieter sections more softly and gradually build energy during the choruses. This gives your accompaniment more character and drive.
Be careful not to speed up when strumming more forcefully. Your timing should remain consistent, even when you vary the dynamics.
Play the Entire Song on Your Own
The final step is to play Say Something without the original recording. Use a metronome or a simple drum pattern and follow the chord chart from the intro to the outro. Remember the repetitions, the chord changes within a measure, and the break after the bridge.
Set the tempo to 97 BPM in a 4/4 time signature. Use Smart Click to practise with a clear metronome beat, or try GROOVR if you prefer playing along with a simple drum pattern. Choose a straight 4/4 groove in GROOVR.
Start at a slower tempo if 97 BPM is still too challenging. Your goal is to play the entire song without stopping or losing your place, using accurate chord changes, a consistent strumming pattern, and steady timing. Once you've achieved this, you can focus on developing the sixteenth-note groove of the original recording.
6 Common Mistakes When Playing Say Something on Guitar
The basic chords in Say Something are relatively simple, but the sixteenth-note groove, slash chords, and repetitive song structure make the song more challenging than it first appears. Avoid these six common mistakes.
Trying to Play the Sixteenth-Note Pattern Too Soon
Don't underestimate the tempo of 97 BPM. It may not sound particularly fast, but with sixteenth notes, your strumming hand needs to make four movements per beat. This requires considerable speed, accuracy, and control.
It becomes even more difficult when your chord changes aren't automatic yet. Start with one strum per chord, then practise the simple eighth-note pattern from Stage 1 before moving on to the sixteenth-note pattern in Stage 2.
Stopping Your Strumming Hand Between Strokes
The dashes (–) in the strumming pattern mean no strum, not that your strumming hand should stop. Your hand should continue moving up and down, even when you're not hitting the strings.
Especially with sixteenth notes, this continuous movement is essential for accuracy, timing, and groove. As soon as your strumming hand starts moving irregularly, you lose rhythmic precision. Practise the pattern on muted strings first, without changing chords.
Getting Stuck on Slash Chords
D/F# and G/B are not essential beginner chord shapes. The slash indicates a specific bass note, which could also be played by a bass guitarist. For a simplified guitar accompaniment, you can play D instead of D/F# and G instead of G/B.
If you want to include the bass notes, you can play the F# on the low E string using your thumb when playing D/F#. For G/B, play a regular G chord without strumming the low E string. The B on the A string then becomes your lowest sounding note. Master the basic chord shapes first and add the slash chords afterwards.
Playing the Entire Sixteenth-Note Pattern From the Wrist
With this type of sixteenth-note strumming pattern, many guitarists make the mistake of generating every movement from the wrist alone. Instead, apply more funk-style strumming technique: keep your wrist firm and let the rhythmic movement come primarily from your forearm and elbow. This helps you maintain a consistent sixteenth-note motion with greater control over timing, accents, dynamics, and groove.
Larger strumming movements aren't necessarily wrong, either. They can actually add dynamics, energy, and visual expression, especially during live performances. The important thing is to keep those movements rhythmically controlled.
Losing Your Place in the Song Structure
With repetitive songs like Say Something, it's easy to lose track of where you are. You keep playing the same chord progression over and over, making it easy to forget which section you're in or when the next transition occurs.
Memorise the song structure. Sing the melody or vocal lines in your head while playing. This makes it easier to recognise the transitions between the verse, chorus, and bridge. Then practise the entire song with just a drumbeat, without the original recording. You'll quickly discover whether you can follow the structure independently.
Playing Too Fast and Tensing Up Your Strumming Hand
When you try to play the sixteenth-note pattern faster than your current technique allows, your strumming hand can easily become tense. As a result, you lose timing, dynamics, and control. You may also start gripping your pick more tightly, making it harder to move smoothly or even causing it to slip out of your fingers.
Increase your tempo gradually. Only play as fast as you can while staying relaxed and accurate. As soon as you notice tension in your wrist, forearm, or fingers, slow down. Speed comes from efficient movements and repetition, not from applying more force.
Frequently Asked Questions About Playing Say Something on Guitar
What Guitar Chords Do You Need for Say Something?
With a capo on the 3rd fret, the main chord shapes are Am, C, G and D/F#. The bridge and final chorus also introduce F and G/B. Most of the song follows the same four-chord progression. You'll find all the repetitions and transitions in the complete chord chart.
Do You Need a Capo to Play Say Something?
A capo isn't essential, but it makes the song much easier to play. With a capo on the 3rd fret, you can use familiar open chord shapes. Without a capo, you'll need to play the actual sounding chords in C minor: Cm, Eb, Bb and F/A, along with Ab and Bb/D. Use the No Capo button above the chord chart to switch between the two versions.
Can You Replace D/F# and G/B With Regular Chords?
Yes, the slash chords are optional. The note after the slash indicates the intended bass note, which could also be played by a bass guitarist. For a simplified guitar accompaniment, you can play D instead of D/F# and G instead of G/B.
If you want to include the bass notes, you can play the F# on the low E string using your thumb when playing D/F#. For G/B, use a regular G chord shape but avoid strumming the low E string. The B on the A string then becomes your lowest sounding note.
What Strumming Pattern Should You Use for Say Something?
The groove of Say Something is built around rhythmic sixteenth-note movements. At 97 BPM, this means four movements per beat. That may not sound particularly fast, but it requires considerable control over your strumming hand.
Start with the simple eighth-note pattern from Stage 1. Once you've mastered the chord changes and timing, move on to the sixteenth-note pattern from Stage 2. Maintain a steady rhythmic movement from your arm and elbow, even when you're not hitting the strings.
Is Say Something Suitable for Beginner Guitarists?
Yes, the simplified version is suitable for beginners. With a capo on the 3rd fret, familiar open chords, and a simple eighth-note strumming pattern, Say Something is accessible to beginners who can already change between basic guitar chords.
The full accompaniment, including slash chords, sixteenth-note strumming, and controlled accents, is better suited to intermediate guitarists. You can therefore learn the song at your own level and gradually increase the difficulty as your technique improves.
How Do You Memorise the Song Structure of Say Something?
Because the same chord progression repeats throughout the song, it's easy to lose track of the different sections. That's why you should memorise not only the chords but also the order of the song sections.
Sing the melody in your head while playing and use the vocal lines to recognise the transitions. Pay particular attention to the bridge, the one-bar break, and the modified chord progression in the final chorus. Eventually, practise the entire song with just a drumbeat. This will reveal whether you can follow the structure independently, without relying on the original recording.

Guitar Training Studio
Ready to Make Real Progress on Guitar?
Build better technique, timing and musicianship with structured guitar training, practical tools and personal coaching.
www.guitarstudio.be (Belgium)
www.guitartrainingstudio.com (International)
c/o Wouter Baustein
Driehoekstraat 1, BE-3891 Gingelom
+32.(0)476.666.300
info@guitarstudio.be
CoC: 0872.862.121
VAT: BE0872862121
IBAN: BE33-7350-0967-6746
BIC: KREDBEBBXXX
© 2000 – 2026 All Rights Reserved
Web apps & development by Baustein.digital