
How to Change Guitar Chords Faster and More Smoothly
Struggling with slow or awkward chord changes? The solution is not to force your fingers to move faster. Faster chord changes come from using efficient fingerings, reducing unnecessary movement and preparing each transition before it happens.
In this lesson, you’ll learn how to make guitar chord changes faster, cleaner and more reliable by training the movement between chords—not just repeating entire songs and hoping your fingers eventually catch up.
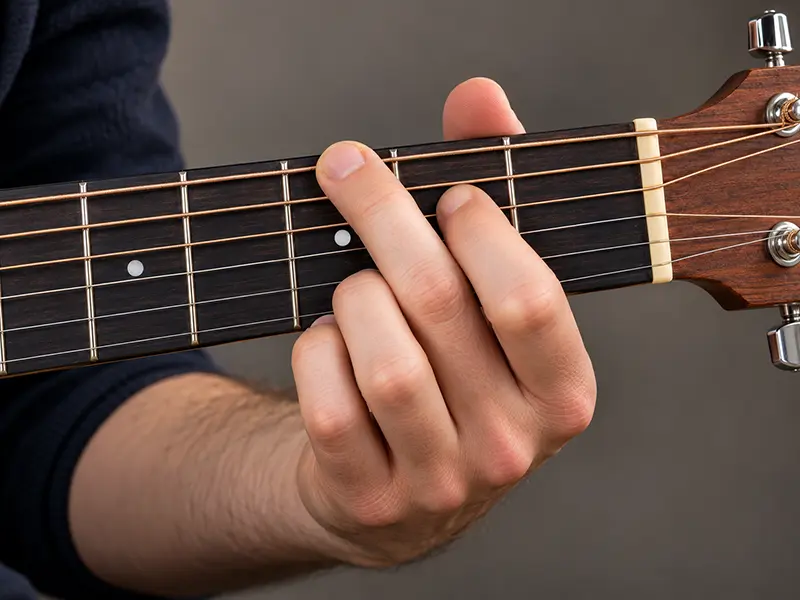
How Do You Change Guitar Chords Faster?
To change guitar chords faster, don't simply try to move your fingers faster. Use efficient fingerings, minimize unnecessary movement and train the transition itself until it becomes smooth, accurate and repeatable.
Main rule: don't practise speed directly. Build an efficient, reliable chord change first—then make it faster.
Practice Smarter, Not Faster
Faster chord changes are not created by forcing your fingers to move faster. They are the result of better movement. If a chord change keeps failing, repeating the same inefficient movement at a higher speed will not solve the problem. Slow it down, analyze what is happening and fix the movement first. Once the fingering, preparation and transition are efficient and repeatable, speed becomes much easier to build.
Speed is an outcome, not the exercise.
1. Use the Right Fingering for Faster Chord Changes
A guitar chord does not always have to be played with exactly the same fingering. The best fingering depends on the chord progression, the situation and the song.
When you want to change guitar chords faster, don't look at each chord as an isolated shape. Look at the complete transition: where are your fingers coming from, and where do they need to go next?
Sometimes a different fingering lets one or more fingers stay in place, reduces the distance your fingers need to travel, or simply makes the next chord easier to reach. The goal is always the same: make the transition as efficient as possible.
Choose the Fingering That Fits the Transition
The fingering that works best for one chord progression may not be the best choice in another. That is why experienced guitarists often use different fingerings for chords they already know.
Instead of asking only, "What is the correct fingering for this chord?", also ask:
- Which chord am I coming from?
- Which chord comes next?
- Can any fingers stay in place?
- Can I use a different fingering to reduce movement?
This small change in thinking can make chord transitions faster, smoother and easier to repeat.
Sometimes an Easier Chord Shape Is the Smarter Choice
In some situations, you can also simplify or slightly adjust a chord shape to make the transition easier.
- Bm7 instead of Bm: Bm7 can be much easier to play as an open chord, which can make fast chord changes easier.
- G6 instead of G: a simplified G6 shape can be useful for players who cannot form a full G chord quickly enough yet.
The point is not to avoid difficult chords forever. The point is to choose a playable solution that allows you to keep the music moving while you develop better control.
Place the Most Important Fingers First
Your fingers do not always need to land at exactly the same millisecond. In many rhythm-guitar situations, especially when you start the next chord with a downstroke, the bass strings are played first.
That means you can often place the fingers on the thicker strings first and then complete the rest of the chord shape while the strum is already moving toward the thinner strings.
For example, when forming a G chord, you can work from the bass side toward the treble strings. This gives the fingers that matter first a small timing advantage.
The Wrong Fingering Can Make the Next Chord Harder
Fingering choices become especially important when two chords are closely connected.
A good example is Dsus4. If you choose a fingering that forces the wrong fingers into position, you can make the return to the next chord unnecessarily difficult. A smarter fingering keeps useful fingers in place and makes the transition much more natural.
This is why there is no single “best fingering” in isolation. The best fingering is the one that makes the entire chord change work.
Practice Check
Before practising a difficult chord change, stop for a moment and analyse it:
- Play the first chord.
- Look at the next chord.
- Check which fingers can stay in place.
- Look for a fingering that requires less movement.
- Repeat the transition slowly before trying to play it faster.
2. Reduce Finger Movement Between Chords
One of the simplest ways to make guitar chord changes faster is to move your fingers less. Every unnecessary movement costs time, adds tension and makes the transition harder to repeat consistently.
Instead of lifting your entire hand away from the fretboard every time you change chords, look closely at the two chord shapes and ask: which fingers actually need to move?
Keep Fingers in Place Whenever Possible
Many chord changes share one or more finger positions. If a finger is already on the correct string and fret for the next chord, there is no reason to lift it and place it again.
In Chord Mastery, these fingers are used as reference points during the transition. Keeping them in place reduces the amount of movement your hand has to make and gives the remaining fingers a fixed point to work around.
Beginners often overlook this because they think of every chord as a completely new hand shape. A better approach is to compare both chords first and identify what can stay where it is.
Finger numbers: 1 = index finger, 2 = middle finger, 3 = ring finger, 4 = pinky, T = thumb.
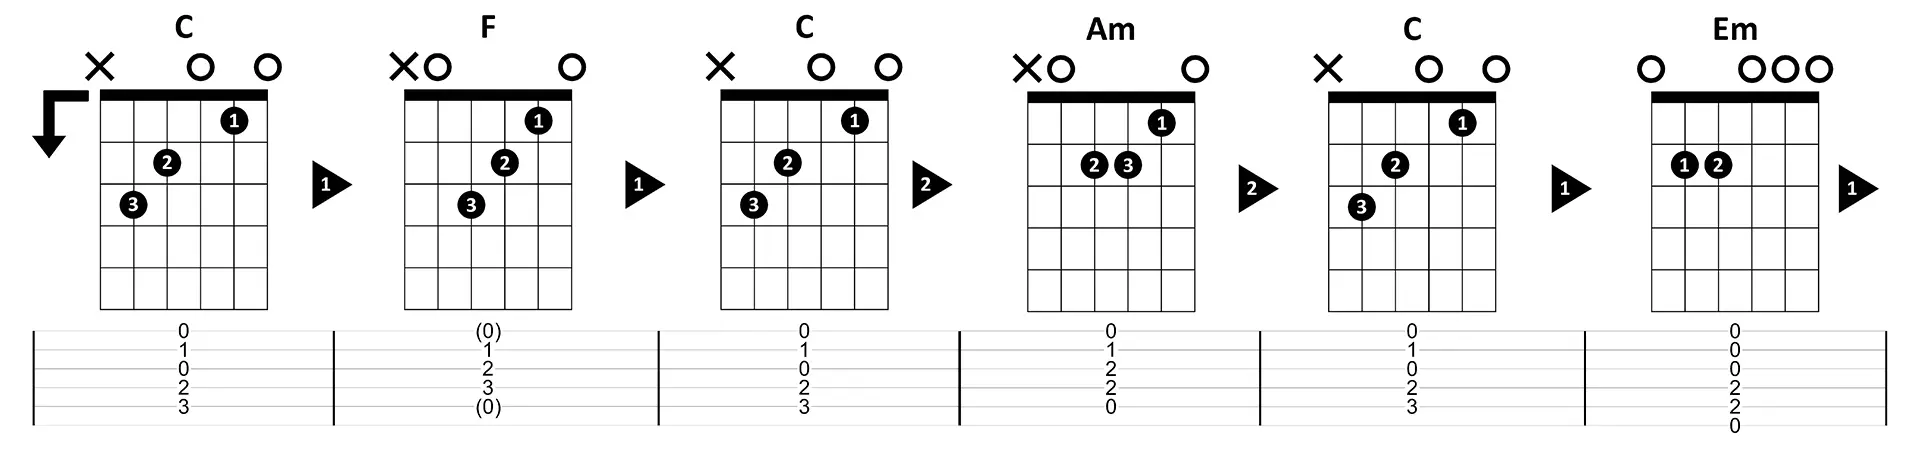
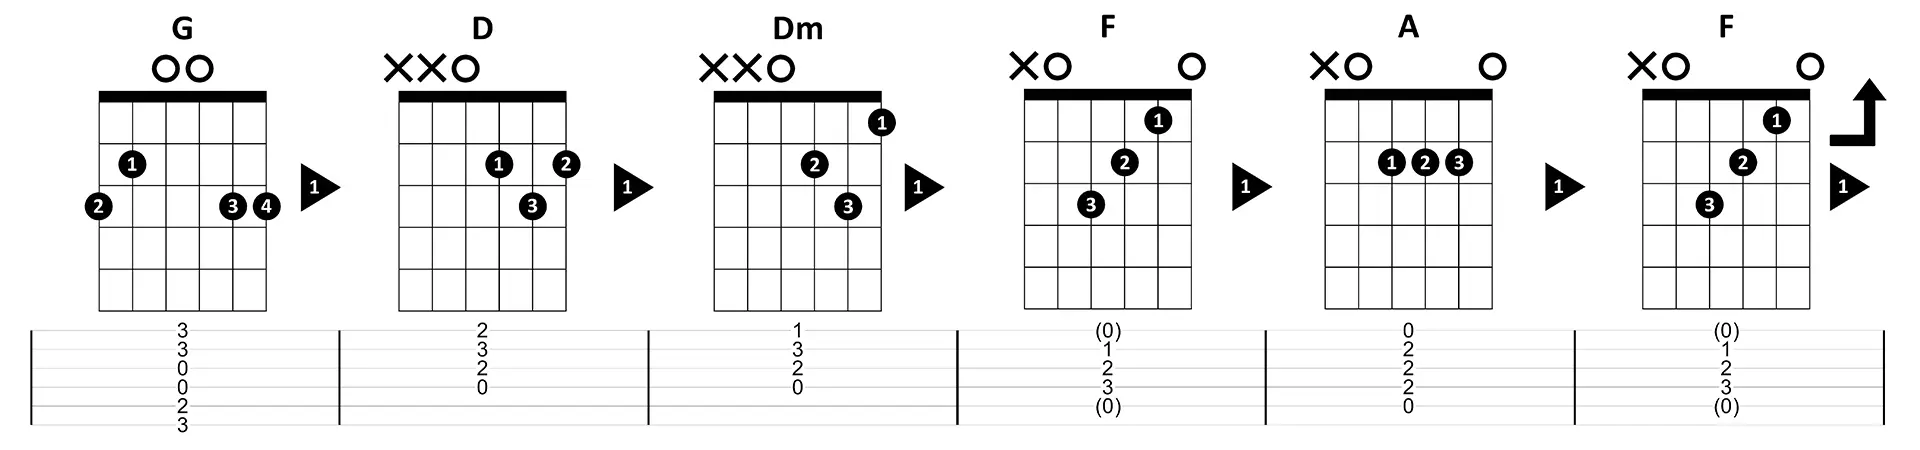
Why Anchor Fingers Make Chord Changes Easier
Keeping useful fingers in place has several advantages:
- Faster transitions: fewer fingers need to move, so the change takes less time.
- Smoother sound: the chords connect more naturally, with less silence between them.
- A reference point for the next chord: a finger that stays in place helps your hand find the next shape without rebuilding it from scratch.
- Faster memorization: repeated efficient movements become easier to reproduce automatically.
- Less tension and fatigue: unnecessary lifting and repositioning require more effort.
- Better control: keeping fingers in place can also help reduce unwanted noise and maintain a more consistent sound.
Practice Small Movements
During practice, make every movement as small and controlled as possible. Don't throw your fingers far away from the fretboard and then try to race them back into position.
The smaller and more efficient the movement, the easier it becomes to control. This is especially important when you later increase the tempo, because inefficient movements become much more obvious under time pressure.
Slow Down Before You Speed Up
Start slowly enough that you can clearly see and feel what each finger is doing. Accuracy comes first. If you practise a large, sloppy movement at high speed, you are only repeating the inefficient movement faster.
First make the transition small, clean and repeatable. Speed becomes much easier once the movement itself is efficient.
3. Prepare the Next Chord Before the Change
A fast chord change starts before the next chord needs to sound. If you wait until the exact moment of the change to figure out where your fingers need to go, you are already behind. While you are still playing the current chord, you should already know what comes next and how your hand is going to get there.
Think One Chord Ahead
Before making the transition, mentally check four things:
- Which chord comes next?
- Which fingers can stay in place?
- Which fingers need to move?
- Where do those moving fingers need to land?
This turns the chord change from a last-second reaction into a prepared movement.
Use Anchor Fingers as Reference Points
If one or more fingers can remain on the fretboard during a chord change, use them as reference points for the next shape. Instead of releasing the entire chord and rebuilding the next one from scratch, your hand already has a physical reference for where the new shape needs to form. This makes the transition easier to control and also reduces your dependence on constantly looking at your fretting hand.
Your Fingers Do Not Always Have to Land at the Same Time
Another useful principle is to think about which notes of the chord actually need to be ready first. In many rhythm-guitar situations, the next chord starts with a downstroke. Because a downstroke normally reaches the thicker bass strings first, the fingers on those strings need to be ready first. You can then continue placing the remaining fingers toward the thinner strings while the strumming hand is already moving through the chord.. For example, when forming a G chord, you can prepare the bass-side fingers first and complete the rest of the shape immediately afterwards. Those tiny fractions of a second can make a difficult chord change feel much easier.
Don't Wait for the Chord Change to Start Thinking
One of the biggest mistakes beginners make is treating each chord as a separate event: play one chord, stop, search for the next shape, place the fingers and start again. Instead, think of two chords as one continuous movement. As soon as the current chord is sounding, your brain should already be preparing the next transition. The less searching and hesitation there is between chords, the smoother and faster your playing becomes.
4. Visualize Chord Shapes and Practice Without Looking
Once you know where your fingers need to go, the next step is to stop depending on your eyes. Close your eyes and picture the chord shape on the fretboard. Imagine where each finger needs to land and mentally go through the chord change before you actually play it. This kind of visualization helps connect the chord shape in your mind with the physical movement in your hand.
See It, Feel It, Then Play It
A useful way to train this is to work in three stages:
- See it: look at the chord shape and identify the finger positions and the movement into the next chord.
- Feel it: close your eyes and notice the shape of your hand, the position of your fingers and any anchor fingers that stay in place.
- Play it without visual confirmation: make the transition smoothly without looking back at the chord grid or constantly checking your fretting hand.
Train the Shape, Not Just the Picture
Memorizing a chord diagram is not the same as being able to play the chord automatically. Your goal is to develop a physical sense of the shape so your fingers know where to go without having to visually search for every string and fret. In Chord Mastery, the memory exercise is deliberately played in one smooth motion, without pausing and without looking at the chord grids. You are encouraged to close your eyes and actually feel the shape of the chord.
Use Anchor Fingers to Navigate Without Looking
Anchor fingers make this much easier. If one finger stays in place during the transition, it becomes a physical reference point for the next chord. Instead of locating the entire shape visually, your hand can organize the remaining movement around something it already knows. Over time, this makes the chord change feel more automatic and reduces the need to constantly watch your fretting hand.
Memory Training
Choose two chords you already know and practise changing between them in one smooth motion. Start slowly, avoid pausing between the shapes and gradually reduce how often you look at your hand. Once the movement feels reliable, close your eyes for the transition and concentrate on how the chord shape feels instead of how it looks. The goal is not speed yet; the goal is to make the movement accurate and repeatable without visual confirmation.
5. Isolate Difficult Chord Transitions
If one chord change keeps slowing down an entire song or progression, don't keep practising everything from beginning to end. Isolate the exact transition that causes the problem and train those two chords on their own. You can practise a difficult change dozens of times in a few minutes this way instead of encountering it only once every time you play through the full song.
Step 1: Analyze the Transition
Before you start repeating the chord change, compare both shapes. Look for fingers that can stay in exactly the same position, identify the fingers that actually need to move and decide on the most efficient route into the next chord. In Chord Mastery, this is the first part of the Analysis & Play method: understand the movement before trying to automate it.
- Which fingers can stay in place?
- Which fingers need to move?
- Where does each moving finger need to land?
- Can the movement be made smaller or simpler?
Step 2: Train the Change in Both Directions
Once you understand the movement, practise only those two chords. Change slowly from chord A to chord B, then immediately back from chord B to chord A. Pay attention to the anchor fingers and keep the movement as small and relaxed as possible. Don't increase the speed until both directions feel controlled.
Try These Three Chord Changes
Use the same method on these transitions from the first Chord Mastery lesson. Before checking the answers, work out which finger or fingers can remain in place during each change.
- C → Am → C
- Am → Em → Am
- G → D → G
Check Your Anchor Fingers
- C → Am: fingers 1 + 2 can stay in place.
- Am → Em: finger 2 can stay in place.
- G → D: finger 3 can stay in place.
Don't just memorize these answers. Look at your own hand and feel why the transition becomes easier when those fingers remain in position. The goal is to learn how to analyze other chord changes yourself instead of treating every new progression as a completely new problem.
The Three-in-a-Row Test
Once a transition feels comfortable, put it back into a short chord progression. Can you play the progression three times in a row, flawlessly, without looking at your fretting hand? If not, isolate the difficult transition again and fix the movement before playing the whole progression. This is far more effective than repeatedly practising the parts that were already working.
6. Use a Metronome to Make Chord Changes Faster
Speed should come after accuracy, not before it. Start slowly enough to place every finger correctly and make the transition without unnecessary movement or tension. Rushing a chord change before the movement is under control only teaches your hands to repeat the same inefficient change faster.
Use the Metronome as Controlled Time Pressure
A metronome is not only a timing tool. It also creates controlled time pressure. Without a fixed beat, you can take as long as you want to find the next chord. With a metronome, the next beat gives you a clear deadline. Your fingers have to complete the transition within a specific amount of time.
At 60 BPM, for example, there is one full second between beats. If you play one chord on every beat, you have one second to prepare and complete each change. When that becomes clean and reliable, increasing the tempo gradually reduces the amount of available time.
Increase the Pressure Gradually
Start at a tempo where the transition feels easy enough to control, then increase the BPM in small steps. A simple practice sequence could be:
- 60 BPM — focus on the correct movement.
- 70 BPM — keep the same movement with less available time.
- 80 BPM — check that your fingers still stay relaxed and efficient.
- 90 BPM — only continue if the chord changes remain clean and reliable.
If the transition starts falling apart, don't force the higher tempo. Go back until the movement is controlled again. The goal is not to survive the fastest BPM possible; the goal is to perform the same efficient transition under gradually increasing time pressure.
Don't Let the Metronome Change Your Technique
As the tempo increases, keep checking the principles from the previous sections: use the right fingering, keep useful fingers in place, minimize movement, prepare the next shape and avoid unnecessary tension. If faster playing causes your fingers to fly away from the fretboard or makes you squeeze the neck harder, the tempo has increased faster than your technique.
Make Your Progress Measurable
Practising with a metronome turns “I want to change chords faster” into something you can actually measure. Instead of guessing whether you are improving, you can see at which tempo a transition remains clean, controlled and repeatable. Build that reliable movement first, then gradually give yourself less time to execute it.
Common Chord-Change Mistakes
Most slow chord changes are not caused by a lack of finger speed. They come from inefficient movement, too much tension or practising the transition at a tempo where you can no longer control what your fingers are doing.
Playing Too Fast Too Soon
Rushing through a difficult chord change usually makes the problem worse. Start slowly enough to place every finger accurately and repeat the same clean movement each time. If the transition becomes sloppy when you increase the tempo, slow down again. Accuracy comes before speed.
Squeezing the Guitar Neck Too Hard
More pressure does not make a chord change faster. Excessive tension makes your hand harder to move, causes fatigue and can reduce control. Use only the pressure needed to make the notes sound clean and keep the hand as relaxed as possible during the transition.
Lifting Every Finger Off the Fretboard
Don't automatically release the entire chord shape before every change. Check whether one or more fingers can stay in place and use them as anchor points. Every unnecessary lift adds movement, and every extra movement costs time.
Repeating the Whole Song Instead of Fixing the Problem
If one transition is causing the problem, isolate that transition. Repeating an entire verse or song means you spend most of your practice time playing chords that already work. Train the difficult change directly, then put it back into the progression once it becomes reliable.
Ignoring the Sound of the Chord
A fast chord change is useless if half the strings are muted or buzzing. After each change, listen critically: are the notes ringing clearly, are you using unnecessary pressure and is the transition clean? Speed should never come at the expense of the sound.
A 5-Minute Practice Routine for Faster Chord Changes
You don't need a long practice session to work on one difficult transition. Use five focused minutes and apply the same principles from this lesson: analyze the change, reduce the movement, memorize the shape and only then increase the time pressure.
Minute 1 — Analyze the Chord Change
Choose one transition that gives you trouble. Compare both chord shapes, decide which fingers can stay in place, which fingers need to move and where they need to land. Check whether a different fingering would make the transition easier.
Minute 2 — Repeat It Slowly
Change from the first chord to the second and back again at a comfortable speed. Keep the fingers close to the fretboard, use the anchor fingers as reference points and remove any unnecessary movement or tension.
Minute 3 — Stop Looking
Look at the two shapes, visualize the transition and then practise it without constantly watching your fretting hand. Feel the anchor fingers and the shape of the chord. If necessary, close your eyes for a few repetitions and focus entirely on the movement.
Minute 4 — Add the Metronome
Set a comfortable tempo — for example 60 BPM — and perform the change within the available time. When the transition stays clean and relaxed, increase the tempo slightly. If the movement falls apart, reduce the tempo again instead of forcing it.
Minute 5 — Put It Back Into Music
Place the transition back into a short chord progression and play it continuously. Finish with the three-in-a-row test: can you play the progression three times without a mistake, without pausing and without constantly looking at your fretting hand? If not, isolate the weak transition again during your next practice round.
Five focused minutes on the movement that actually causes the problem will usually teach you more than repeatedly playing the entire song from the beginning.
Put It Into Practice: Free Guitar Chord Workout
Understanding how to change guitar chords is one thing. Playing them smoothly and consistently is another. Now it's time to put your skills into practice!
Follow this free guided open-chord workout and train your finger coordination, chord transitions and timing. Grab your guitar, press play and practise along.
Ready for Your Next Guitar Workout?
One workout is just the beginning! Build stronger technique, smoother chord changes and better timing with our structured guitar workout program. Explore the complete Open Chords collection and discover more guided play-along exercises at GuitarWorkout.club.
Continue Training at GuitarWorkout.club →Frequently Asked Questions About Faster Chord Changes
Why are my guitar chord changes so slow?
Slow chord changes are usually caused by inefficient movement rather than fingers that are simply “too slow.” Common problems include lifting every finger off the fretboard, using an awkward fingering, waiting too long to prepare the next chord, using too much tension and trying to play faster before the movement is reliable.
How can I change guitar chords faster?
Use an efficient fingering, keep useful fingers in place, minimize unnecessary movement and prepare the next chord before the change happens. Isolate difficult transitions and practise them slowly until they are clean and repeatable. Only then should you gradually increase the tempo.
Should I lift all my fingers when changing chords?
No. If a finger already sits on the correct string and fret for the next chord, leave it there whenever possible. These anchor fingers reduce movement and act as physical reference points for the next chord shape.
Should I look at my hand when changing guitar chords?
Looking is useful while learning a new shape, but you should gradually become less dependent on visual confirmation. Visualize the next chord, feel the shape of your hand and practise familiar transitions without constantly watching your fretting fingers.
Should all my fingers land at the same time?
Not always. In rhythm guitar, a downstroke normally reaches the thicker bass strings first. Those notes therefore need to be ready first, while the remaining fingers may have a fraction of a second longer to complete the chord shape.
What BPM should I use to practise chord changes?
Start at a tempo where every change is clean, relaxed and controlled. At 60 BPM, for example, you have one second between beats when changing chords once per beat. Increase the tempo gradually only when the transition remains reliable.
Should I practise whole songs or individual chord changes?
If one transition keeps causing problems, isolate it. Practising two difficult chords back and forth gives you far more useful repetitions than repeatedly playing the entire song. Once the transition works, put it back into the progression.
Can different fingerings make chord changes easier?
Yes. The best fingering can depend on the chord you are coming from, the chord that follows and the musical context. A fingering that reduces movement or allows fingers to stay in place can make the complete transition faster and smoother.
How often should I practise chord changes?
Short, focused and regular practice is more useful than occasionally forcing long sessions. Even five focused minutes can be effective when you spend that time analysing and correcting the transition that is actually slowing you down.

Guitar Training Studio
Ready to Make Real Progress on Guitar?
Build better technique, timing and musicianship with structured guitar training, practical tools and personal coaching.
www.guitarstudio.be (Belgium)
www.guitartrainingstudio.com (International)
c/o Wouter Baustein
Driehoekstraat 1, BE-3891 Gingelom
+32.(0)476.666.300
info@guitarstudio.be
CoC: 0872.862.121
VAT: BE0872862121
IBAN: BE33-7350-0967-6746
BIC: KREDBEBBXXX
© 2000 – 2026 All Rights Reserved
Web apps & development by Baustein.digital