
Left hand basics and technique on guitar
There are a lot of things for the left hand and left hand technique that one should pay attention to while playing the guitar.
Many guitarists have their own idea and vision about whether or not the technique is right. It is not my intention to impose strict rules with these guitar lessons and tips, each is allowed to do its own thing and it is often also dependent on the anatomy of your hand (each hand is built differently, long or short fingers, curvature of the fingers, thick or thin fingers, abnormality by fractures, etc). But just consider this as basic guidelines for developing and improving the left hand technique on guitar.
In case of pain to the fingers, wrists, hands, elbows, back, neck, headache, etc. during playing the guitar it is important to stop, rest and do some stretch exercises. At the music school, the school physiotherapist advised us pausing 10 minutes and/or do stretching exercises for every 1 hour you practice. So 50 minutes of guitar playing + 10 minute break. Don’t practice on your guitar with pain – that’s just stupid! Pain is an indication that certain muscles or joints are overloaded, and playing guitar with pain will cause even more problems in the long run.
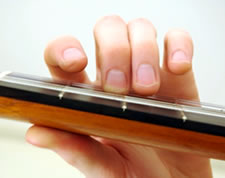
When learning to play the guitar, it is important that the left hand fingers are correctly placed, in order to obtain clear and correct notes when playing scales and chords. Place the thumb at the back against the guitar neck, approximately in the middle. The thumb at the back of the guitar neck can easily shift depending on the place where the guitar neck is played, the size and shape of the hands and the length of the fingers.
The thumb (indicated as “T”) must be placed flat/outstretched, and must not be bent/folded inwards. Though, there are guitar techniques where the thumb is not placed at the back of the guitar neck but on top/side, but this playing technique will be discussed later with the more advanced guitar lessons. The fingers 1-2-3-4 should preferably be perpendicular to the strings, so that when pushing one string, the other string is not touched.
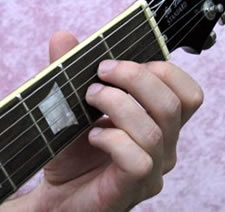
The fingering can be considered as a three-dimensional placement.
The first dimension is in the length of the string: place the finger just behind the frets until at most halfway through the fret. When the finger is placed too far to the previous fret, the string will rattle or even give no sound. When the string rattles or makes a buzz noise, slide your finger to the right, closer to the next fret.
The second dimension is pushing the string. Insufficient pressure on the string will rattle the note or even give no sound. Pushing the string too hard will make the note sound false. Pay attention if you have a guitar neck with hollowed-out scalloped frets, in which case it happens quickly that you put too much pressure on your finger and bend the note and pitch. So you have to push just hard enough until the note sounds clear on any type of guitar neck.
The third dimension is to place the finger in such a way that the string will not bend upwards or downwards. When the string is bent at least, the note will sound false. Bending a string (or playing bendings) to “bend” the note, is a playing technique that we will learn in the advanced guitar lessons.
When you start playing guitar, it’s a challenge to place the fingers correctly and get the notes clear without buzz, rattle or false pitch. It takes a while, but no worry, practice makes perfect! Make sure you master this guitar technique before starting with chords or scales on the guitar.