
How to Read Guitar Chord Diagrams – A Beginner's Guide
Learn how to read guitar chord diagrams, also known as chord grids or chord boxes, and understand exactly where to place your fingers on the guitar fretboard. Discover how to identify strings, frets, finger numbers, open strings and muted strings, and learn to recognize barre chords and higher fret positions. With clear explanations and practical examples, you'll be able to read guitar chord diagrams and play new chords with confidence.

2. Understanding the Guitar Chord Grid
A guitar chord grid represents the guitar neck as if you're looking directly at the fretboard, with the headstock at the top. The vertical and horizontal lines represent the strings and frets.
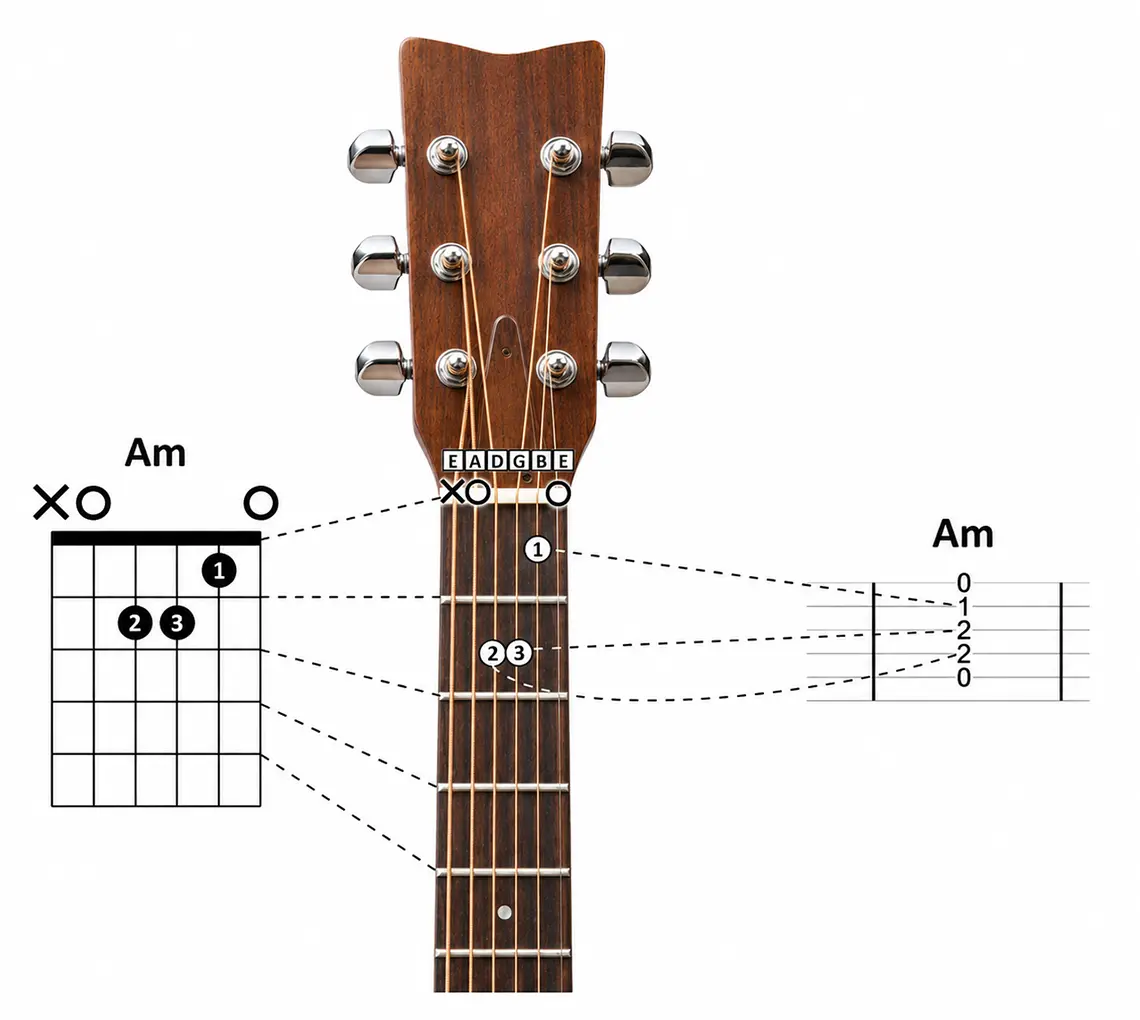
In the image above, the Am chord diagram on the left corresponds to the finger positions on the real guitar neck in the center. The tablature on the right represents the same chord in another notation system.
- Vertical lines: The six guitar strings, from left to right: E, A, D, G, B and high e.
- Horizontal lines: The fret positions across the guitar neck.
- Thick top line: The nut, located between the headstock and the fretboard.
- Spaces between the lines: The frets where you press the strings. The first space below the nut represents the first fret.
The thickest string (low E) appears on the left of the chord diagram, while the thinnest string (high e) appears on the right. This orientation also applies to chord diagrams showing positions higher up the fretboard.
The dots, finger numbers, X and O symbols in the diagram indicate which strings to press, which fingers to use and which strings to play open or avoid. We'll explain these symbols in the next section.
3. Reading Dots, Finger Numbers, X and O
Once you understand the chord grid, the next step is learning what the symbols mean. Let's use an open D major chord as an example.
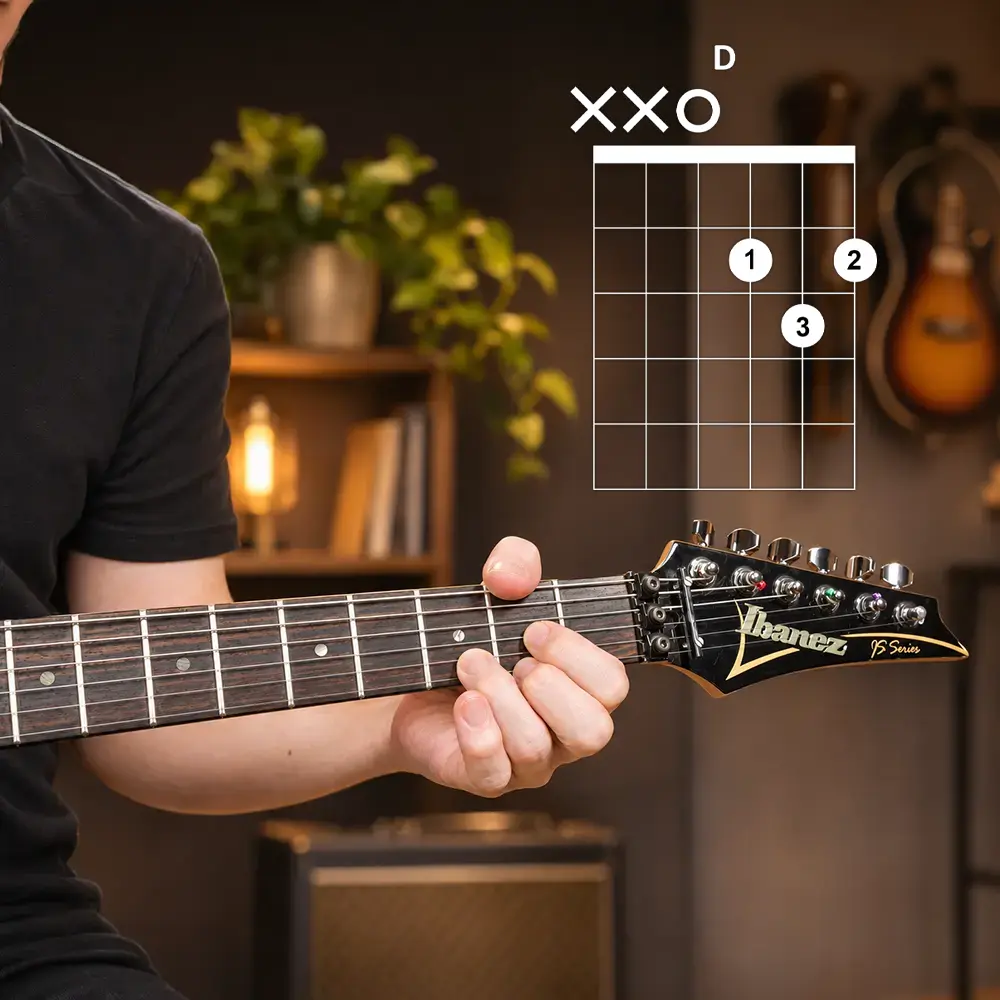
- Dots: Show where you press a string against the fretboard.
- Finger numbers (1–4): Indicate which finger to use: 1 = index, 2 = middle, 3 = ring and 4 = little finger.
- T (Thumb): Indicates that you use your thumb to fret a string, usually the low E string by wrapping your thumb over the top of the guitar neck. This is common in certain chord fingerings but is not required for every chord.
- O (Open string): Play the string without pressing it against a fret.
- X (Muted or unused string): Do not play that string when strumming the chord.
In the D major chord shown above, the low E and A strings are marked with an X, so you don't play them. The D string has an O, meaning you play it open.
Place your index finger on the second fret of the G string, your ring finger on the third fret of the B string and your middle finger on the second fret of the high E string.
Once your fingers are positioned correctly, strum from the open D string down to the high E string. That's how you turn the symbols in a guitar chord diagram into an actual chord.
4. Reading Your First Guitar Chord Diagrams
Now that you understand the symbols, let's look at some real guitar chord diagrams. These examples show different chord shapes near the beginning of the fretboard, including chords that use open strings.
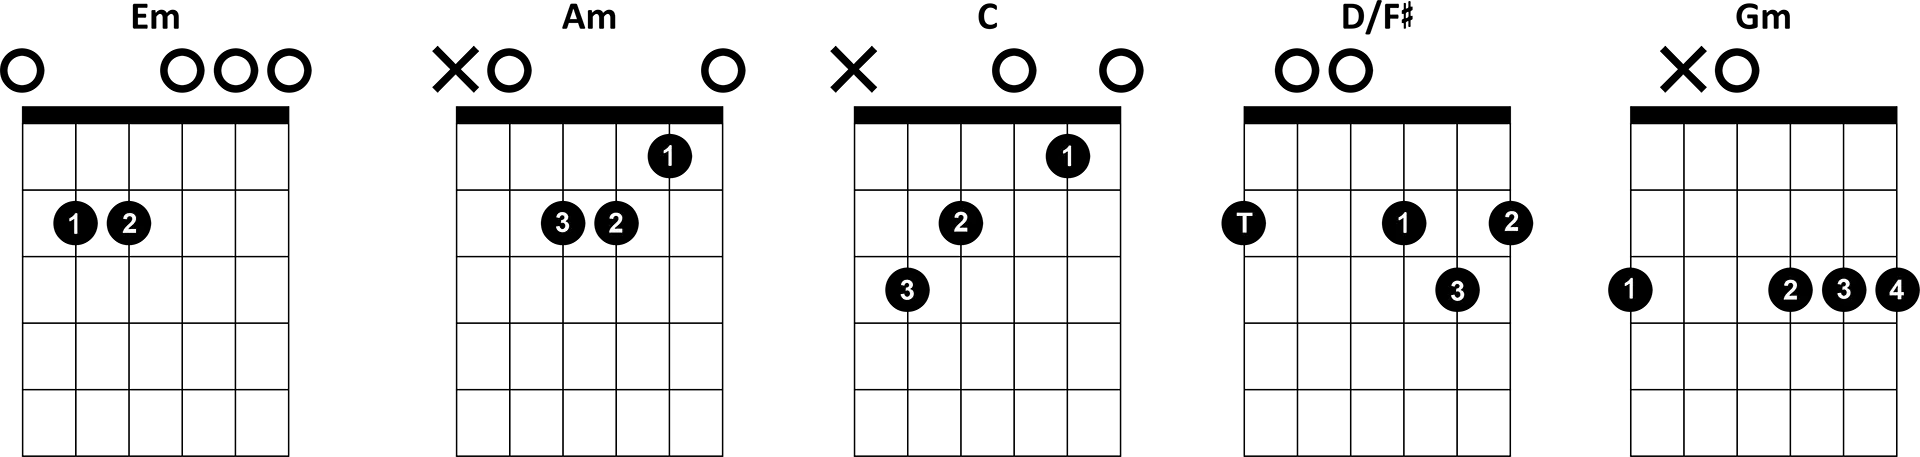
Read each diagram from top to bottom. Start by identifying the chord name, then check the finger positions and the O and X symbols above the strings.
- Em: A simple open chord using two fingers and four open strings.
- Am: Uses three fingers. The low E string is not played.
- C: Uses three fingers, with the G and high E strings played open.
- D/F#: A slash chord with F# in the bass. The letter T indicates the thumb, which frets the low E string.
- Gm: An alternative G minor fingering that includes an open D string.
The photo below shows how the open C major chord looks on a real guitar fretboard. Compare the finger positions with the C chord diagram above.

What about your thumb position? As you can see in the photo, I often let my thumb rest over the top of the guitar neck. This can feel natural and relaxed, but it's certainly not a rule. Your thumb position depends on your hand size, finger length, the chord or progression you're playing, and the shape and width of the guitar neck. A classical guitar with a wider neck may require a different approach than an electric guitar. The goal is a comfortable, relaxed hand position without unnecessary tension, not forcing your thumb into one fixed position.
Notice that not every chord diagram uses the same number of fingers or open strings. Some chords even use the thumb, while others avoid certain strings. The diagram tells you exactly which notes to fret and which strings to play.
For more beginner-friendly chord shapes and finger positions, see our Open Guitar Chords for Beginners lesson.
5. Reading Barre Chord Diagrams
A barre chord uses one finger, usually the index finger, to press down several strings at the same fret. In a guitar chord diagram, a barre is normally represented by a thick horizontal line connecting the strings being pressed.
The following examples show G, Gm, C and Cm barre chord shapes. Notice that the C major chord appears in two different fingerings.
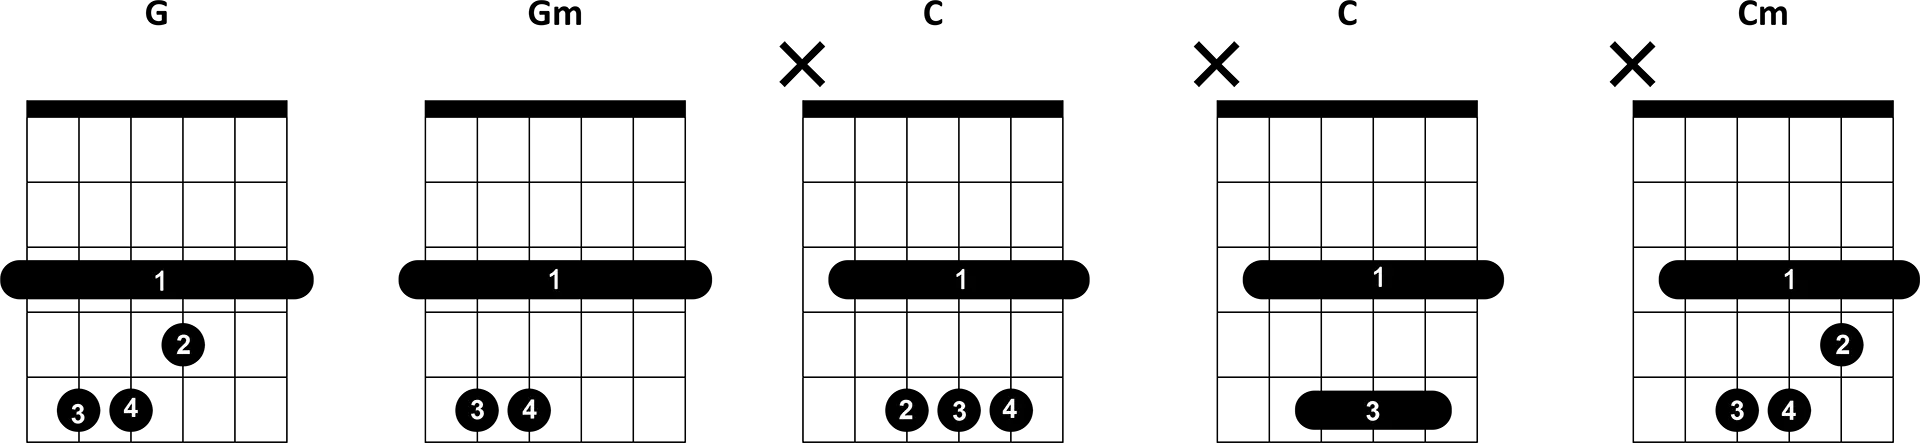
Here's how to interpret these diagrams:
- Full barre: The index finger (1) presses all six strings at the same fret, as shown in the G and Gm examples.
- Partial barre: The finger covers only some of the strings, as shown in the C and Cm examples.
- Additional fingers: Numbers 2, 3 and 4 show where the remaining fingers are placed above the barre.
- Alternative fingerings: The two C major diagrams show different ways to play the same chord. The second uses an additional barre with the ring finger (3).
The photo below shows an F major barre chord played at the first fret. The index finger forms the barre across all six strings, while the other fingers complete the chord shape. Compare this hand position with the G major barre diagram above: the basic shape is the same, but the G chord is played two frets higher.
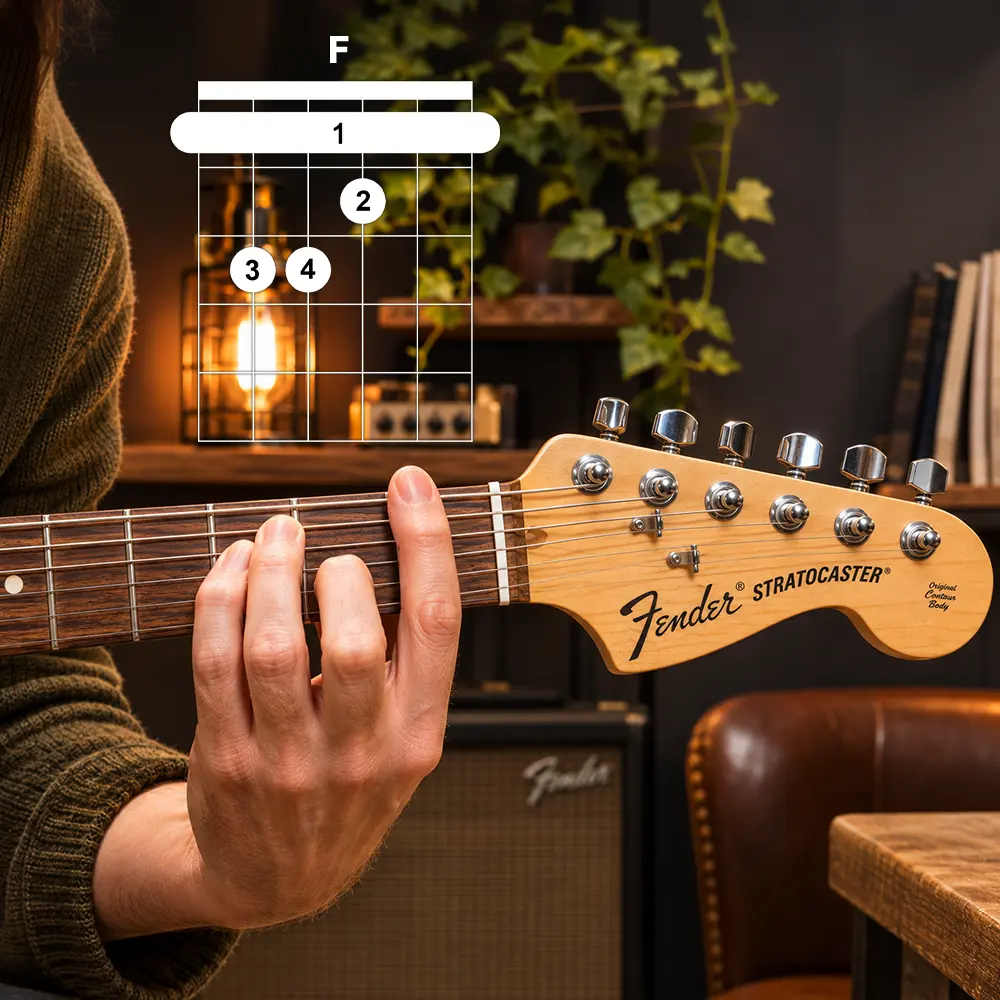
In the chord diagrams above, the main barre is placed at the third fret. The G and Gm shapes use the low E string as their root, while the C and Cm shapes are based on the A string.
Higher fret positions: Some chord diagrams start further up the guitar neck instead of showing the nut. In that case, a marking such as 5fr or 7fr tells you where the displayed grid begins. Always check this number before positioning your fingers.
The most important thing when reading barre chord diagrams is recognizing which finger creates the barre, how many strings it covers and where the other fingers are positioned.
6. Reading Guitar Chord Diagrams in a Song
Now let's put your chord-reading skills into practice with Wake Me Up by Avicii. We'll use the eight-bar chorus progression to practice reading different guitar chord diagrams and playing them in sequence.
Capo: 2nd fret · Tempo: 124 BPM · Time signature: 4/4
Chorus (8 bars): | Am | F | C | G | Am | F | C | E |

The chorus contains eight measures with one chord per bar. Each chord lasts four beats, and the progression uses five different chord shapes: Am, F, C, G and E. With the capo on the second fret, follow the chord diagrams relative to the capo.
- Read the diagrams: Identify the fretted notes, open strings, unused strings and the simplified open F (Fmaj7) chord instead of the F barre chord.
- Practice the changes: Play Am–F–C–G, followed by Am–F–C–E. Start slowly and concentrate on accurate finger placement.
- Follow the rhythm: Count four beats per chord, gradually increase the tempo towards 124 BPM and repeat the complete eight-bar progression.
Note: This example covers the chorus only. The verse uses a different chord arrangement. To learn how chord progressions and song sections fit together, continue with our How to Read Guitar Chord Sheets lesson.
