Free Guitar Lesson
A guitar capo can do much more than simply change the key of a song. It helps you play easier chords, explore different sounds and adapt songs to your vocal range.
Learn how to position a capo correctly, understand chord shapes versus sounding chords, transpose progressions and find the best capo position. Includes a guitar capo chord chart, practical examples and exercises.
View Capo Chord Chart →
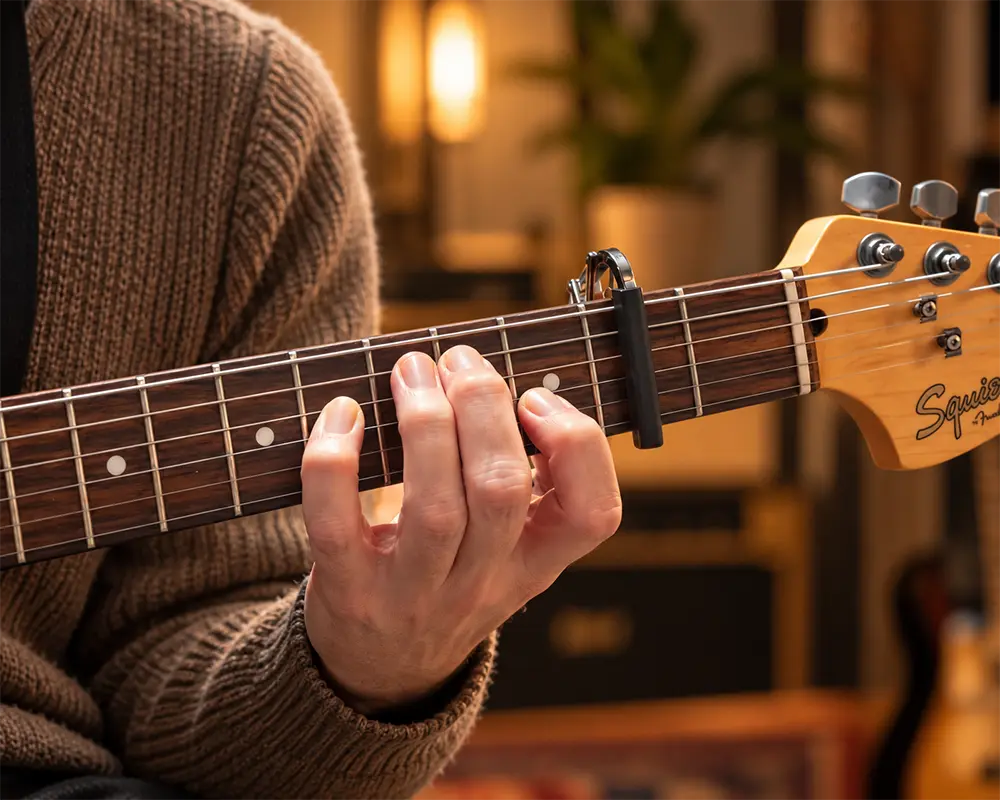
A guitar capo clamps across the strings at a selected fret, raising their pitch. It allows you to play familiar chord shapes in different keys, simplify difficult chords and explore new sounds without learning additional fingerings.
Place the capo just behind the desired fret. Make sure all six strings ring clearly and check your tuning.
Use your usual chord fingerings relative to the capo, treating it as the guitar's new nut.
Each fret raises the pitch by one semitone. The chord shape stays the same, but the sounding chord changes.
Remember: A G major chord shape with a capo on fret 2 sounds as A major. By changing the chord shapes as well, you can also use a capo to play easier chords while keeping the original key.
A guitar capo is a small device that clamps across the strings at a selected fret. It works like a movable nut, shortening the vibrating length of the strings and raising their pitch. This allows you to play familiar chord shapes in different positions on the fretboard without changing your fingerings.
Although capos are particularly useful for beginners, they are also widely used by professional guitarists. A capo is much more than a shortcut for avoiding difficult chords. It is a practical and creative tool for changing keys, exploring different chord voicings and making guitar arrangements easier and more comfortable to play.
A capo lets you transpose an entire song without learning new chord shapes. This is particularly useful when accompanying a singer who needs the song in a higher key. Simply move the capo and keep playing your familiar chord progression.
Many songs contain barre chords that can be challenging or uncomfortable to play. With the right capo position, you can replace difficult fingerings with easier open-chord shapes while preserving the original sounding chords and key.
Playing the same song with different capo positions and chord shapes can produce different musical textures. Higher capo positions often create a brighter, lighter sound, while open strings and alternative chord voicings can add resonance and character to an arrangement.
Long passages involving barre chords can be physically demanding. A capo can reduce the need for continuous barre fingerings, allowing you to play more comfortably with less unnecessary tension. This is especially useful during longer practice sessions and performances.
Before exploring chord transposition and capo calculations, let's look at how to choose the right capo and position it correctly on your guitar.
Choosing the right guitar capo and positioning it correctly are essential for clean chords, accurate tuning and comfortable playing. A poorly fitted or incorrectly positioned capo can cause buzzing, muted strings and intonation problems.
Not every capo fits every guitar. The most important differences are the neck width, fretboard curvature and clamping pressure.
Classical guitars typically have wider necks and flat fretboards. A wider, flat capo, such as the Shubb C2, is generally the better choice for nylon-string guitars, providing even pressure across all six strings.
Most steel-string acoustic and electric guitars have a curved fretboard. Choose a capo designed for the neck width and fretboard radius of your instrument. A suitable curved capo, such as the Shubb C1, applies even pressure across the strings.
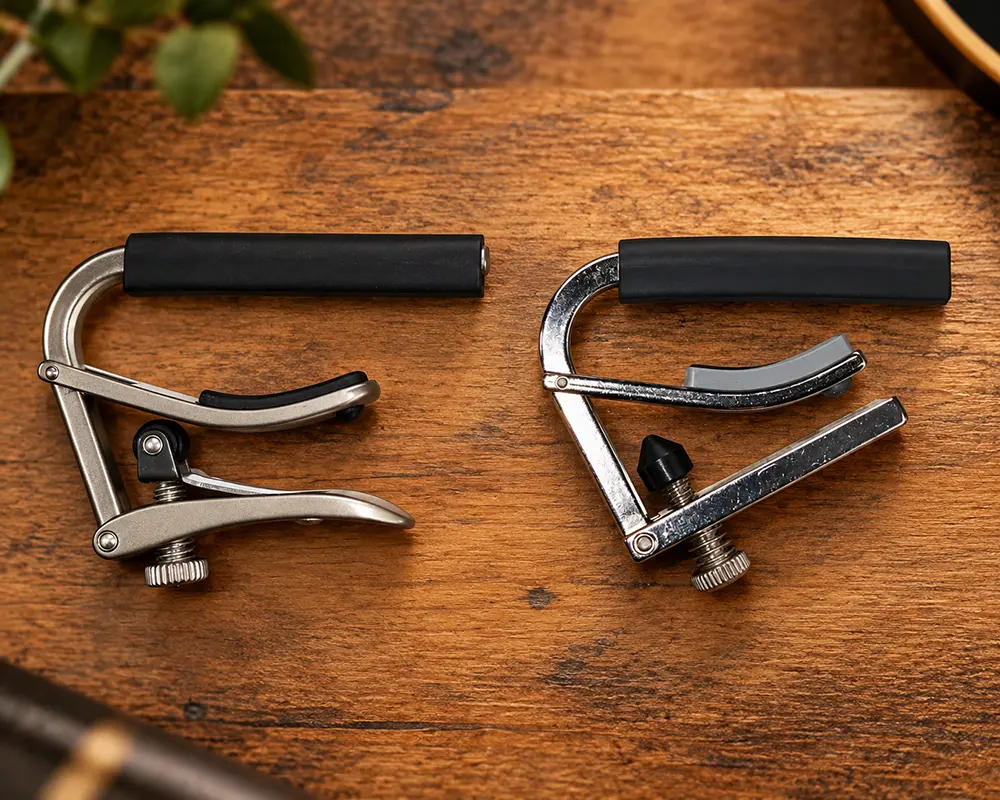
Recommended: A capo with adjustable tension allows you to apply only as much pressure as necessary. Spring-loaded capos can also work well, provided they fit your guitar correctly and don't clamp the strings too tightly.
Find the capo position indicated in your song or chord chart. For example, "Capo 3" means placing the capo at the third fret.
Position the capo close to the metal fret wire, on the side towards the headstock. Don't place it directly on top of the fret or too far behind it.
Make sure the capo presses all six strings evenly. Avoid pulling the strings sideways or applying excessive pressure, which can make the notes sound sharp.
Play each string individually. All six strings should ring clearly without buzzing or unwanted muting. If necessary, adjust the capo's position or pressure.
Check the actual pitch of each string using a chromatic tuner. The capo raises the open-string pitches, so tune to the notes produced at the capo position, not the original open-string notes.
For accurate tuning, the important final check is made after the capo has been positioned. Capo pressure can slightly raise the pitch of individual strings, even when your guitar was perfectly tuned beforehand.
For example, with a capo on fret 2, the six strings of a standard-tuned guitar should sound: F#–B–E–A–C#–F#, from the thickest to the thinnest string. Use your chromatic tuner to check these notes and make any necessary adjustments.
Want to understand exactly why a capo can make a perfectly tuned guitar sound out of tune? Read our detailed lesson: Should You Tune Your Guitar With or Without a Capo? It includes a practical demonstration and explains the correct tuning procedure.
Once your capo is correctly positioned and your guitar is in tune, you're ready to discover how moving it changes the pitch and key of your chords.
Every fret on a guitar represents one semitone (half step). When you place a capo on a fret, it raises the pitch of every string by the same number of semitones.
For example, capo 1 raises the pitch by one semitone, capo 2 by two semitones (one whole tone), and capo 3 by three semitones. The higher you position the capo, the higher your familiar chord shapes will sound.
The table below shows how the same C major and G major chord shapes change pitch at different capo positions. The pitch shift is measured in semitones.
| Capo | Pitch Shift | C Shape Sounds As | G Shape Sounds As |
|---|---|---|---|
| 0 | 0 | C | G |
| 1 | +1 | Db | Ab |
| 2 | +2 | D | A |
| 3 | +3 | Eb | Bb |
| 4 | +4 | E | B |
| 5 | +5 | F | C |
Notice that the chord quality doesn't change. A major chord shape still produces a major chord, and a minor chord shape still produces a minor chord. Only the pitch changes.
Imagine you're playing a song using the chord progression Am–F–G–C. Your singer wants to perform it three semitones higher.
Instead of learning new chord fingerings, place a capo on fret 3 and continue playing exactly the same shapes.
| Shape | Capo Pitch Shift | Sounds As |
|---|---|---|
| Am | +3 → | Cm |
| F | +3 → | Ab |
| G | +3 → | Bb |
| C | +3 → | Eb |
Result: The song now sounds three semitones higher, without changing your fingerings.
No. It depends on what you do with your chord shapes.
If you move the capo and keep playing the same shapes, the key changes. But if you also change your chord shapes to compensate for the capo position, you can keep the original key while creating different sounds or using easier fingerings.
If you're unfamiliar with the notes and their positions on the fretboard, our guide to guitar string names and notes provides a useful reference.
Next, let's explore the essential difference between chord shapes and sounding chords, so you always know which chords you're actually playing.
A capo isn't just a shortcut for playing easier chords. Professional guitarists use it to change keys, create different chord voicings and simplify difficult arrangements.
The key is understanding what you want to achieve. Let's explore three practical applications you can try immediately.
Imagine you're accompanying a singer who needs a song in a higher key. Instead of learning new fingerings, you can simply move the capo.
For example, playing C–G–Am–F with a capo on fret 2 produces the actual chords D–A–Bm–G. Your fingerings remain unchanged, but the entire song sounds two semitones higher.
This is especially useful when adapting songs to different vocal ranges. You can experiment with capo positions until the song feels comfortable for the singer.
A capo can also change the sound of a song without changing its actual chords or key. To do this, you must change your chord shapes to compensate for the capo.
Suppose you're playing Em–G–D–A without a capo. You can play exactly the same sounding chords using a capo on fret 2 and different fingerings:
| Arrangement | Chord Shapes |
|---|---|
| No Capo | Em – G – D – A |
| Capo 2 | Dm – F – C – G |
Both arrangements produce the same sounding chords: Em–G–D–A. However, the different shapes produce different chord voicings, changing the distribution of notes across the strings.
This can make an arrangement sound brighter, softer or more open, depending on the guitar and the chord shapes you choose. It's particularly useful when recording multiple guitar parts or arranging songs for two guitarists.
Many songs contain barre chords that can be challenging for beginners or physically tiring during long performances.
Rather than replacing difficult chords with simpler power chords and losing some of the original harmony, a capo often allows you to retain the full major and minor chord qualities while using easier fingerings.
Consider this progression: Fm–Ab–Bbm–Eb. Without a capo, several chords commonly require barre fingerings. With a capo on fret 1, we can simplify the entire progression:
| Arrangement | Chord Shapes |
|---|---|
| No Capo | Fm – Ab – Bbm – Eb |
| Capo 1 | Em – G – Am – D |
The sounding chords are still Fm–Ab–Bbm–Eb, but you're now playing the familiar Em–G–Am–D shapes. All four can be played using standard open-chord fingerings.
This makes the progression easier to play, reduces the need for continuous barre chords and preserves the original harmony.
If you need to practise the open-chord fingerings used in these examples, review our Basic Guitar Chords lesson.
Next, we'll learn how to calculate capo chords in both directions: from a chord shape to its actual sounding chord, and from a sounding chord to the shape you need to play.
This chart uses a selection of common basic open guitar chords as examples: C, D, Dm, E, Em, F, G, A, Am and Bm. Choose a chord shape at the top and a capo position or pitch shift on the left to find the actual sounding chord. The (m) means you can use either the major or minor version of that chord.
What is a negative capo? There is no physical negative capo. Negative values simply represent tuning your guitar down. For example, −2 means lowering all six strings by two semitones (one whole step): E–A–D–G–B–E becomes D–G–C–F–A–D. Positive values represent normal capo positions, while 0 means standard tuning without a capo.
| Capo / Pitch Shift | C | D(m) | E(m) | F | G | A(m) | Bm |
|---|---|---|---|---|---|---|---|
| −4 | Ab | Bb(m) | C(m) | Db | Eb | F(m) | Gm |
| −3 | A | B(m) | Db(m) | D | E | Gb(m) | G#m |
| −2 | Bb | C(m) | D(m) | Eb | F | G(m) | Am |
| −1 | B | Db(m) | Eb(m) | E | Gb | Ab(m) | Bbm |
| 0 | C | D(m) | E(m) | F | G | A(m) | Bm |
| +1 | Db | Eb(m) | F(m) | Gb | Ab | Bb(m) | Cm |
| +2 | D | E(m) | Gb(m) | G | A | B(m) | C#m |
| +3 | Eb | F(m) | G(m) | Ab | Bb | C(m) | Dm |
| +4 | E | Gb(m) | Ab(m) | A | B | Db(m) | Ebm |
| +5 | F | G(m) | A(m) | Bb | C | D(m) | Em |
| +6 | Gb | Ab(m) | Bb(m) | B | Db | Eb(m) | Fm |
| +7 | G | A(m) | B(m) | C | D | E(m) | F#m |
The best capo position depends on the entire chord progression, not just one difficult chord. Sometimes several positions work well, offering different fingerings and sounds.
Let's use an eight-chord arrangement from Hotel California by the Eagles, with Asus2 and E7 variations. The chord names at the top are the actual sounding chords. Each row shows which shapes you would play to keep the same harmony.
| Capo / Pitch Shift | Bm | F#7 | Asus2 | E7 | G | D | Em | F#7 | Assessment |
|---|---|---|---|---|---|---|---|---|---|
| −4 | Ebm | Bb7 | Dbsus2 | Ab7 | B | Gb | Abm | Bb7 | Skip |
| −3 | Dm | A7 | Csus2 | G7 | Bb | F | Gm | A7 | Skip |
| −2 | C#m | G#7 | Bsus2 | F#7 | A | E | F#m | G#7 | Skip |
| −1 | Cm | G7 | Bbsus2 | F7 | Ab | Eb | Fm | G7 | Skip |
| 0 | Bm | F#7 | Asus2 | E7 | G | D | Em | F#7 | Original |
| +1 | Bbm | F7 | Absus2 | Eb7 | Gb | Db | Ebm | F7 | Skip |
| +2 | Am | E7 | Gsus2 | D7 | F | C | Dm | E7 | Good option |
| +3 | G#m | D#7 | F#sus2 | C#7 | E | B | C#m | D#7 | Skip |
| +4 | Gm | D7 | Fsus2 | C7 | Eb | Bb | Cm | D7 | Skip |
| +5 | F#m | C#7 | Esus2 | B7 | D | A | Bm | C#7 | Skip |
| +6 | Fm | C7 | Ebsus2 | Bb7 | Db | Ab | Bbm | C7 | Skip |
| +7 | Em | B7 | Dsus2 | A7 | C | G | Am | B7 | Good option |
Playing with other musicians? Always communicate the actual sounding chords, not just your capo chord shapes. For example, with capo +2, an Am shape sounds as Bm, so the other musicians still play Bm.
Let's look at five famous songs that use a guitar capo. The chord shapes you play aren't necessarily the chords you actually hear. These examples show how the capo changes the sounding chords while you use familiar fingerings.
| Song / Artist | Capo Fret | What You Play (Chord Shapes) | What You Hear (Sounding Chords) |
|---|---|---|---|
| Perfect Ed Sheeran | +1 | G – Em7 – Cadd9 – D | Ab – Fm7 – Dbadd9 – Eb |
| Boulevard of Broken Dreams Green Day | +1 | Em – G – D – A | Fm – Ab – Eb – Bb |
| Wonderwall Oasis | +2 | Em7 – G – Dsus4 – Asus4 | F#m7 – A – Esus4 – Bsus4 |
| Hallelujah Jeff Buckley | +5 | G – Em7 – C – D | C – Am7 – F – G |
| Hero Family of the Year | +5 | C – Am – Em – F – G | F – Dm – Am – Bb – C |
Using a guitar capo is simple, but incorrect placement, excessive pressure or poor tuning can affect your sound. Here are six common mistakes to avoid.
A capo positioned too far behind the fret can cause buzzing or muted strings. Place it just behind the fret wire, without resting directly on top of it. Check that every string rings clearly.
Excessive pressure can stretch the strings and make notes sound too sharp. Use only enough pressure to hold the strings firmly against the frets. An adjustable-tension capo makes this easier to control.
Attaching or moving a capo carelessly can pull strings out of position, causing tuning problems. Keep the capo properly aligned and make sure the strings remain straight when tightening it.
Not every capo suits every guitar. Classical guitars generally have flatter fingerboards, while acoustic and electric guitars often have curved ones. Choose a capo that matches your guitar's fingerboard for even pressure.
Always check your tuning after attaching or moving the capo. Remember that the capo raises the open-string pitches. Use a chromatic tuner and avoid tuning the capoed strings back to standard E–A–D–G–B–E. Read our guitar capo tuning guide .
With a capo, the chord you play isn't always the chord you hear. For example, an Am shape with capo 2 sounds as Bm. This distinction is especially important when playing along with recordings or other musicians.
Ready to put your capo skills into practice? Try these three exercises before revealing the answers. Play one chord per bar and use the capo chord chart above whenever you need help.
Place your capo on fret 4 and play these chord shapes. Can you name the four sounding chords?
Your song requires the following sounding chords. With capo on fret 3, which basic chord shapes can you play without changing the original key?
Find two capo positions between +1 and +7 that allow you to play this progression using familiar basic chord shapes.
Put your capo knowledge into practice. Use the Guitar Training Studio tools to explore chord transposition, check your tuning and experiment with different guitar tunings.
Best for this lesson
Explore different capo positions, convert chord shapes into sounding chords and find easier fingerings for entire chord progressions. Compare your options without calculating every chord manually.
Coming SoonCheck your tuning
Check your guitar's tuning before and after attaching a capo. Use the chromatic tuner to identify the actual pitches and correct any sharp or flat notes caused by capo pressure.
Open PITCHR →Explore lower tunings
Explore standard and alternative guitar tunings, including lower tunings used for negative pitch shifts. Compare string notes and see how changing your tuning affects your guitar.
Open TuneMap →Yes, if you keep playing the same chord shapes. Each fret raises the pitch by one semitone. You can also change your chord shapes to preserve the original key while using a capo.
Start with the key and chords of the song. Compare different capo positions and look for comfortable fingerings that preserve the intended sounding chords. Always test the complete progression.
Check your tuning whenever you attach or move the capo. Use a chromatic tuner and remember that the capo raises the open-string pitches. Don't tune the capoed strings back to standard E–A–D–G–B–E.
Yes, in many songs. A capo can let you replace difficult fingerings with familiar open chord shapes while preserving the sounding harmony. Not every progression can be simplified equally well.
Not always. Acoustic and electric guitars often have curved fingerboards, while classical guitars typically have flatter ones. Choose a capo that matches your guitar's fingerboard and applies even pressure across all strings.
A negative pitch shift means lowering the pitch rather than raising it with a capo. For example, −2 means tuning all six strings down two semitones while keeping the same chord shapes.

Guitar Training Studio
Build better technique, timing and musicianship with structured guitar training, practical tools and personal coaching.
www.guitarstudio.be (Belgium)
www.guitartrainingstudio.com (International)
c/o Wouter Baustein
Driehoekstraat 1, BE-3891 Gingelom
+32.(0)476.666.300
info@guitarstudio.be
CoC: 0872.862.121
VAT: BE0872862121
IBAN: BE33-7350-0967-6746
BIC: KREDBEBBXXX
© 2000 – 2026 All Rights Reserved
Web apps & development by Baustein.digitalWe use cookies to enhance your experience and analyze traffic. You can accept all, decline, or adjust your settings. Some features may not work without consent.