fb-pixel Skip to main content

Guitar Training Studio

Free Guitar Lesson · Nirvana

Nirvana – Come as You Are Guitar Lesson with TAB

Learn to play Come as You Are by Nirvana on electric guitar with our free guitar TAB for the iconic main riff, chords and guitar solo. Discover the distinctive grunge sound with its recognizable chorus effect. This step-by-step guitar lesson shows you how to combine the different guitar parts, rhythms and playing techniques to perform the complete song accurately and smoothly.

Key E minor Time 4/4 Tempo 120 BPM Beginner+
Electric guitarist performing – Come as You Are guitar lesson by Nirvana with riff, chords, solo and TAB
Quick Answer

How Do You Play Come as You Are by Nirvana on Guitar?

To play Come as You Are by Nirvana on guitar, start with the world-famous guitar riff. Our tablature is written in F# minor, but the guitar is tuned down one whole step, making the song sound in E minor. Play the riff and the other guitar parts exactly as written in the TAB, but with your guitar tuned lower.

1. The Iconic Guitar Riff

The recognizable intro features a melodic single-note guitar riff. Focus on the correct note sequence and consistent timing. Practice slowly until you can repeat the riff smoothly without interruptions.

2. Tuning and Key

Tune all six strings down one whole step: from E–A–D–G–B–E to D–G–C–F–A–D. This is called D standard tuning. The TAB is written in F# minor, but sounds in E minor because of the lower tuning.

3. Rhythm and Guitar Tone

The song is in 4/4 time with a tempo of approximately 120 BPM. Its distinctive guitar tone comes partly from a chorus effect. Practice the riff with a clean tone first and concentrate on accurate timing.

Remember: the notes in our TAB are written for a guitar in standard tuning, but you play them on a guitar tuned down one whole step. The finger positions and fret numbers stay the same; only the sounding pitch changes. In the complete guitar TAB, you'll learn the riff, the different guitar parts and how to practice the entire song step by step.

Song Info – Come as You Are

Key: E minor (TAB written in F♯ minor)

Time Signature: 4/4

Tempo: 120 BPM

Guitar: Electric

Tuning: D–G–C–F–A–D (one whole step down)

Capo: No

Tone/Effects: Clean, chorus, distortion, delay (solo)

Come as You Are – Simplified Guitar TAB

Below you'll find the simplified guitar TAB for Come as You Are by Nirvana. This TAB provides a compact overview of the song, including the main guitar parts, chords and repeat markings. It allows you to follow the entire song structure without writing out the same sections multiple times.

The most important things to focus on are the special guitar tuning, the recognizable riff with let ring, the pickup and the use of chorus and distortion. We'll cover the guitar solo separately, as it's slightly more technically demanding.
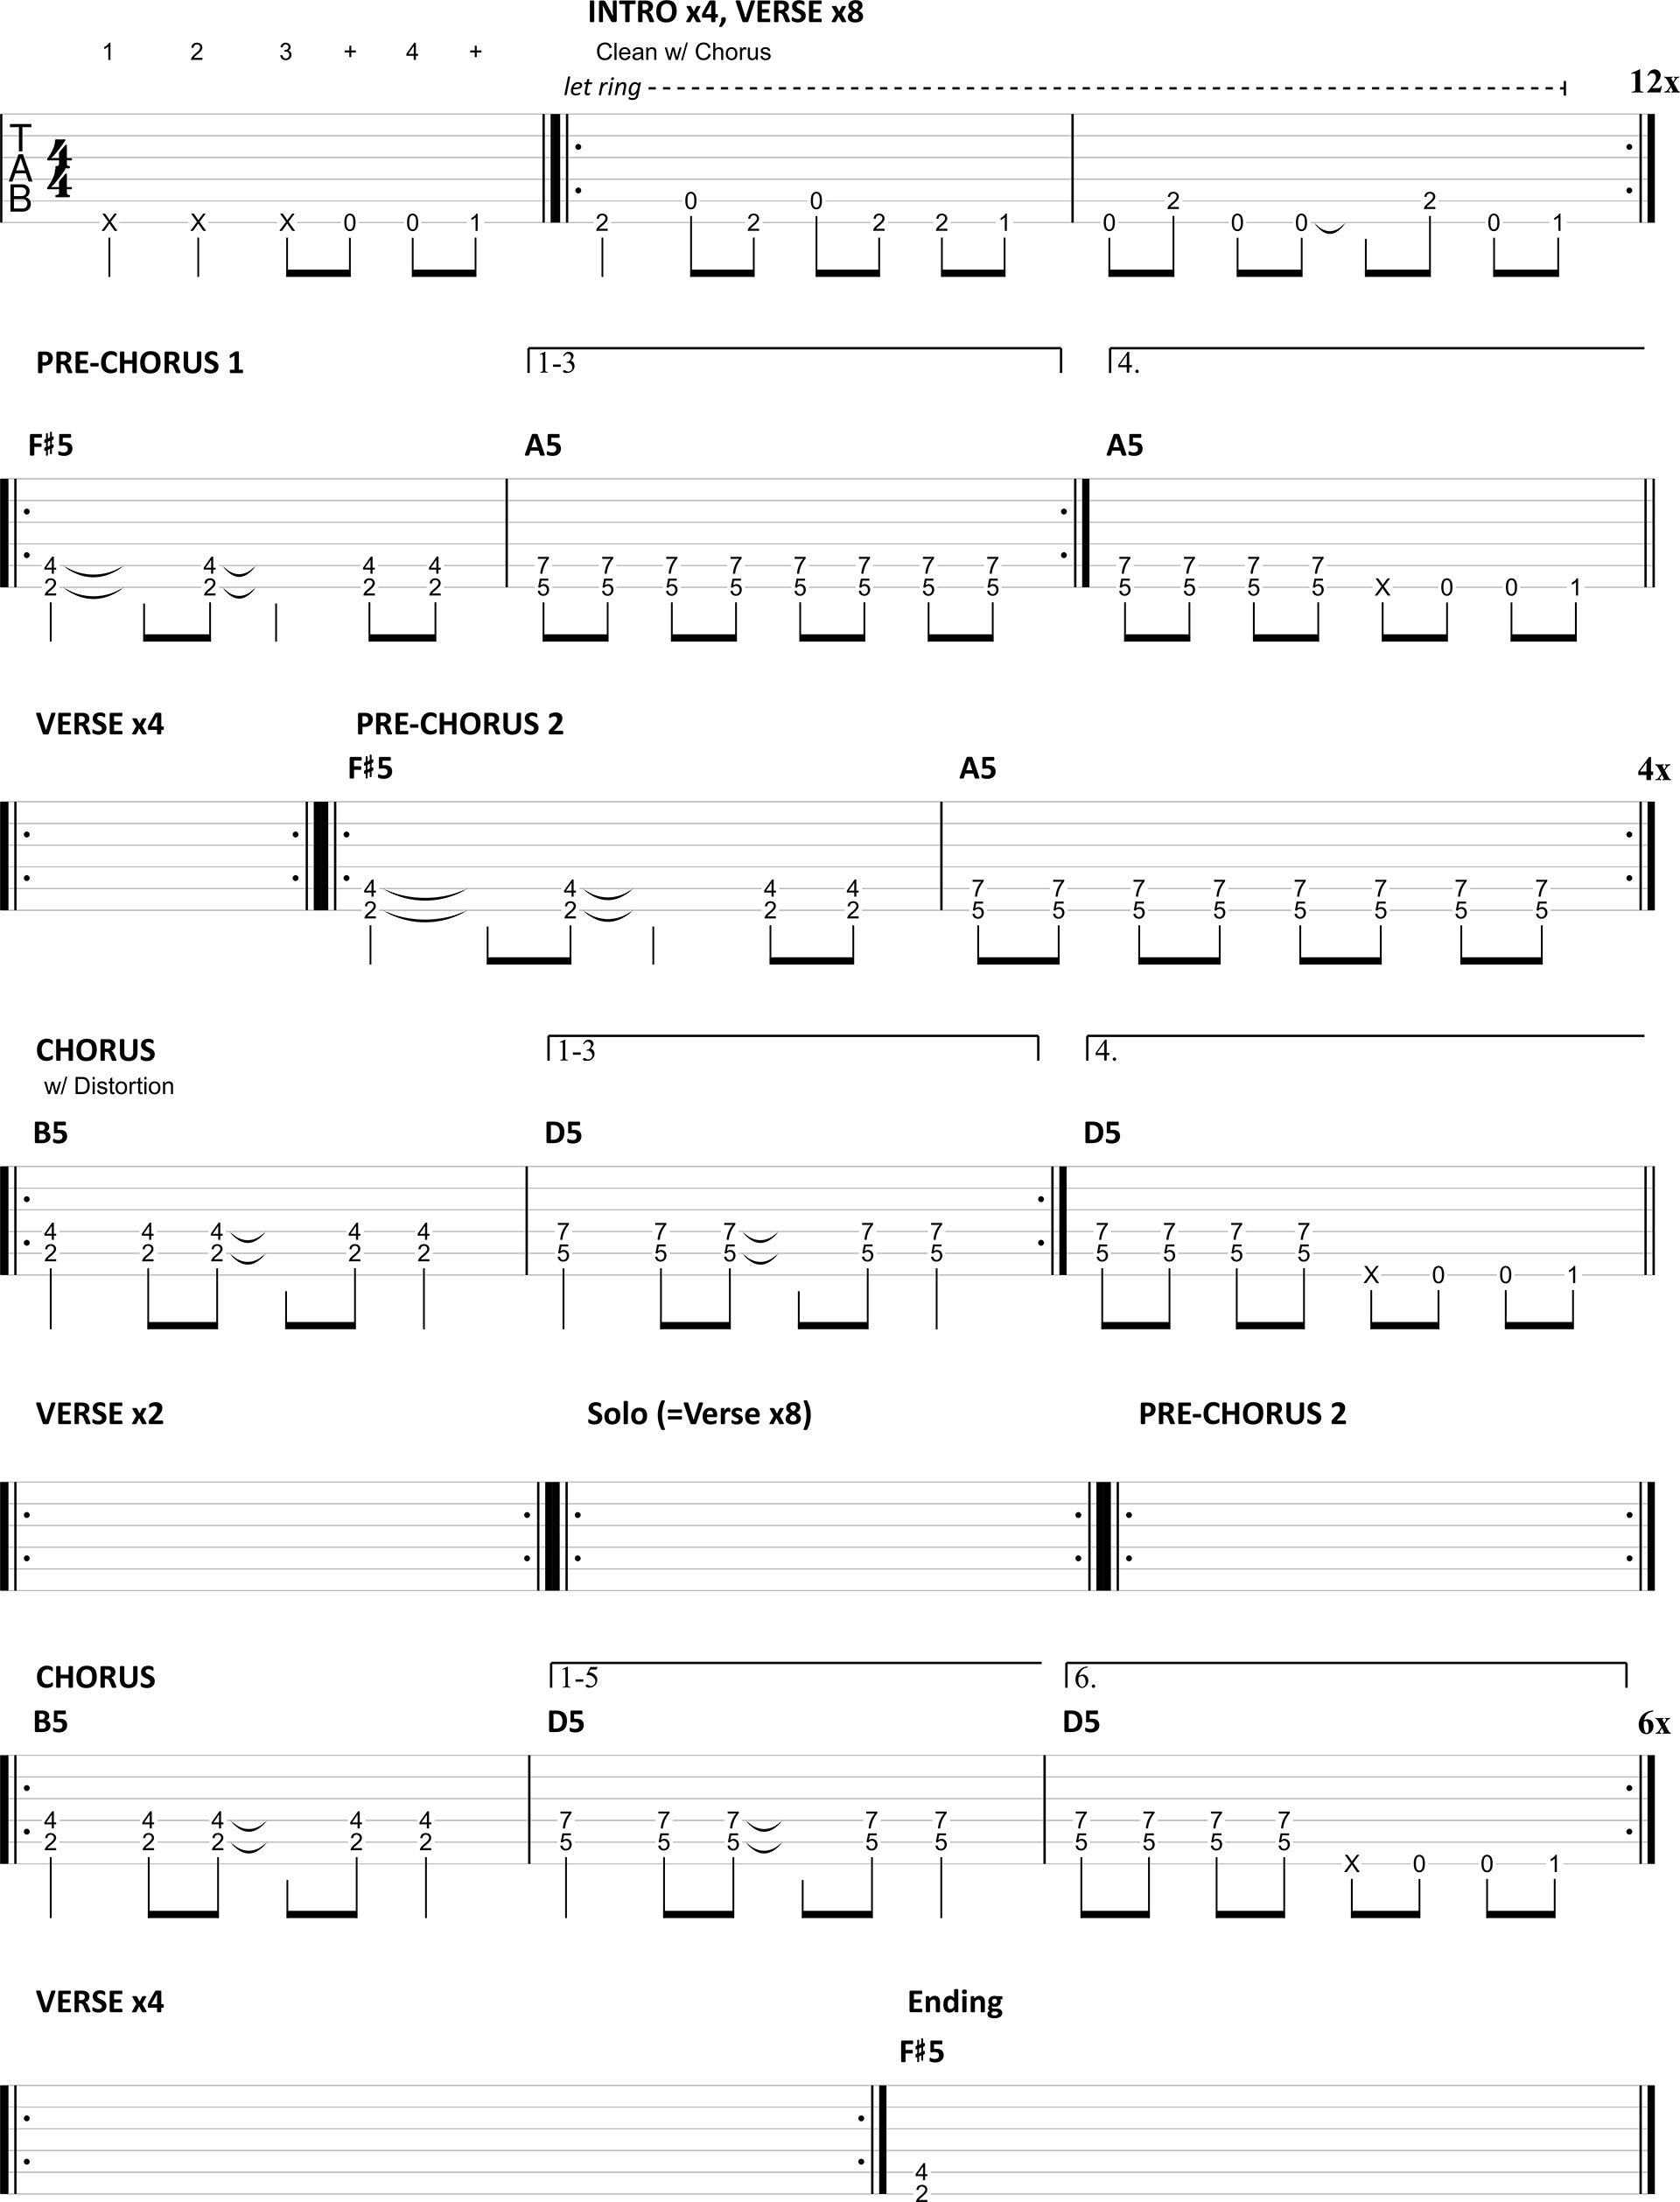
Simplified guitar TAB for Come as You Are by Nirvana showing the intro riff, verses, chords, let ring technique and complete song structure

1. Guitar Tuning and Relative Chord Names

Come as You Are is played with a guitar tuned down one whole step. Instead of standard guitar tuning E–A–D–G–B–E, we use D–G–C–F–A–D. This is also known as D standard tuning.

Standard Tuning E – A – D – G – B – E
Come as You Are – One Whole Step Down D – G – C – F – A – D

Use a chromatic guitar tuner and lower each string until you reach the correct pitch. Start with the thickest string: E becomes D, A becomes G, D becomes C, G becomes F, B becomes A and the thinnest E also becomes D. All six strings are therefore tuned two semitones lower.

Pay attention to the chord names in the TAB. They're written as relative chord names and refer to the shapes you would play on a guitar in standard tuning. The TAB is written in F# minor, but because your guitar is tuned down one whole step, everything sounds in E minor.

For example, a chord shape written as F#m will sound like Em on your down-tuned guitar. You don't need to change the fingering to achieve this. Simply play the chord shapes and fret numbers shown in the TAB.

Important: First, tune your guitar down one whole step, then play the TAB exactly as written. The fret numbers and finger positions remain the same, but the actual sounding pitch is one whole step lower.

2. Pay Attention to the Pickup

Come as You Are begins with a pickup. The first guitar note falls on the "and" of beat 3, between beats 3 and 4. Count in 4/4 and begin on the "and" after beat 3. When playing along with the original recording, you won't hear a count-in beforehand. The riff starts immediately with this pickup.

3. The Intro and Verse: Let the Notes Ring

The famous guitar riff from the intro and verse uses the let ring technique. This means allowing the notes to sustain for as long as possible, even while playing other notes. It's therefore important not to lift your fingers too early or accidentally mute other strings.

Use your index finger for the notes on fret 1 and your middle finger for the notes on fret 2. Keep your middle finger as upright as possible, with a curved finger, so it doesn't accidentally mute the adjacent open string.

In the first bar, keep your middle finger on fret 2 for as long as possible. The open string, indicated by 0, should be able to ring at the same time. Avoid lifting your middle finger unnecessarily between notes.

In the second bar, move your middle finger to fret 2 on the fifth string. Once again, the open string above it should be able to ring freely. Keep your middle finger as upright as possible and maintain that position until the end of the bar.

It's perfectly fine to start with downpicking only until you've mastered the timing and can play the riff almost automatically. Then try using alternate picking to make your playing more relaxed. For the pre-chorus and chorus, you can use alternate strumming right from the beginning.

Practice tip: Consistently use your index finger for fret 1 and your middle finger for fret 2. Keep your fingers in position for as long as possible and make sure the open strings continue ringing clearly. That's the essence of let ring in this guitar riff.

4. Guitar Effects: Chorus and Distortion

The distinctive guitar sound of Come as You Are comes from the use of a chorus effect. During the intro and verses, you play with a clean guitar tone and chorus. This creates the recognizable, slightly shimmering sound of the riff.

From the chorus onward, distortion is added, making the guitar sound more powerful and full-bodied. In this arrangement, distortion remains present throughout the rest of the song. You can also leave the chorus effect on if you like the way both effects sound together.

Don't have a chorus pedal or distortion available? No problem. Start by practicing the guitar parts with a clean tone. Playing the correct notes with accurate fingering and timing is more important than the effects.

5. Shortened Repeats in This Guitar TAB

To keep the guitar TAB clear and easy to follow, I haven't written out every repeated song section in full. Instead, I use shortened markings such as Verse ×2, Pre-Chorus ×2 and Chorus ×2.

These markings mean that you repeat the previously written verse, pre-chorus or chorus. For example, Chorus ×2 means you play the previously notated chorus twice, following the same notation unless a change is indicated. This saves space and makes it easier to understand the complete song structure at a glance.

Note: These shortened markings are my own practical way of making the TAB more compact. They're not an official standard form of guitar tablature notation. Read the repeat markings first and follow the complete TAB while listening to the original recording.

6. Practice the Complete Song Step by Step

Start by tuning your guitar correctly, one whole step down. Then practice the intro and verse at a slow tempo, focusing on the pickup, accurate fingering and letting the notes ring. Next, learn the remaining guitar parts and chord changes shown in the TAB.

Then listen to the original recording while following the complete guitar TAB without playing your guitar. Pay close attention to the repeat markings and transitions between the different song sections. You should be able to follow the entire song from beginning to end without losing your place.

Next, play the complete song at a comfortable tempo and gradually increase your speed toward 120 BPM in 4/4. Once you've mastered the rhythm guitar parts and the song structure, you can learn the separate guitar solo as an additional challenge.

Remember: The most important elements of Come as You Are are the correct guitar tuning, the pickup, accurate fingering and allowing the notes to ring. Focus on playing the song correctly first, then add chorus and distortion.

Come as You Are – Guitar Solo TAB

Below you'll find the guitar solo for Come as You Are in tablature. This solo is slightly more challenging than the main riff and includes several typical lead guitar techniques, such as vibrato, slides and a full-step bend. That's why we cover the solo separately from the simplified rhythm guitar part.

During this solo section, the rhythm guitar accompaniment continues, with the verse riff played eight times in total. The solo itself consists of a four-bar phrase that is played four times in total. This provides a clear structure for learning the solo step by step.
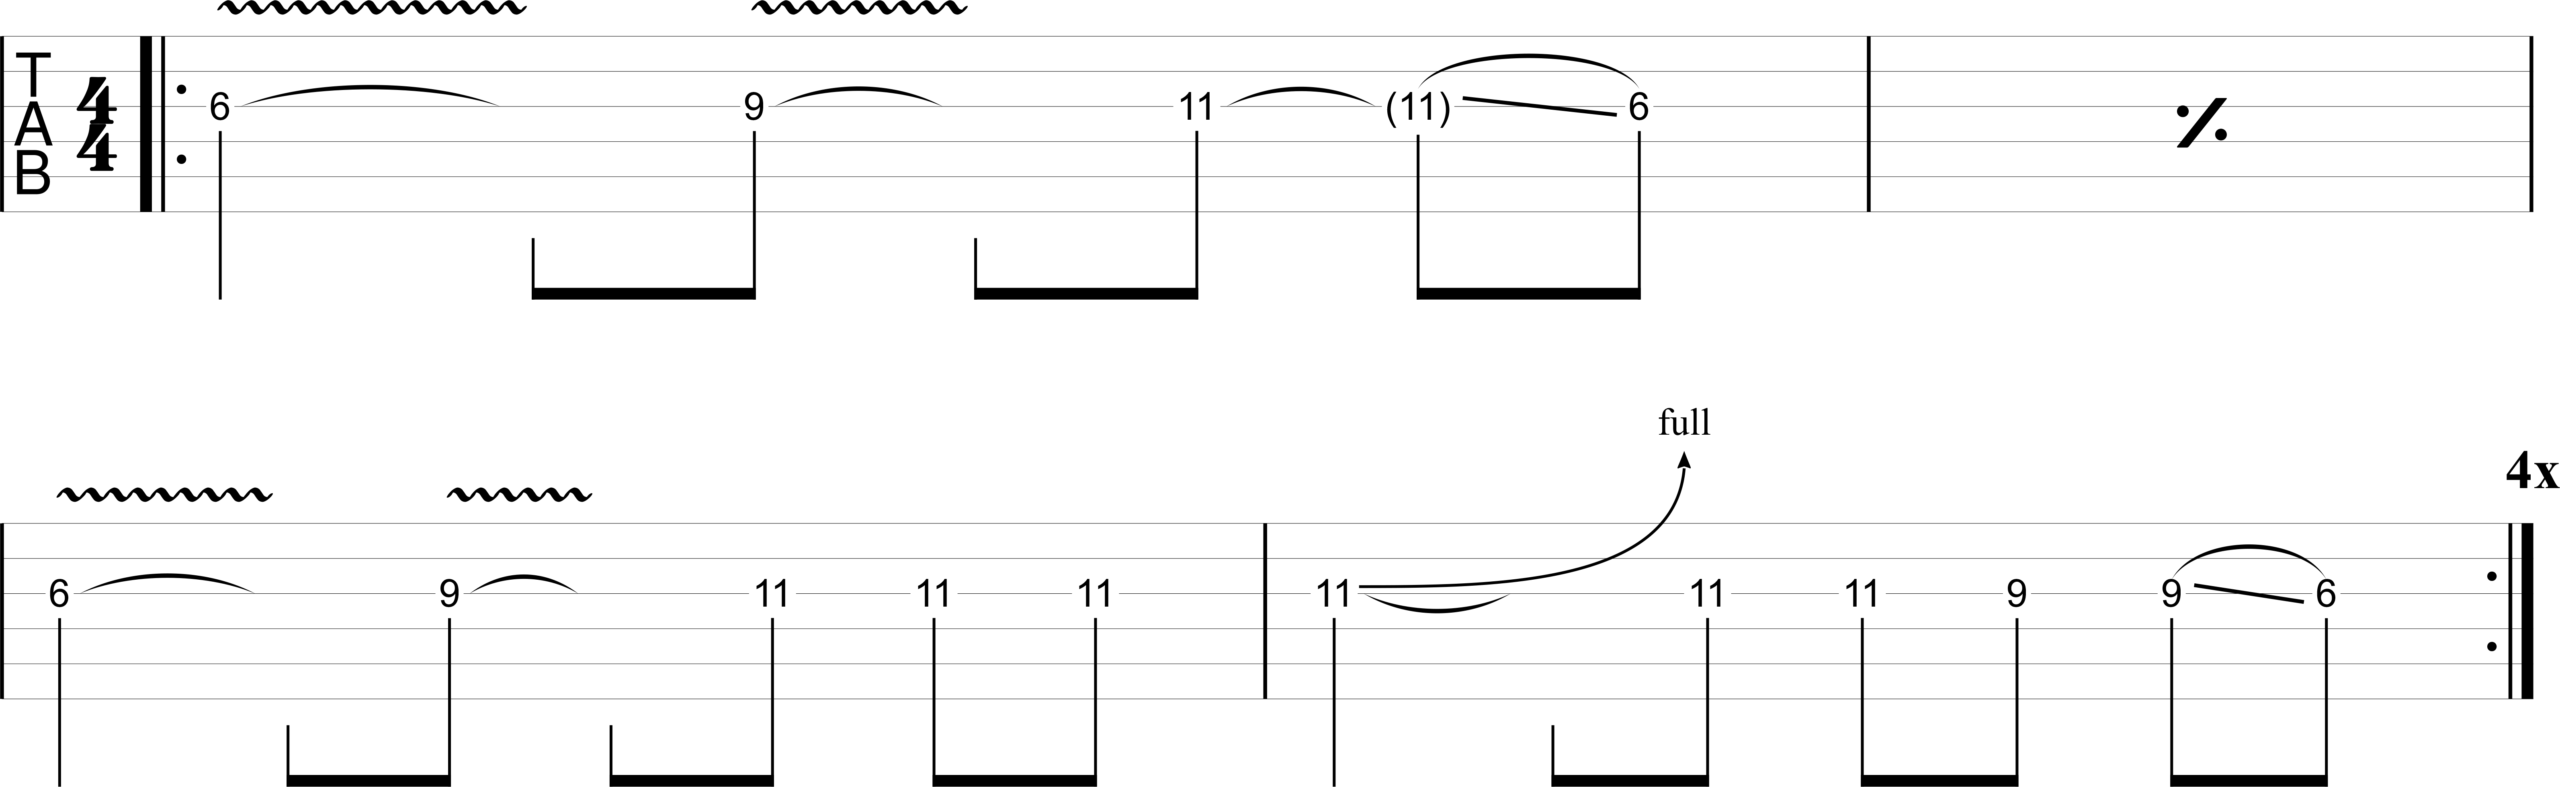
Come as You Are guitar solo TAB by Nirvana showing vibrato, slides, full-step bending and repeat markings

1. Play the Solo Over the Verse Riff

The solo is part of the complete song arrangement. While you're playing the solo, the familiar verse riff continues in the background. During this section, the riff is repeated eight times. It's therefore important not only to learn the solo notes, but also to know exactly where you are within each bar and the song structure.

The four bars of the solo form one short musical phrase. You then play the same phrase again, for a total of four repetitions. This keeps the structure simple and allows you to focus on your playing technique.

2. Important Symbols in This Guitar Solo

This solo contains several symbols that you need to understand correctly. A wavy line above or beside a note indicates vibrato. This means making the pitch fluctuate slightly by moving the string back and forth after picking the note. For more information, read our guide to guitar vibrato.

A diagonal line indicates a slide. Pick the first note and maintain finger pressure on the string while sliding toward the next fret. The note should continue sounding throughout the movement.

Notes in parentheses don't need to be picked again. They simply continue ringing from the previous note. If you see a percent sign (%) in the second bar, it means repeat the entire previous bar. The third bar looks almost identical, but you should still read its notation carefully.

In short: vibrato = make the pitch fluctuate, slide = move between notes without picking again, parentheses = let the note sustain, % = repeat the previous bar.

3. The Full-Step Bend in Bar 4

In the fourth bar, you'll see 11 with the marking "full". This means you bend the note on fret 11 up one whole step. This technique is called a full-step bend. Your goal is to raise the pitch of the note on fret 11 until it matches the pitch normally played two frets higher.

Play this bend with your ring finger on fret 11, supported by your other fingers: index finger on fret 9, middle finger on fret 10, and ring finger on fret 11. Using these three fingers together allows you to bend the string with greater stability, strength and control.

Push the string upward in a controlled motion, rather than bending it abruptly. Listen carefully to make sure you reach the correct pitch. For more information, see our lesson on guitar string bending.

Practice tip: Practice the bend separately before playing the complete solo. Check whether the bent note matches the pitch of the note two frets higher.

4. Guitar Effects During the Solo

For the solo, use distortion. You can leave the chorus effect switched on to maintain a consistent guitar sound throughout the song. You can also add some delay or a subtle echo to make the solo sound fuller and more spacious.

If you don't have these effects, you can still practice the solo with a simpler guitar tone. Playing the correct notes, performing smooth slides, controlling your vibrato and especially achieving accurate bending pitch are more important than recreating the exact sound.

5. Practice the Guitar Solo Step by Step

Start by practicing the four bars of the solo slowly and separately. Pay particular attention to the slides, vibrato and full-step bend in bar 4. Then combine the four bars into one complete phrase and play it four times, as indicated in the arrangement.

Next, listen to the original recording and pay attention to how the solo fits over the repeating verse riff. You don't need to play along at full speed immediately. First, make sure you can perform the notes and techniques correctly. Only then should you gradually increase your speed toward the original tempo.

Remember: This solo isn't about playing a large number of notes. It's about playing them well. Smooth slides, controlled vibrato and an accurate full-step bend make all the difference.

How to Play Come as You Are on Guitar

These five steps will help you learn Come as You Are by Nirvana in a structured way. Start by understanding the complete song structure, then tune your guitar correctly and work on the iconic riff, rhythm guitar parts and optionally the guitar solo.

  1. Listen and Follow the Complete Guitar TAB

    First, listen to the original recording while following the simplified guitar TAB, without playing your guitar. Pay attention to the pickup, repeat markings and transitions between the intro, verses, choruses and solo. You should be able to follow the entire TAB without losing your place and reach the end of the TAB at exactly the same moment the original recording ends. Repeat this exercise until you fully understand the song structure.

  2. Tune Your Guitar Down One Whole Step

    Tune your guitar from E–A–D–G–B–E to D–G–C–F–A–D. Use a chromatic guitar tuner. The chords in our TAB are written as relative shapes in F# minor, but because of the lower tuning, they sound in E minor. The finger positions and fret numbers remain unchanged. For more information about tuning and guitar string names, see our lesson on standard tuning and D standard tuning on guitar.

  3. Learn the Intro and Verse Riff with Let Ring

    Practice the iconic riff slowly and consistently use your index finger for fret 1 and middle finger for fret 2. Keep your fingers sufficiently upright on the strings so the adjacent open strings can continue ringing freely. Keep your fingers in position for as long as possible: this is the let ring technique. For more information about efficient finger positioning, see our lesson on guitar finger numbers and fretting-hand technique.

    The power chords in this TAB are written using two strings and played with your index and ring fingers. You can also play them on three strings by adding the root note one octave higher. To do this, place your pinky on the same fret as your ring finger, but on the next thinner string. Both versions are equally correct.

  4. Learn the Rhythm Guitar Parts and Optional Solo

    Learn the different chord sections and follow the shortened repeat markings in the TAB. Start with a clean guitar tone and chorus effect for the recognizable riff. Add distortion from the chorus onward. Once you've mastered the rhythm guitar parts, you can take on the guitar solo as an additional challenge, featuring slides, vibrato and a full-step bend. For more information about pitch control, see our lesson on guitar vibrato.

  5. Play the Complete Song with a Metronome or Drums

    Play the entire song without the original recording and practice with Smart Click for an accurate metronome beat, or GROOVR to practice along with a drumbeat. Start at a comfortable tempo and gradually build up to approximately 120 BPM in 4/4. Your goal is to play the complete song independently, with correct repeats, accurate timing and smooth transitions between the different guitar parts.

6 Common Mistakes When Playing Come as You Are on Guitar

The iconic riff from Come as You Are by Nirvana may seem simple, but the unusual guitar tuning, sustaining the notes and the different lead guitar techniques require considerable control. Avoid these six common mistakes when practicing the song.

  1. Not Tuning Your Guitar Down Correctly

    A common mistake is trying to play the guitar TAB in standard tuning along with the original recording. Our TAB is written in F# minor, but the guitar is tuned down one whole step, making everything sound in E minor. The chord names in the TAB are therefore relative rather than the actual sounding chords. Solution: tune all six strings to D–G–C–F–A–D and then play the indicated fret numbers and chord shapes. See the guitar TAB explanation for complete tuning instructions.

  2. Accidentally Muting the Open Strings

    The intro and verse riff use let ring, meaning the notes should sustain for as long as possible. When your fingers lie too flat against the fretboard, they touch adjacent strings and unintentionally stop the notes from ringing.

    Solution: use your index finger for fret 1 and your middle finger for fret 2. Keep your middle finger sufficiently upright on the string so the adjacent open string can continue ringing freely. Keep your fingers in position for as long as possible and only move them when necessary. This preserves the distinctive flowing character of the riff.

  3. Playing the Pickup and Rhythm Incorrectly

    The song begins with a pickup on the "and" of beat 3. If you automatically start on beat 1, you'll immediately be out of sync with the original recording. It's also easy to lose your place when following the repeats.

    Solution: first follow the simplified guitar TAB while listening to the original recording, without playing your guitar. Pay attention to the pickup and the shortened repeat markings for the verse, pre-chorus and chorus. Make sure you can follow the entire TAB from beginning to end without losing your place.

  4. Focusing Too Much on Guitar Effects

    The recognizable sound of Come as You Are is largely shaped by the chorus effect. From the chorus onward, distortion is added. Beginners sometimes try to recreate the exact guitar tone immediately, even when they haven't yet mastered the riff technically.

    Solution: start practicing with a clean guitar tone. Check your picking accuracy, timing and especially your ability to let the notes ring. Then add chorus and distortion. Avoid using more gain than necessary so the individual notes remain clearly audible.

  5. Playing Slides and Bends Inaccurately

    The guitar solo includes vibrato, slides and a full-step bend on fret 11. During a slide, the note should continue sounding throughout the movement. A bend must also reach the correct target pitch. Even a semitone too low will sound noticeably out of tune.

    Solution: practice slides while maintaining consistent finger pressure on the string. Support the bend on fret 11 with three fingers: index finger on fret 9, middle finger on fret 10 and ring finger on fret 11. Bend the string up one whole step in a controlled motion and compare the pitch with the note two frets higher. Practice these techniques separately before playing the complete solo.

  6. Practicing Only with the Original Recording

    When you play along with Nirvana, the vocals, drums and bass guitar help you follow the song structure. As a result, you may not always notice when you repeat a section incorrectly or your timing becomes inaccurate. Especially during the guitar solo, it's important to keep track of the accompaniment and repeats.

    Solution: practice the song without the original recording as well, using only a metronome or drumbeat. For example, use Smart Click to check your timing. Start at a comfortable tempo and gradually build up to approximately 120 BPM in 4/4. This will help you play the complete song structure independently and develop accurate timing.

Frequently Asked Questions About Playing Come as You Are on Guitar

What Guitar Tuning Do You Need for Come as You Are?

To play Come as You Are by Nirvana, tune your guitar down one whole step from standard tuning. Instead of E–A–D–G–B–E, use D–G–C–F–A–D. This is called D standard tuning. All six strings are tuned two semitones lower.

Use a chromatic guitar tuner and check each string individually. See our simplified guitar TAB for a complete explanation of this special tuning.

Why Is Come as You Are Written in F# Minor but Sounds in E Minor?

In our tablature, we use relative chord names. The chord shapes are written as if your guitar were in standard tuning. This means the TAB is written in F# minor, but because your guitar is tuned down one whole step, the song actually sounds in E minor.

For example, a chord shape marked F#m will sound like Em. You don't need to change the finger positions or fret numbers. Simply tune your guitar correctly and play the TAB exactly as written.

Is Come as You Are Suitable for Beginner Guitarists?

Yes, the famous intro and verse riff is excellent for beginners with some basic guitar experience. The notes and finger positions are relatively simple, but letting the notes ring requires accuracy and control. The special guitar tuning and repeat markings also deserve careful attention.

Start by learning the riff, then move on to the remaining guitar parts. The separate guitar solo includes slides, vibrato and bends, making it particularly interesting for guitarists with more experience.

What Does Let Ring Mean in the Come as You Are Riff?

Let ring means allowing the notes to sustain for as long as possible, even while you're playing other notes. This is especially important in the intro and verse riff, because the open strings must continue ringing while you fret other notes.

Use your index finger for fret 1 and your middle finger for fret 2. Keep your fingers sufficiently upright on the strings and leave them in position for as long as possible. This prevents you from accidentally muting the adjacent open strings and helps the riff sound smooth and flowing.

Why Does Come as You Are Start with a Pickup?

The riff begins on the "and" of beat 3, between beats 3 and 4. This is called a pickup. When you play the original recording, there is no count-in beforehand: the guitar starts immediately with this pickup.

First, count slowly in 4/4 and practice exactly when to begin. If you start the riff on beat 1, your timing won't match the original recording. Follow the rhythmic notation in the guitar TAB to play the pickup correctly.

What Guitar Effects Do You Need for Come as You Are?

The recognizable sound of Come as You Are is largely created by a chorus effect. For the intro and verses, use a clean guitar tone with chorus. From the chorus onward, add distortion for a more powerful rock sound.

For the guitar solo, you can combine distortion with chorus and a subtle delay (echo). You can leave the chorus effect switched on during the solo. If you don't have these effects, you can still practice all the guitar parts with a clean tone. Playing the correct notes with accurate timing is what matters most.

How Do You Play the Come as You Are Guitar Solo?

The guitar solo includes several typical lead guitar techniques: vibrato, slides and a full-step bend. Vibrato creates a slight fluctuation in pitch. During a slide, you move your finger along the string to the next fret without picking again.

In the fourth bar, you play a full-step bend on fret 11. This means bending the string up one whole step. Use your ring finger on fret 11, supported by your middle finger on fret 10 and index finger on fret 9. Using three fingers gives you greater control when bending the string.

In our simplified notation, the solo phrase is played four times, while the accompanying verse riff is repeated eight times. Practice the solo slowly at first and pay particular attention to the pitch accuracy of the bend.

What Do the Symbols and Repeat Markings Mean in the Guitar TAB?

This TAB uses several symbols and shortened repeat markings. A percent sign (%) means you repeat the entire previous bar. A diagonal line indicates a slide. A wavy line indicates vibrato. Notes in parentheses should continue ringing without being picked again.

Markings such as Verse ×2, Pre-Chorus ×2 and Chorus ×2 mean that you repeat the previously written section. These are practical shortcuts we use to keep the complete guitar TAB clear and compact. They're not part of official standard guitar tablature notation.

How Do You Practice Come as You Are at the Original Tempo?

For this lesson, we use a tempo of approximately 120 BPM in 4/4 time. Start at a slower tempo and focus first on correct fingering, the pickup and letting the notes ring. Gradually increase your speed once you can play the different sections accurately and without tension.

First, listen to the original recording while following the complete guitar TAB without playing your guitar. Make sure you can follow all the repeats and transitions and reach the end of the TAB at exactly the same moment the song finishes. Then practice independently with a metronome or drumbeat. For example, use Smart Click to check your timing. This will help you master the complete song structure independently.

Wouter Baustein - Guitar Coach

Guitar Training Studio

Ready to Make Real Progress on Guitar?

Build better technique, timing and musicianship with structured guitar training, practical tools and personal coaching.