Free Guitar Lesson · Olivia Rodrigo
Learn how to play good 4 u by Olivia Rodrigo on electric guitar. In this free guitar lesson, you'll learn the recognizable bass line from the intro and verses, the powerful power chords, and the energetic rhythm guitar parts. With a complete rhythm guitar TAB and practical playing tips, we'll work through the song step by step. For more experienced players, we've also included the guitar solo TAB as an extra challenge. No capo required.

For this easy guitar arrangement of good 4 u by Olivia Rodrigo, we use only power chords: F#5, E5, D5, C#5, A5, and B5. No barre chords required! The song is played in standard tuning (E–A–D–G–B–E), without a capo, in 4/4 time at 167 BPM.
The recognizable bass line mainly revolves around:
F#5 – E5The verses also feature the D5 – C#5 change. You can learn the bass line separately as a guitar riff.
The powerful rhythm guitar accompaniment mainly uses:
D5 – A5 – E5With F#5 – E5 as an additional transition. Play the power chords with tight picking and clear rhythmic accents.
The bridge includes the following power chords:
F#5 – E5 – B5For intermediate guitarists, we've also included the instrumental lead guitar part with separate tablature.
Remember: Power chords contain neither a major nor a minor third. This means you can simplify both major and minor chords into the same two-note power chord shape. Start with the recognizable bass line and the power chord progressions. Then work on your rhythm guitar playing, palm muting, and timing. The guitar solo is an extra challenge. Check out the complete rhythm guitar TAB and the solo tablature below.
Key: F♯ minor / A major
Time Signature: 4/4
Tempo: 167 BPM
Guitar: Electric
Tuning: E–A–D–G–B–E (standard)
Capo: No
Tone/Effects: Clean, distortion or overdrive
Below you'll find the complete rhythm guitar arrangement for good 4 u by Olivia Rodrigo, written in tablature across two images. This is a simplified arrangement using power chords, so you won't need to play any barre chords. The separate guitar solo TAB provides an additional challenge for intermediate guitarists.
Not completely comfortable with the fingering indications used in guitar TAB? Review our lesson on guitar finger numbers. The reading guide below also explains the specific rhythmic symbols and playing techniques used in this arrangement.
The tablature begins with the recognizable bass line from the intro and verses, arranged so you can play it on guitar. The rhythm guitar sections then introduce power chords, palm muting, and rhythmic accents. The more challenging 16th-note chorus is optional. You can learn the simpler accompaniment first and add the extra rhythmic details later.
To keep the TAB easy to read, I haven't written out every repeated section in full. Instructions such as Repeat same chorus, Repeat same interlude, or a specified number of measures refer to previously written passages. This makes the complete arrangement easier to follow.
Guitar tone: Use a strong distortion effect for the aggressive pop-punk sound of the rhythm guitar. Make sure individual notes and power chords remain clearly defined. Too much gain can make your playing sound muddy and reduce rhythmic clarity and articulation.
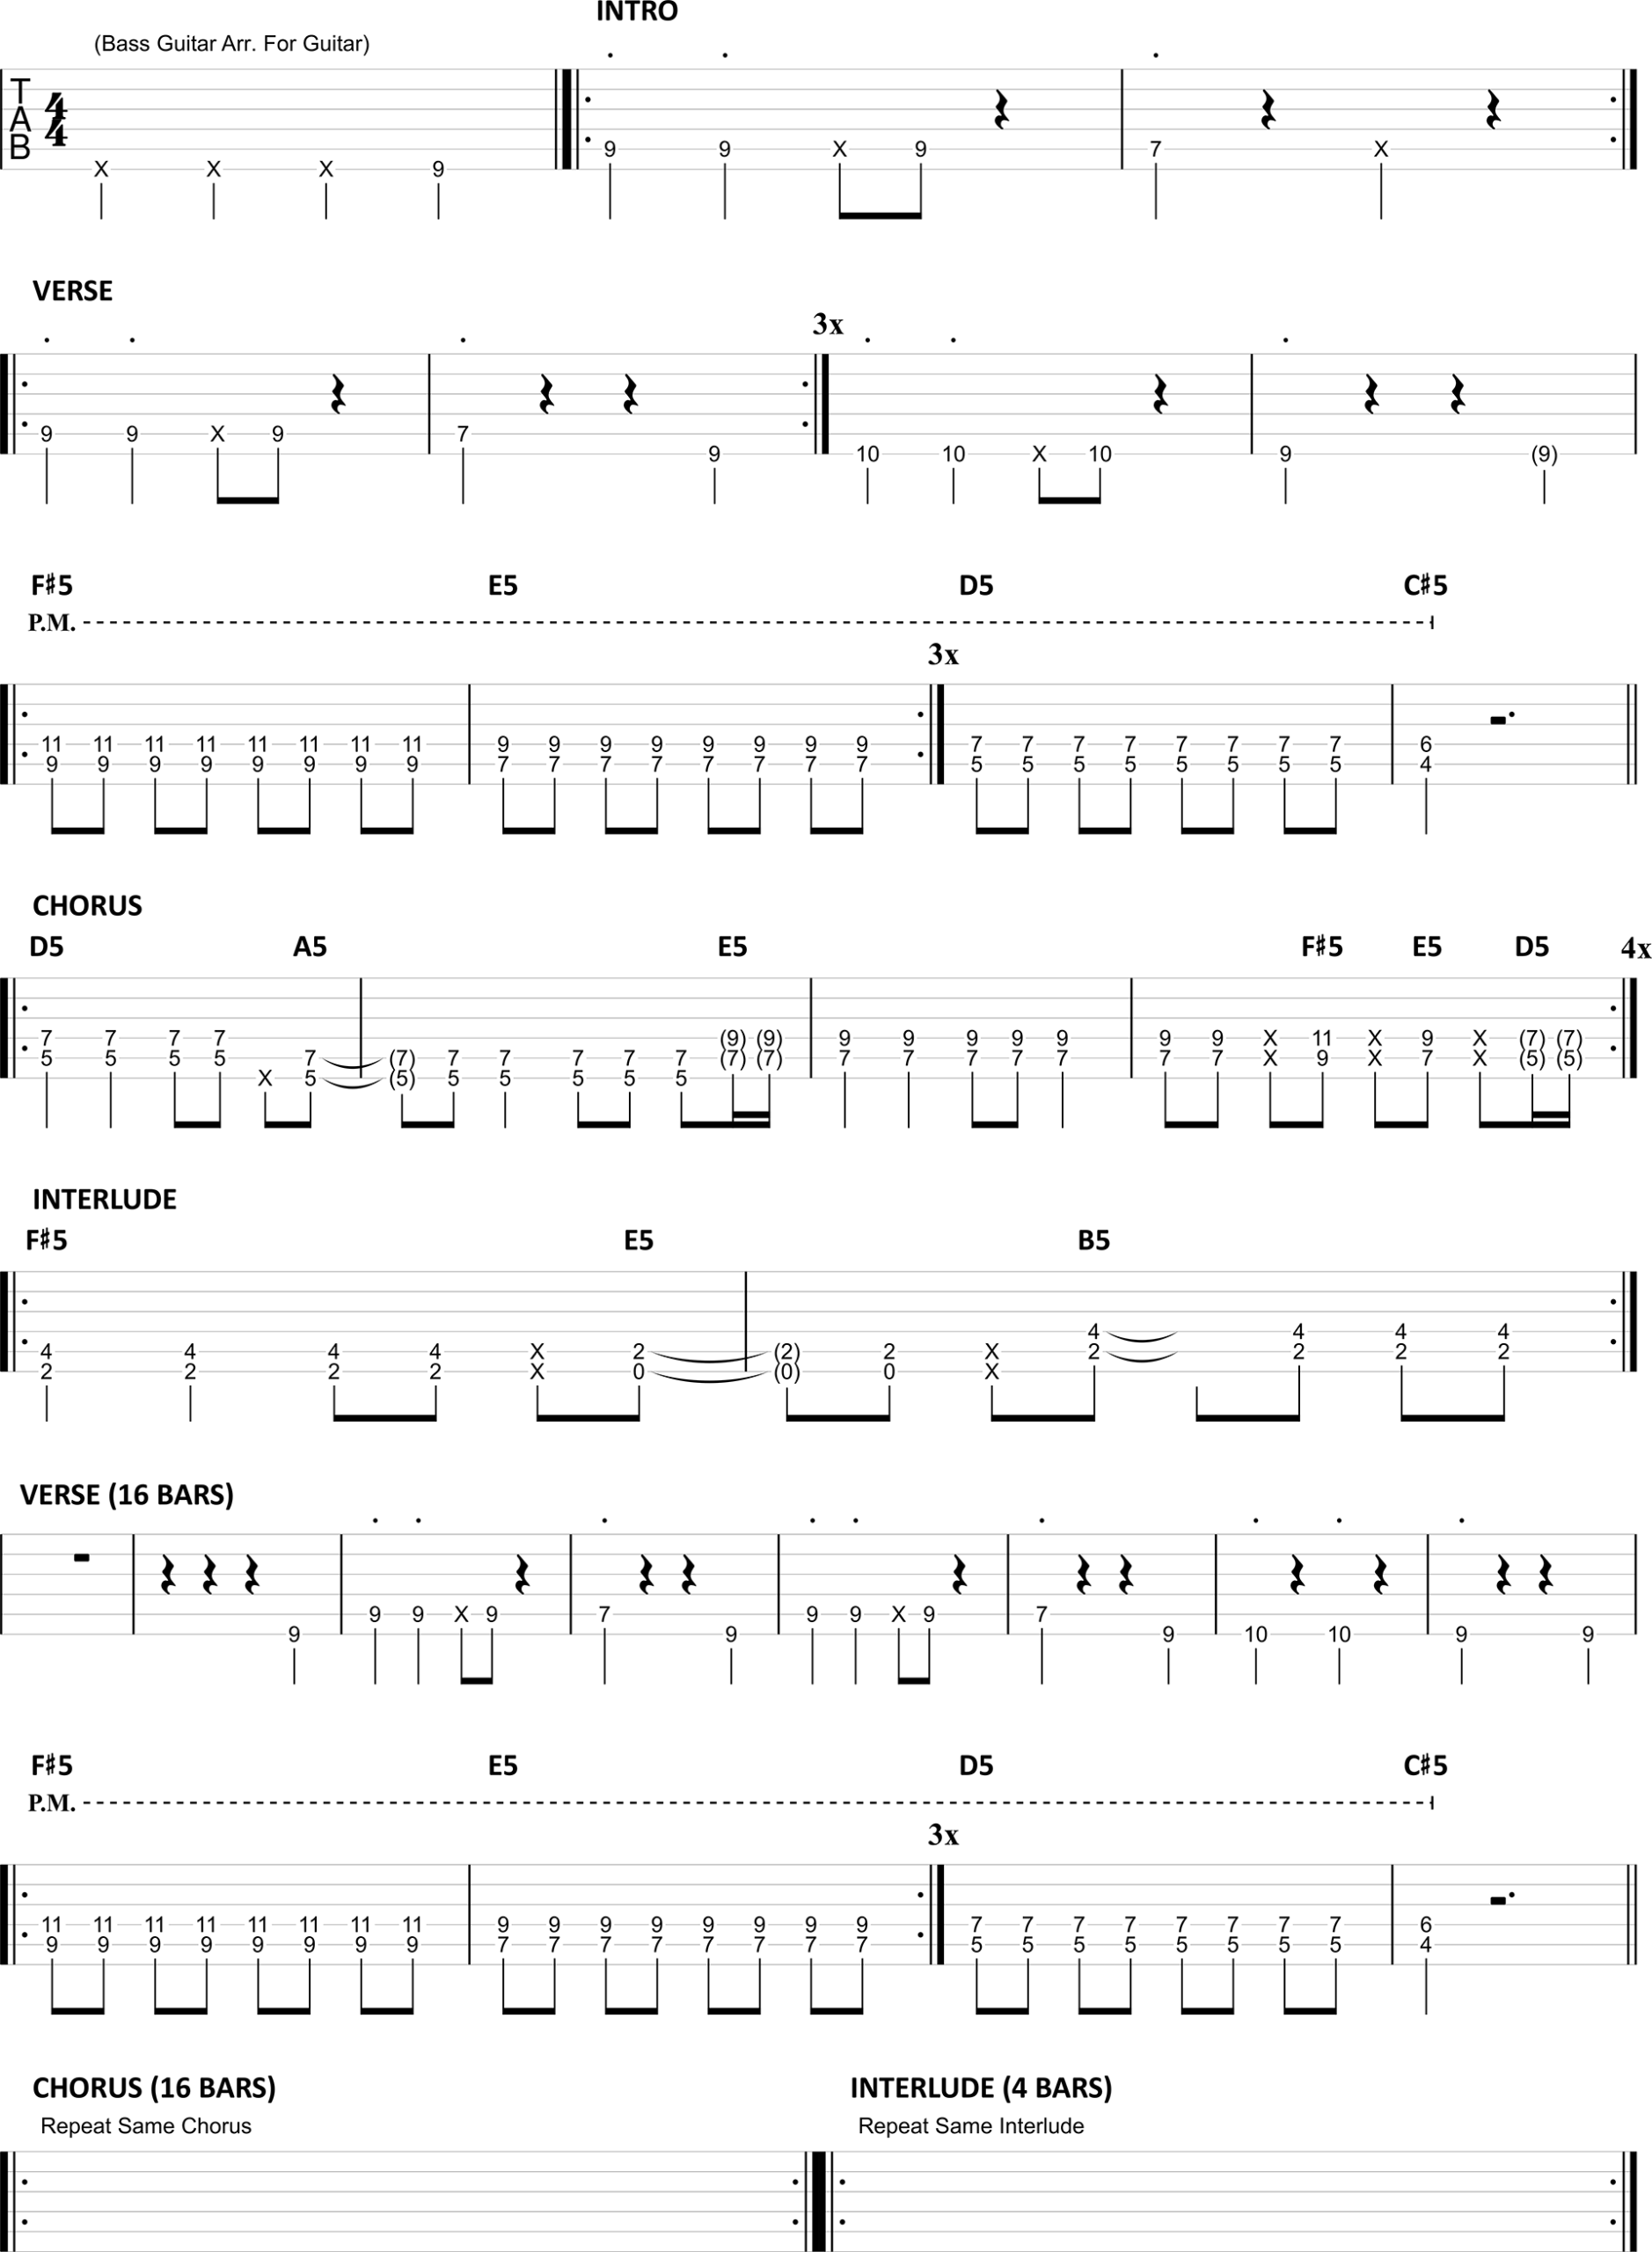
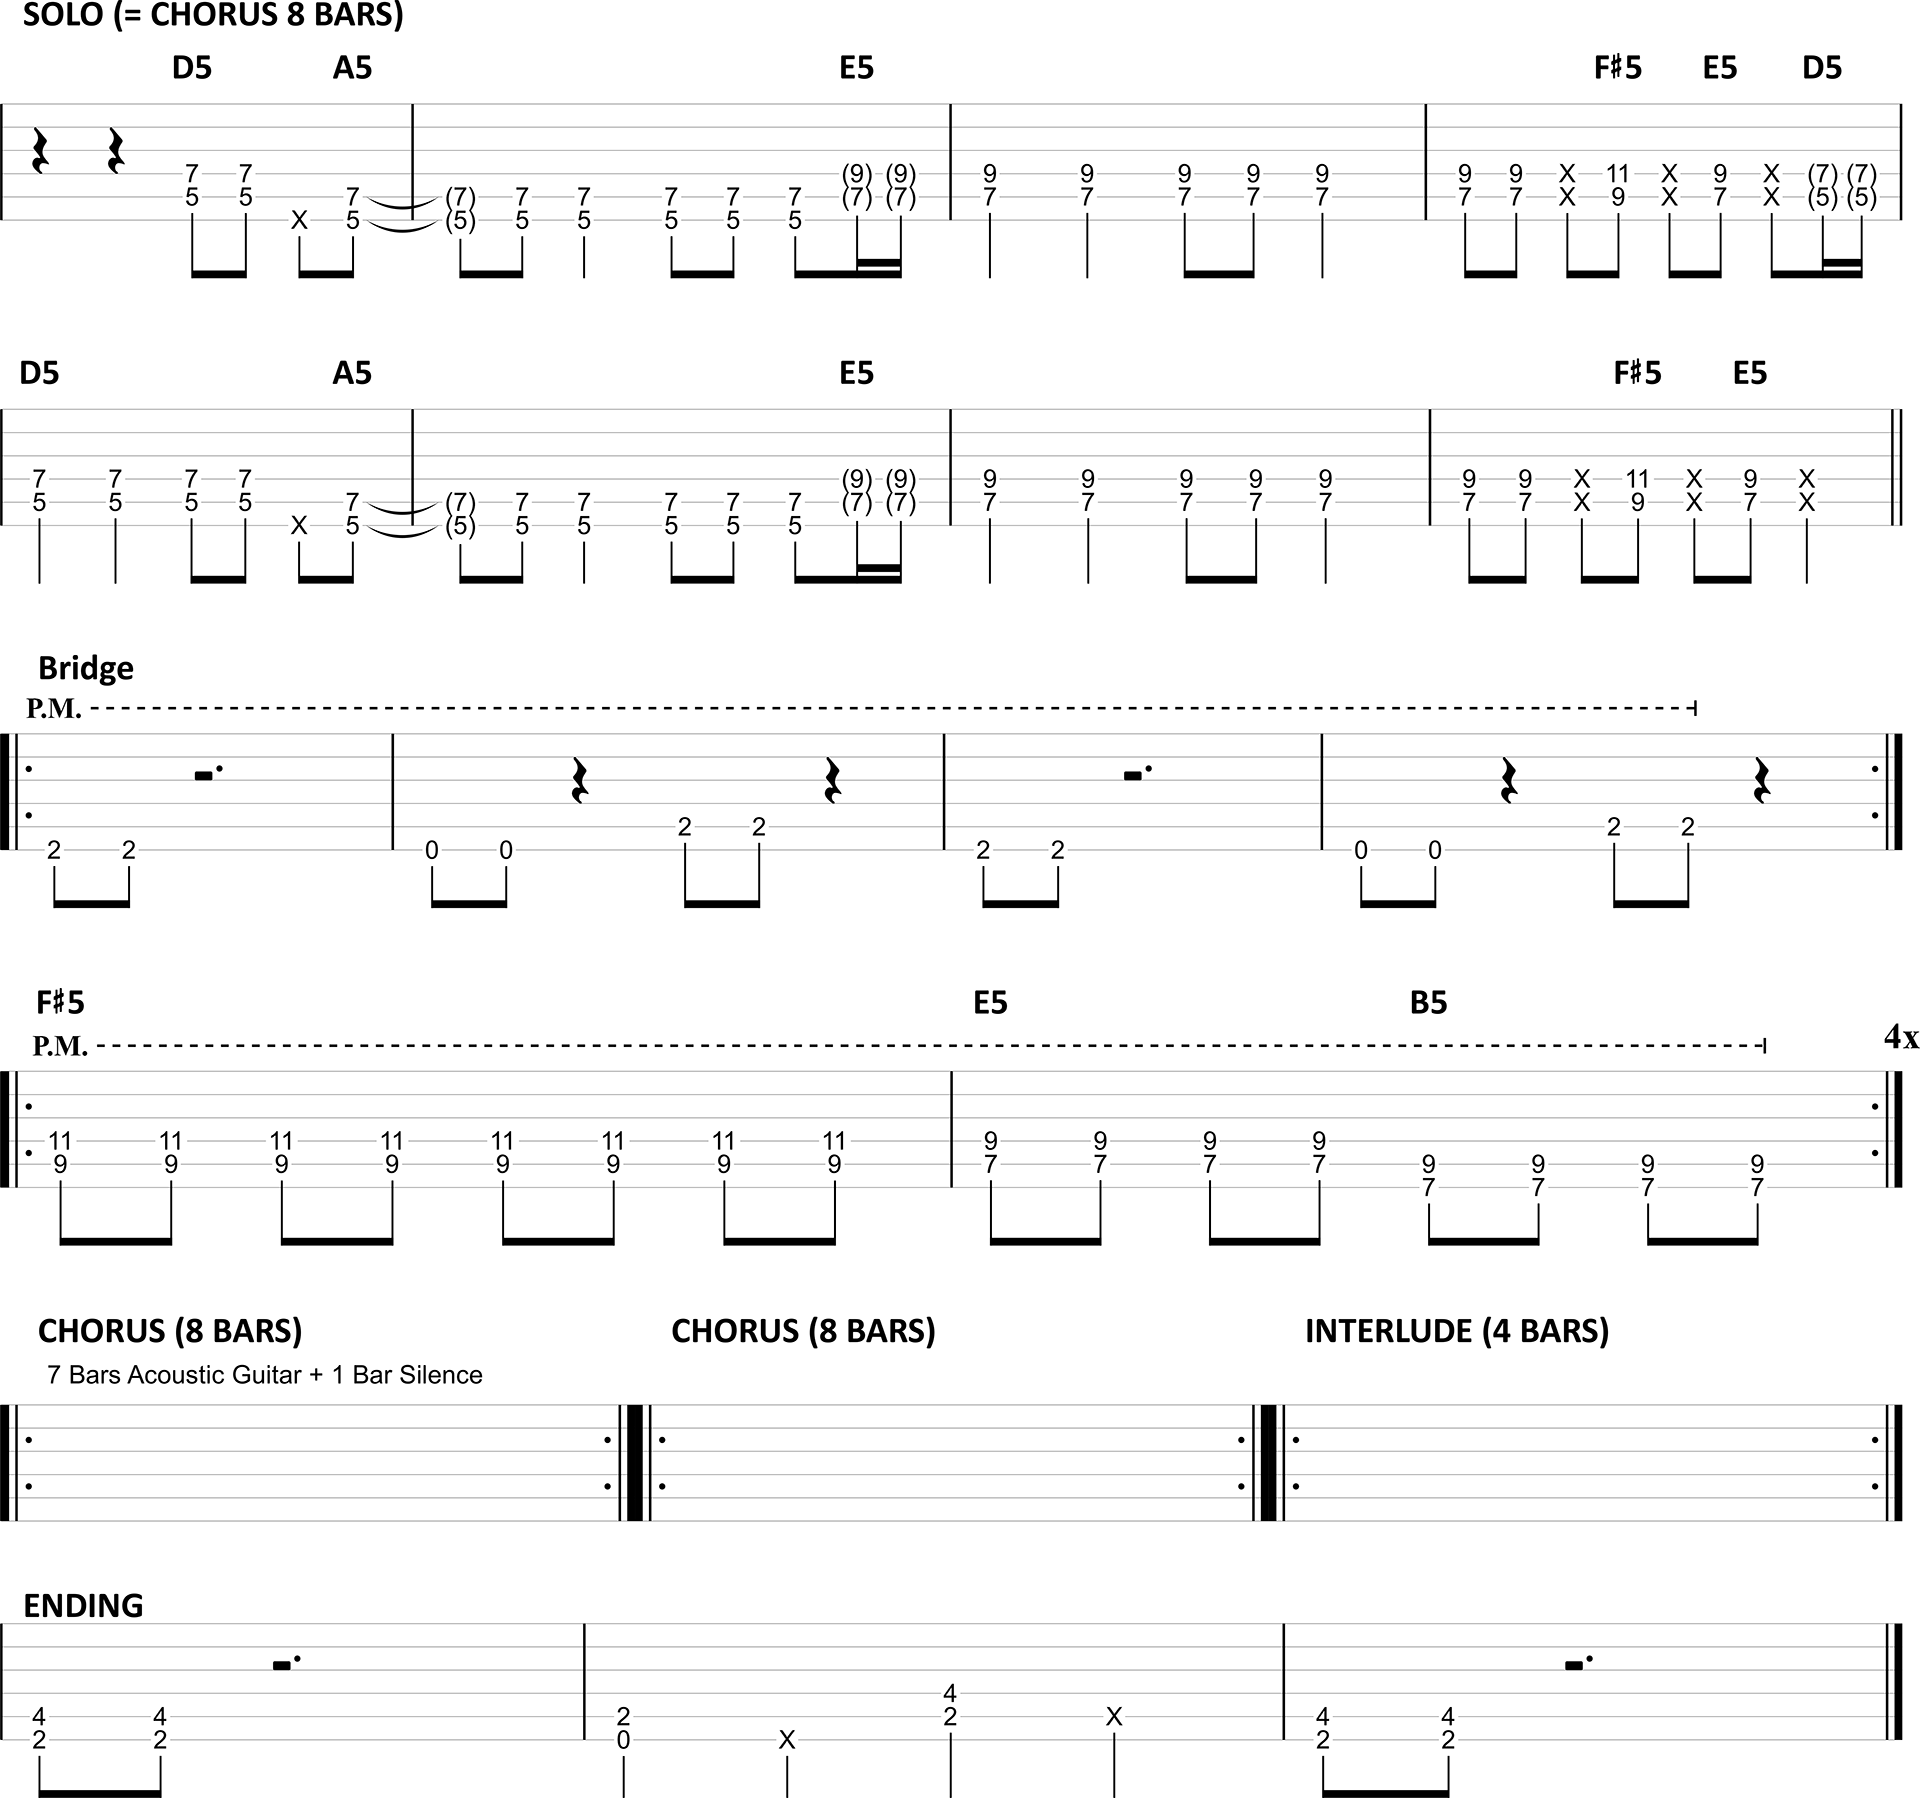
The double dots next to the barlines, such as ||: and :||, indicate a repeated section. If you see x3 or x4, play the indicated passage three or four times, respectively.
In this particular arrangement, I sometimes use crosses (x) instead of standard rest symbols. Both mean the same thing here: do not play at that position. This simplified notation makes the rhythmic subdivisions easier to read and count.
The second part of the verse contains palm-muted notes (P.M.). To palm mute, lightly rest the side of your picking hand against the strings, close to the guitar bridge. This produces a shorter, muted, and more percussive sound. Don't press too hard: the pitch of each note should remain recognizable.
For the tight, machine-like palm-muted sound in this arrangement, play all the indicated notes with downstrokes, even at the original tempo.
Want to practice this technique further? Check out our guitar lesson on HONEY (ARE U COMING?) by Måneskin, which also focuses on palm muting and rhythmic precision.
A dot above a note indicates staccato. Play the note briefly and stop it from ringing out for its full written duration. This creates a tighter, more rhythmic feel in your guitar playing.
The indication Bass guitar arranged for guitar means that the original bass part has been adapted for electric guitar. You can therefore play the recognizable intro and verse bass line on your regular guitar, without needing a bass guitar.
The chorus also includes a more challenging rhythmic version featuring 16th notes. This version is optional. Start with the simpler power chord accompaniment and add the 16th-note rhythm only when your chord changes and timing are under control. At 167 BPM, this requires considerable speed and precision.
Not every chorus, verse, or interlude is written out again in full. When you see instructions such as Repeat same chorus or Repeat same interlude, return to the corresponding previously written passage. The indicated number of measures tells you how long that section lasts. This shortened notation keeps the complete TAB easier to read.
For more experienced guitarists, we've also included the instrumental guitar solo. Practice difficult passages in short sections and pay attention to articulation, timing, and smooth position shifts. Start at a slower tempo and increase the speed only when you can play each passage accurately and without tension.
Having trouble with finger placement during fast passages or position changes? Review our lesson on guitar finger numbers and fingering.

Practice tip: Start by learning the bass line and the simplified power chord accompaniment. Then work on the palm-muted passages, staccato accents, and repeated sections. Practice the complete song with a metronome or drum beat, gradually working your way up to 167 BPM. The 16th-note chorus and guitar solo can be added later as an extra challenge.
good 4 u by Olivia Rodrigo combines a recognizable bass line with powerful power chords, palm muting, and energetic rhythm guitar. These five steps will help you learn the song from the opening notes to the complete accompaniment at 167 BPM.
First, learn the recognizable bass line from the intro and verses. In the complete guitar TAB, this bass part has been arranged for guitar. Play the notes individually with consistent timing. Practice slowly until you can repeat the riff without looking at the tablature.
The simplified rhythm guitar arrangement uses power chords instead of more difficult barre chords. Start by practicing the chord shapes and transitions without a strumming pattern. Try to lift your fingers as little as possible and move the entire chord shape efficiently along the fretboard.
The power chords in this TAB are written using two strings and played with your index and ring fingers. You can also play them on three strings by adding the root note one octave higher. To do this, place your pinky on the same fret as your ring finger, but on the next thinner string. Both versions are equally correct.
For more information about this technique, check out our lesson on how to play power chords on guitar.
In the second part of the verse, use palm muting to create a short, muted sound. Lightly rest the side of your picking hand against the strings near the bridge. For notes marked with a staccato dot, stop the sound deliberately before the note's full duration. Practice the difference between short, muted notes and sustained notes to develop better rhythmic control and dynamics.
167 BPM is pretty fast. Start at a slower tempo and increase your speed only when you can play the passages accurately and without tension. The more challenging chorus with 16th notes is optional. Make sure your simplified power chord accompaniment sounds tight before attempting it.
You can use Smart Click to gradually build up your playing speed.
Memorize the song structure and use the repeat markings in the TAB to remember the different sections. Then play the entire song without the original recording. This will show you whether you can maintain the transitions, timing, and song structure independently.
Practice with Smart Click for an accurate metronome click, or use GROOVR to play along with a drum beat. Start at a comfortable tempo and gradually work your way up to 167 BPM in 4/4 time. Consistent timing is especially important when playing a fast song like this.
Can you play the complete rhythm guitar arrangement? Then challenge yourself by learning the guitar solo. Practice difficult passages separately before attempting them at the original tempo.
good 4 u may sound simple, but its fast tempo, power chords, and the contrast between muted and open passages require a good deal of control. Avoid these five common mistakes when practicing.
167 BPM is fast, especially when you need to switch between power chords and play rhythmic accents. Starting at the original tempo often leads to unnecessary mistakes and tension in your playing. Begin at a slower speed and only increase the tempo when you can perform the part accurately and without tension. The 16th-note chorus is optional.
Power chords use only two or three specific strings. If you accidentally hit other strings with your pick, your playing can quickly sound messy. However, even strings you don't touch can start vibrating through sympathetic resonance. This becomes particularly noticeable when playing with distortion.
Learn to use your fretting hand (left hand) to mute as many unused strings as possible. Combine this with accurate, controlled picking. This will help you prevent unwanted string noise and keep your power chords sounding tight, even with plenty of distortion.
In the palm-muted passages of this TAB, use downstrokes only. Avoid alternating between downstrokes and upstrokes, even if alternate picking seems easier at 167 BPM.
Practice the downstrokes at a slower tempo first, then gradually increase your speed. Keep your picking hand relaxed and make sure every stroke sounds equally tight. The combination of palm muting, consistent downstrokes, and precise timing gives these passages their powerful, mechanical feel.
In my TAB, I sometimes use crosses (x) as rest symbols. In this arrangement, they mean you should not play at that moment. Also pay attention to repeat signs and instructions such as Repeat same chorus. Read through the complete rhythm guitar TAB carefully before you start. This will help you avoid skipping measures or repeating sections incorrectly.
Playing along with Olivia Rodrigo can feel easier because the recording constantly guides you through the song. You can hear the vocals, transitions, and complete instrumental arrangement. As a result, you may unknowingly become too dependent on the recording.
Make sure you also practice without the original music, using only a metronome or drum beat. Memorize the song structure and try singing the melody in your head while playing. This will show you whether you can perform the entire song independently while developing better timing, concentration, and musical independence.
In our simplified arrangement of good 4 u by Olivia Rodrigo, we use only power chords: F#5, E5, D5, C#5, A5, and B5. You don't need to play any difficult barre chords. Power chords are particularly well suited to the song's powerful pop-punk sound, especially when played with distortion.
Yes, the simplified rhythm guitar arrangement is suitable for beginners. With power chords and the recognizable bass line, you can learn the song step by step. The biggest challenge is the fast tempo of 167 BPM. The more demanding 16th-note passages and guitar solo are optional and mainly intended for intermediate guitarists.
Yes. The recognizable bass line from the intro and verses has been arranged for electric guitar in our TAB. The indication Bass guitar arranged for guitar means you can play this part on your regular guitar. You don't need a separate bass guitar. Check out the complete rhythm guitar TAB to learn the part.
In this particular tablature, I sometimes use crosses (x) as rest symbols. They indicate that you should not play at that position. The double dots next to the barlines indicate repeated sections. For example, x3 means you should play the passage three times.
Instructions such as Repeat same chorus refer to a previously written passage. This keeps the complete song arrangement easy to follow without writing out the same measures over and over again.
Distortion doesn't just make your guitar sound more aggressive; it also makes mistakes and unwanted noise much more noticeable. Inaccurate picking, unwanted string resonance, and sloppy chord changes become more obvious. Something that sounds reasonably clean without effects can suddenly sound quite messy when you add distortion.
That's why it's important to mute unused strings with your fretting hand, even when you're not directly picking them. Sympathetic resonance can cause those strings to vibrate on their own. Combine effective string muting with accurate picking, and avoid using more gain than necessary. Distortion is an excellent test of your technical accuracy.
Of course! You don't need a distortion pedal or a special amplifier to learn good 4 u. You can practice the same bass line, power chords, and rhythms using a clean guitar tone.
Distortion mainly provides the powerful, aggressive rock sound, but it doesn't change the notes you need to play. A clean guitar tone is actually very useful for practicing your picking, timing, and chord changes accurately. If you have access to distortion later, you can simply add it.
The original tempo is approximately 167 BPM in 4/4 time. Start at a speed where you can play the guitar parts accurately and without tension, then gradually increase the tempo. Don't practice only with the original recording. Make sure you can also play independently with a metronome or drum beat.
Try Smart Click or GROOVR. These tools help you develop consistent timing and learn to follow the complete song structure without relying on the original recording.
No, the guitar solo is optional. You can play the complete song using the simplified rhythm guitar arrangement. For more experienced guitarists, we've also included the guitar solo TAB. Practice the solo in short sections and gradually increase the tempo once you can play each passage accurately and without tension.

Guitar Training Studio
Build better technique, timing and musicianship with structured guitar training, practical tools and personal coaching.
www.guitarstudio.be (Belgium)
www.guitartrainingstudio.com (International)
c/o Wouter Baustein
Driehoekstraat 1, BE-3891 Gingelom
+32.(0)476.666.300
info@guitarstudio.be
CoC: 0872.862.121
VAT: BE0872862121
IBAN: BE33-7350-0967-6746
BIC: KREDBEBBXXX
© 2000 – 2026 All Rights Reserved
Web apps & development by Baustein.digitalWe use cookies to enhance your experience and analyze traffic. You can accept all, decline, or adjust your settings. Some features may not work without consent.