
Power Chords for Beginners: Shapes, Muting and Moving Around the Neck
Power chords are simple, movable guitar shapes used everywhere in rock, pop, punk and metal. Once you understand where the root note is, the same basic shape can be moved around the neck to create dozens of different chords.
In this lesson, you’ll learn power chords for beginners: how the basic two-note shape works, how to play power chords with roots on the 6th and 5th strings, how to mute unwanted strings and how to move the shapes around the fretboard cleanly and confidently.
The Basic Power Chord Shape
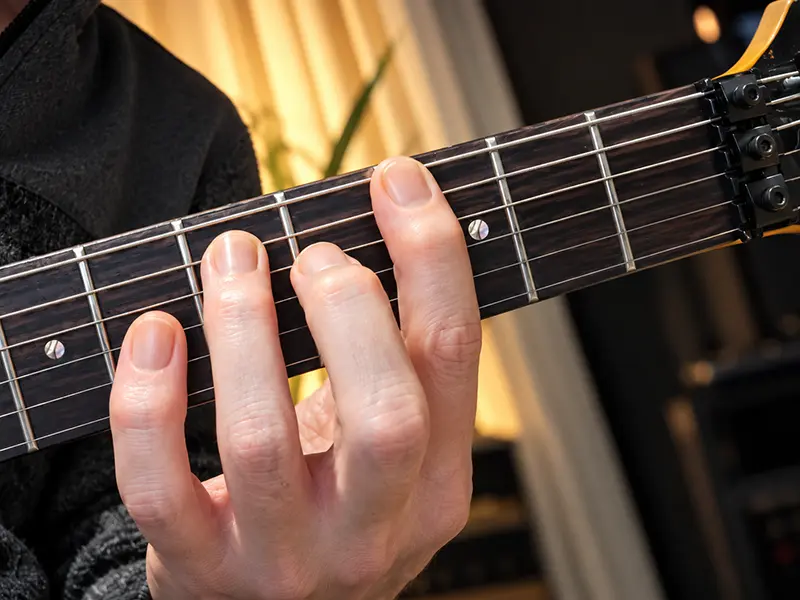
The basic power chord is one of the easiest movable chord shapes on guitar. You only need two notes and two fingers: your index finger plays the root note, and your ring finger plays the note on the next thinner string, two frets higher.
The root note gives the power chord its name. If your index finger is on G, you are playing G5. Move the exact same shape to another root note and the chord name changes, while the basic fingering stays the same. If you're unfamiliar with fret numbers and vertically stacked notes, check our beginner's guide to reading guitar TAB first.

Keep your fingers relaxed and use only enough pressure to make both notes sound clean. Once the shape feels natural, you can start moving it around the neck without changing the distance between your fingers.
Two Notes, Sometimes Three Fingers
A power chord contains only two different notes: the root and the perfect fifth. That is why the basic movable shape in this lesson uses only two fingers.
You will often see power chords played with three fingers. In that version, the third finger does not add a new chord tone — it simply plays the root again, one octave higher. This can make the chord sound fuller and heavier, but the harmonic structure is still the same: root + fifth.

Power Chords with the Root on the 6th String
One of the most common ways to play a power chord is with the root note on the 6th string — the thickest string on the guitar. Your index finger plays the root, and your ring finger goes on the next string, two frets higher.
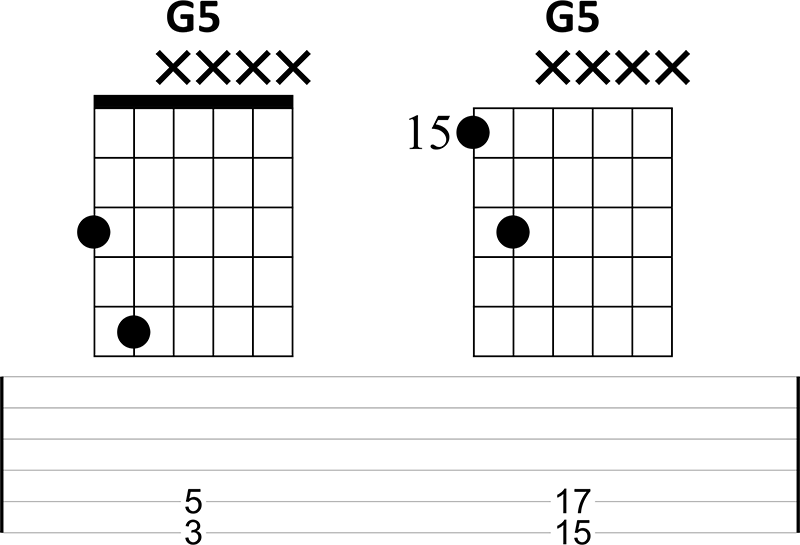
For example, place your index finger on the 3rd fret of the 6th string. That gives you G as the root, so the chord is G5. Your ring finger then goes on the 5th fret of the 5th string.
Find the Root Note on the Neck
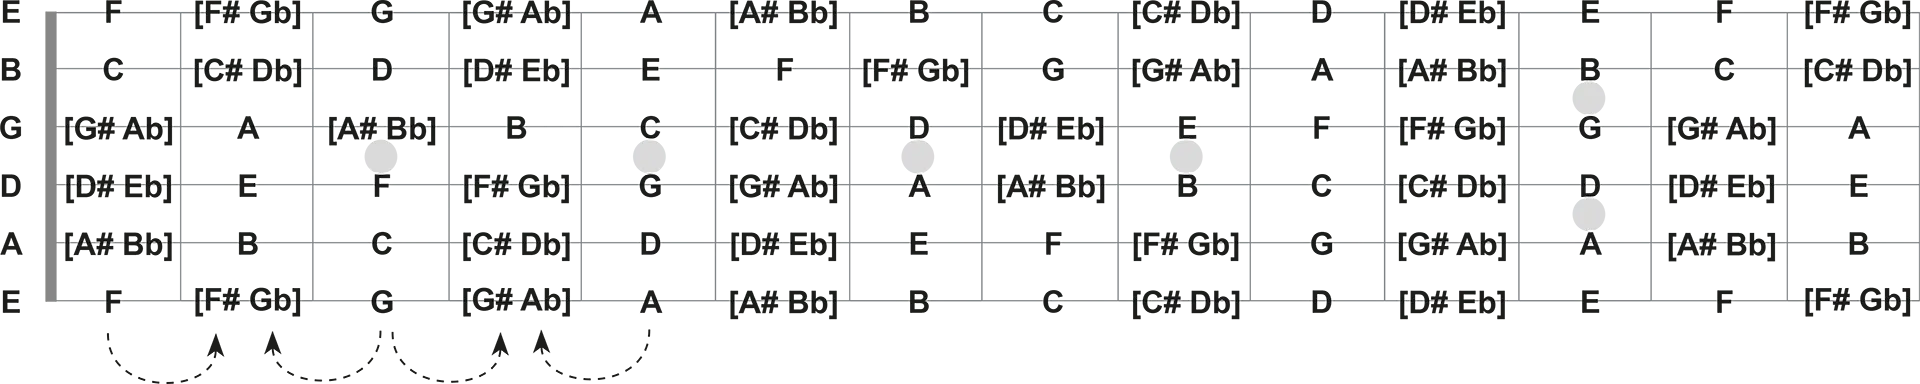
To move power chords around the fretboard, you only need to know where the root notes are on the 6th and 5th strings. Start with the natural notes shown below and use them as reference points.

Think in frets: F# = F + 1 fret and Gb = G - 1 fret. That brings you to the same fret. The same idea works for G#/Ab, A#/Bb, C#/Db and D#/Eb.
The full fretboard follows exactly the same pattern. Once you know a few natural-note reference points, the sharp and flat notes are simply the frets in between.
Once this shape feels comfortable, slide it up and down the neck without changing the distance between your fingers. Wherever your index finger lands on the 6th string determines the name of the power chord.
Power Chords with the Root on the 5th String
The same basic power-chord shape also works with the root note on the 5th string. Your index finger plays the root, and your ring finger moves to the next thinner string, again two frets higher.
For example, place your index finger on the 3rd fret of the 5th string. That root note is C, so you are playing C5. Your ring finger goes on the 5th fret of the 4th string.
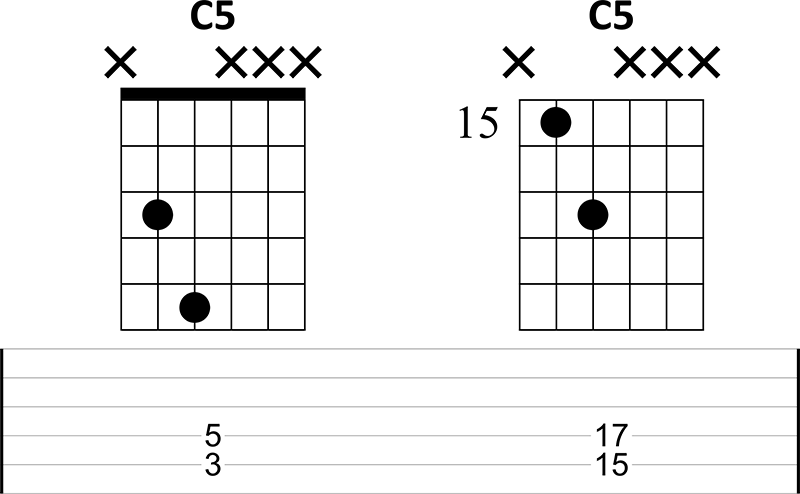
The image shows the same C5 power chord in two positions. The root is still C and the shape stays exactly the same — it is simply moved one octave higher on the neck.
Just like the 6th-string version, this shape can be moved anywhere along the neck. Use the 6th- and 5th-string note reference above to find the root you need, then place the same two-finger shape from that position.
With these two positions — roots on the 6th and 5th strings — you can already play power chords all over the guitar neck without learning a new shape for every chord.
Mute the Strings You Don’t Want to Hear
A clean power chord is not just about fretting the right two notes. You also need to keep the other strings quiet. If unused strings ring along, the chord quickly starts to sound messy — especially with distortion.
Your index finger does most of the muting work. While it presses the root note, let it lightly touch the nearby strings you do not want to hear. The important difference is how you do this depending on whether your root is on the 6th or 5th string.
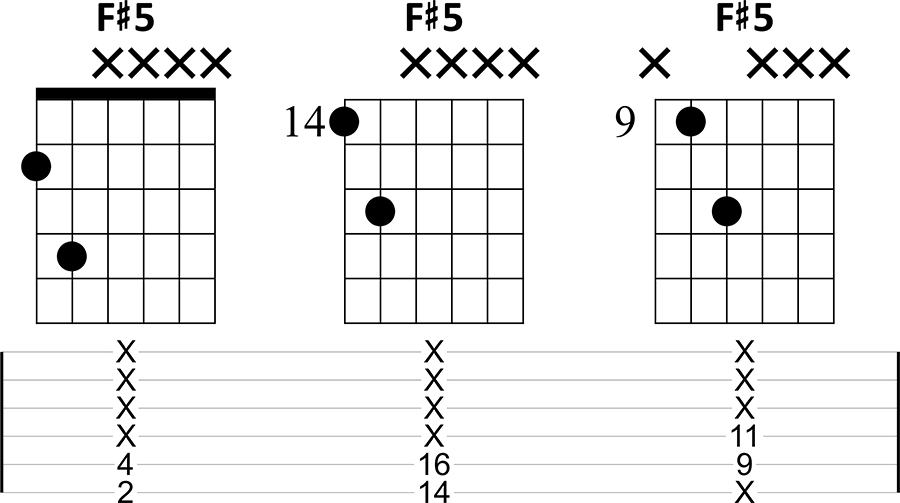
Root on the 6th string: your index finger frets the root and lightly rests against the thinner unused strings underneath it. This helps stop those strings from ringing when your pick touches more than the two strings you want.
Root on the 5th string: use the same light contact to mute the thinner strings, but now you also need to mute the unused 6th string. Let the side or tip of your index finger gently touch the 6th string while you fret the root on the 5th string. Do not press the 6th string down — just touch it enough to stop it from ringing.
Your picking hand should still aim for the strings you actually want to play, but good fretting-hand muting gives you extra protection. The cleaner your muting becomes, the tighter and more controlled your power chords will sound.
Moving Power Chords Around the Neck
This is where power chords become really useful. Once you know the basic shape, you do not need to learn a different fingering for every chord. Simply move the same shape to a different root note.
Keep the distance between your index and ring finger exactly the same while you slide the shape up or down the neck. The note under your index finger is the root, and that root determines the name of the power chord.
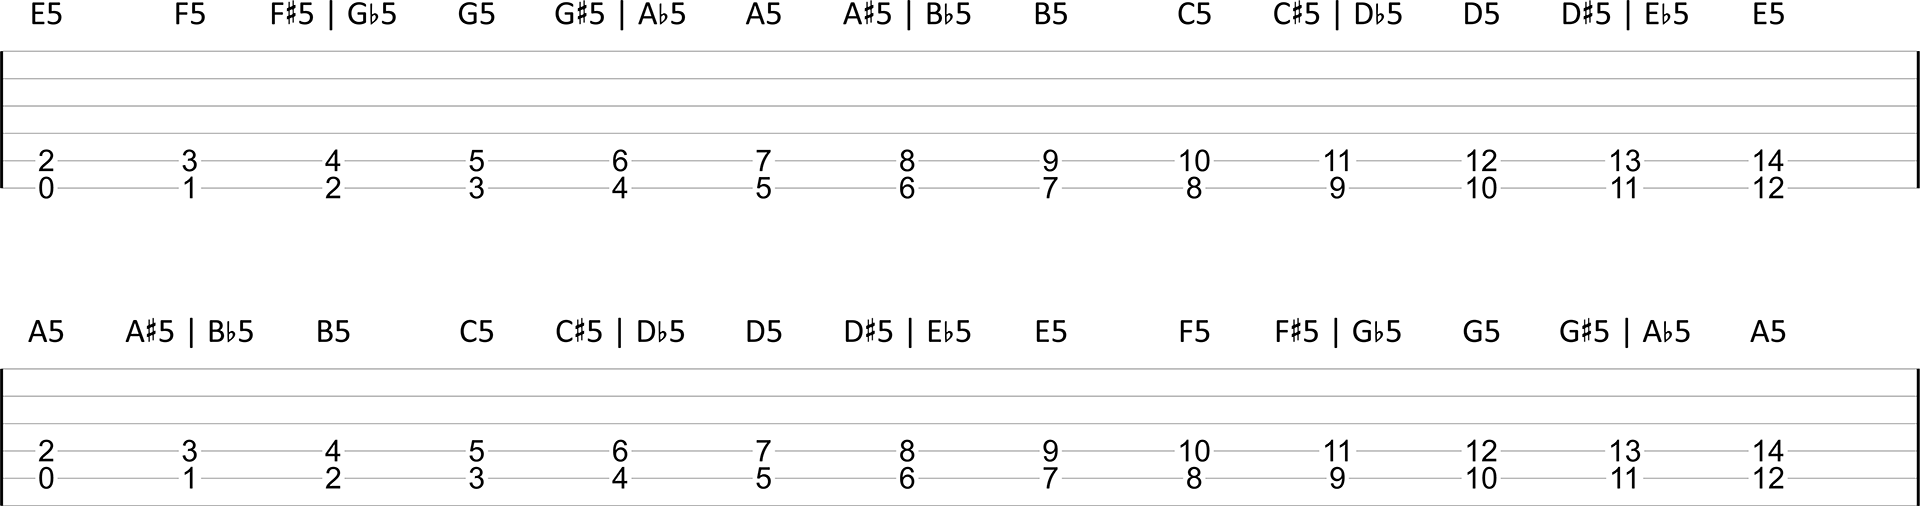
Use the 6th- and 5th-string note map above whenever you need help finding a chord. You do not need to memorize the entire fretboard before you start using power chords.
Try This
Find each root on the 6th or 5th string, keep the same two-finger shape, and move between the chords slowly. Focus on landing both fingers together and keeping the unused strings quiet.
Start slowly. The goal is not to move as fast as possible, but to make every new chord land cleanly and in time. Once the movement becomes automatic, speed will follow naturally.
Palm Muting vs. Fretting-Hand Muting
These two techniques both use the word muting, but they do completely different jobs. Understanding the difference makes power chords much easier to control.
Fretting-Hand Muting
Your fretting hand lightly touches the strings you do not want to hear. The goal is to stop accidental string noise and keep the power chord clean.
Palm Muting
Your picking-hand palm lightly rests on the strings close to the bridge. You are muting the strings you are actually playing, which makes the notes shorter, tighter and heavier.
To palm mute, rest the side of your picking hand lightly on the strings close to the bridge while you play. Do not push too hard. If the notes disappear completely, move your hand slightly closer to the bridge or reduce the pressure.
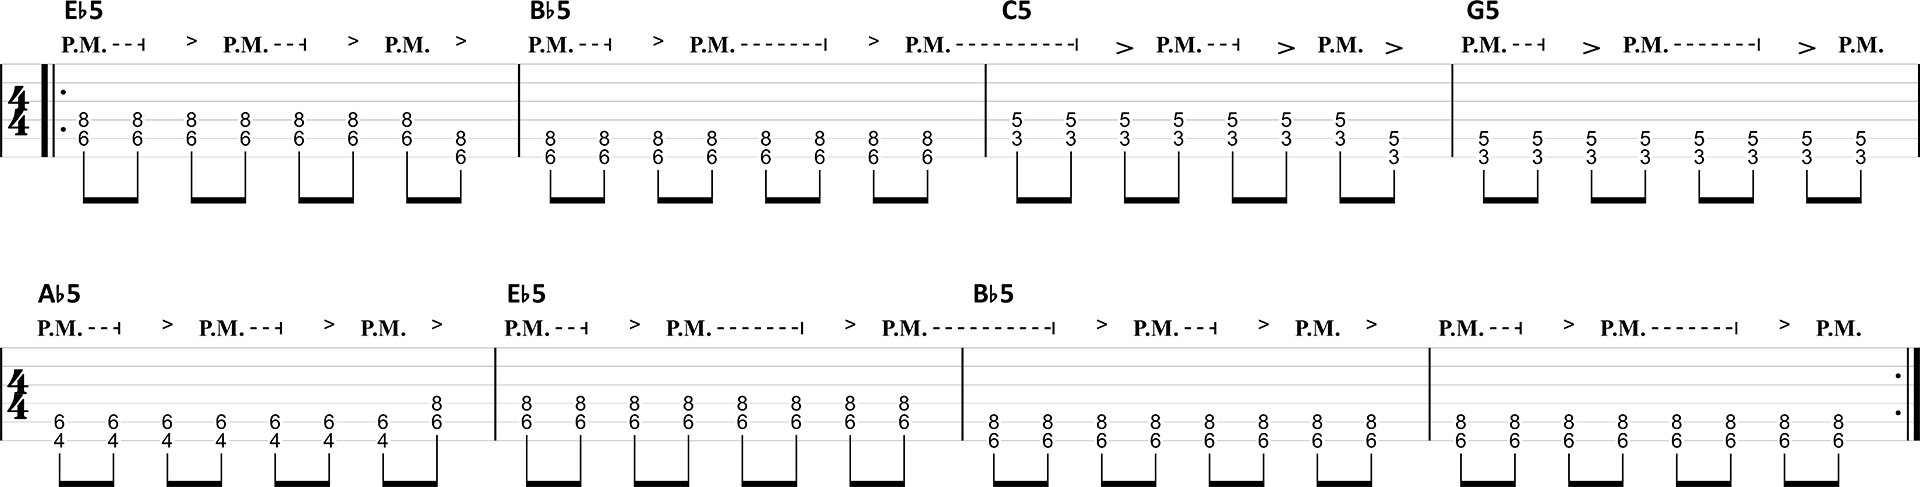
In TAB and guitar notation, palm muting is usually marked with P.M., short for palm mute. The marking shows exactly which notes should be palm muted. The left and right markers indicate where the palm-muted section starts and ends.

Start by playing the same power chord normally, then repeat it with a light palm mute. Alternate between both sounds until you can clearly hear and feel the difference.
Power Chord Exercises
The easiest way to get comfortable with power chords is to use them in real music. The examples below combine simple movable shapes, string changes, muting and rhythm in riffs and progressions you may already recognize.
1. Olivia Rodrigo – Brutal
Start with a modern example. Keep the power-chord shape compact and move both fingers together. Focus on clean changes and make sure unwanted strings stay quiet.

2. One Direction – One Way or Another
This is a good example of using straightforward power-chord movement in a recognizable pop-rock context. Keep the rhythm steady and avoid lifting your fingers farther away from the strings than necessary.
3. Post Malone – Better Now
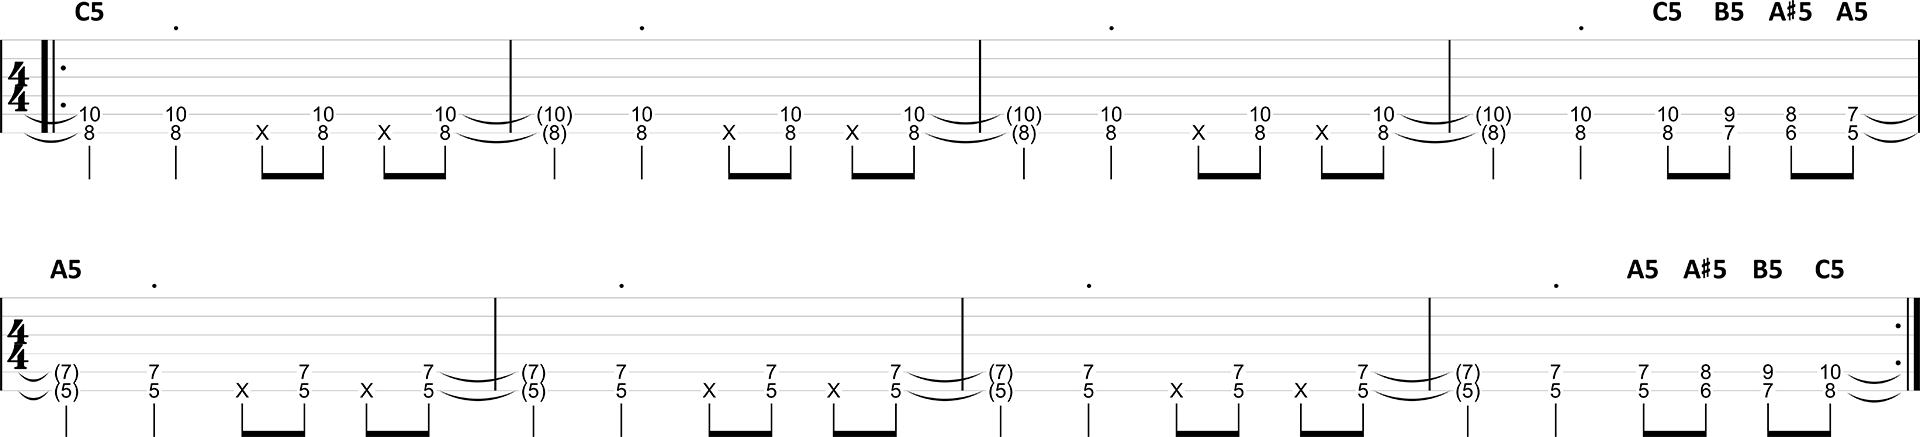
Here we can simplify the harmony into power chords. Use the root notes to find each position, then move the same basic shape around the neck instead of thinking of every chord as a completely new fingering.

4. Green Day – Basket Case
This example adds faster power-chord changes. Keep your fretting hand relaxed, move the complete shape as one unit and pay close attention to unwanted string noise as the tempo increases.
5. Blink-182 – All the Small Things
Use this example to practice palm-muted power chords. Keep your picking-hand palm lightly against the strings near the bridge so the notes become shorter and tighter without disappearing completely.

6. Adele – Rolling in the Deep
Power chords do not have to sound heavily distorted. Use this example to practice them with a cleaner sound and more space between the attacks. Let the chords ring clearly, keep the unused strings muted and focus on making every change sound controlled rather than aggressive.

