
How to Read Guitar Tabs: A Step-by-Step Guide for Beginners
Guitar tablature, commonly called guitar TAB, is one of the easiest ways to learn guitar riffs, melodies and songs without reading traditional sheet music. But to play TAB correctly, you first need to understand what the lines, numbers and symbols actually mean.
In this beginner-friendly lesson, you'll learn how to read guitar tabs step by step: how the six lines represent your guitar strings, how fret numbers work, how to read single notes, chords and riffs, and how timing affects what you play. You'll also discover common TAB symbols and practise reading real examples with simple guitar exercises.
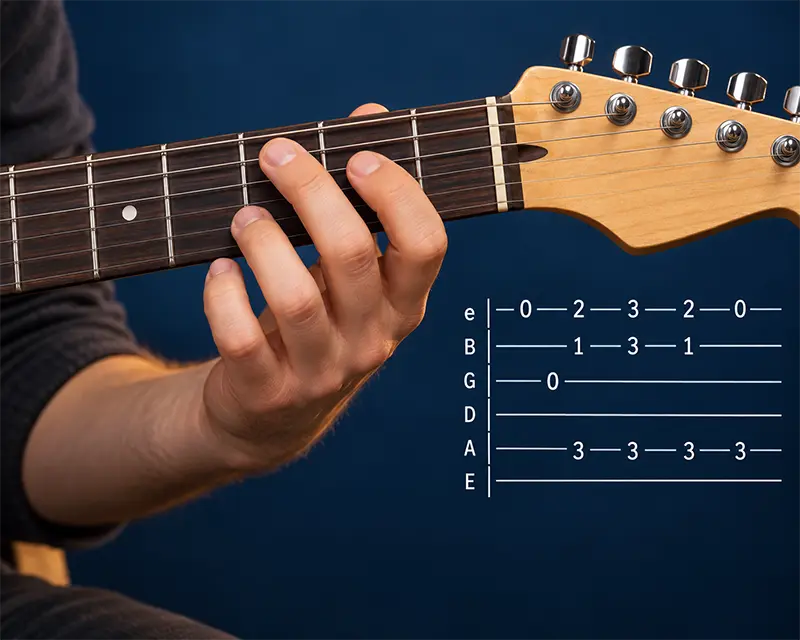
Guitar TAB vs. Sheet Music: Benefits, Limitations & Common Misconceptions
Guitar tablature has long been debated among guitar teachers and music educators. Some see it as a practical learning tool, while others believe it discourages students from learning traditional music notation. But is TAB really a shortcut that limits your musical development? Not necessarily. Guitar TAB and sheet music serve different purposes, and understanding both gives you a significant advantage.
Why Guitarists Use Tablature
Unlike many other instruments, the guitar allows you to play the same musical pitch in several positions on the fretboard. Traditional sheet music identifies the notes and their rhythmic values, but doesn't necessarily specify which string or fret to use. Guitar TAB provides that missing information, making it particularly useful for riffs, solos, technical exercises and passages where fingering, tone and fretboard position matter.
One Note, Multiple Positions: Why TAB Matters
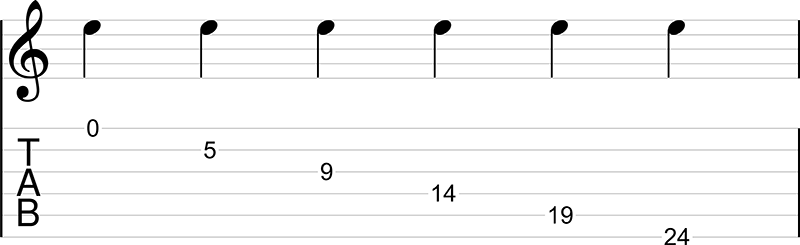
Consider the E4 note. On a standard-tuned guitar with 24 frets, you can play exactly the same sounding pitch in six different positions. The note itself doesn't change, but the string, fret, fingering and tonal character can. The example below demonstrates why tablature is such a valuable addition to traditional notation.
Why Do Some Music Schools Discourage Guitar TAB?
When I studied music, guitar tablature wasn't allowed in class. The concern was that students would rely on TAB instead of learning traditional notation. I understand that argument: reading sheet music develops essential skills in rhythm, pitch recognition and musical understanding. Relying exclusively on basic TAB can leave gaps in those areas.
There's another important limitation: TAB is primarily instrument-specific. If you hand a guitar TAB to the pianist in your band, they can't simply use it as conventional piano notation. Traditional sheet music provides a shared musical language for communicating with pianists, bassists, drummers and other musicians. But that doesn't make TAB useless or inferior. It simply serves a different purpose.
The Best of Both Worlds: Sheet Music + Guitar TAB
In my own teaching and music production work, I always prefer combining traditional notation with guitar TAB. Sheet music communicates pitches, rhythm and musical structure, while TAB identifies the strings and fret positions. Together, they provide a more complete picture of the music, help guitarists develop their playing skills and make arrangements easier to share with other musicians.
Now that you understand why guitar TAB is useful, let's explore how its six horizontal lines represent the strings of your guitar.
What Do the Numbers Mean in Guitar Tabs?
In guitar tablature, each number represents a fret on your guitar. The line tells you which string to play, and the number tells you where to play it. For example, a 3 on the high E string means the third fret of the thinnest string, while a 3 on the low E string means the third fret of the thickest string.
Open Strings and Fret Numbers
The number 0 means an open string: play the string without pressing down on a fret. Numbers such as 1, 3 or 5 indicate the corresponding fret positions, counted from the nut near the headstock. For a clean sound, place your fingertip just behind the fret wire rather than directly on top of it.
Example: Reading Fret Numbers in Guitar TAB
Here's a real guitar TAB example showing notes on the low E string (6th string). Follow the numbers from left to right.

Do TAB Numbers Represent Frets or Fingers?
TAB numbers represent frets, not fingers. A 3 means the third fret, not necessarily your third finger. Depending on the passage and your hand position, you may use different fingers to play the same fret. Unless additional fingering indications are provided, TAB doesn't specify which finger to use. Now that you understand strings and fret numbers, you're ready to combine them and read guitar TAB step by step.
For a complete explanation of finger numbering, see our lesson on Guitar Finger Numbers.
How to Read Guitar Tabs Step by Step
Now that you understand the six strings and fret numbers, let's put everything together. Guitar TAB is read from left to right. Each number identifies a fret, while its horizontal line tells you which string to play. Follow these four steps:
- Check Your Guitar Tuning. Make sure your guitar matches the tuning specified in the TAB. Most beginner examples use standard tuning: E–A–D–G–B–E.
- Identify the String. Locate the first number and identify its string. Remember that the bottom TAB line represents the thickest string, the low E.
- Find the Correct Fret. A 0 means an open string. Any other number indicates the fret position. Use the fretboard markers to find higher frets quickly.
- Play and Move to the Next Note. Play the first note, then continue from left to right. Switch strings whenever the next number appears on a different TAB line.
How to Find Frets Quickly Using Fretboard Dots
Finding the first few frets is straightforward, but what happens when you see fret 7, 9 or 11 in guitar TAB? You don't need to count every fret from the beginning of the neck.
Most guitars have fretboard position markers, commonly called fretboard dots. These are usually found at frets 3, 5, 7, 9 and 12, with additional markers further up the neck. Many guitars have two dots at the 12th fret. Some instruments use different inlay designs or have markers only on the side of the neck.
Use the position markers to navigate the fretboard without counting every fret.
For example, if TAB tells you to play the 7th fret, find the dot at fret 7. If you need the 8th fret, move one fret higher, towards the guitar body. And if you need the 11th fret, find the double-dot marker at fret 12 and move one fret back towards the headstock (12 − 1 = 11). That's much faster than counting eleven frets from the nut.
Example: Reading Guitar TAB Across Three Strings
Let's begin with eight notes across three strings. Start on the open low E string and play frets 1 and 3. Then move to the A string for frets 0, 2 and 3, and finish on the D string with frets 0 and 2.

Notice how the notes move from one string to another. You don't read each TAB line separately from beginning to end. Instead, follow the horizontal position of the numbers across all six TAB lines.
Practice Reading Guitar TAB Slowly
Play each note cleanly, concentrating on the correct string and fret. Don't worry about speed yet. Once the movements feel comfortable, use the Smart Click Metronome and try playing one note per beat. Remember that simple TAB doesn't always specify the exact rhythm, so this is just a practice pattern. You now know how to identify strings, locate frets and follow individual notes. Next, we'll explore how to read double stops, full chords and arpeggios in guitar TAB.
How to Read Chords in Guitar Tabs
Guitar TAB doesn't just show individual notes. It can also represent double stops, full chords and arpeggios. The difference is in how the fret numbers are arranged: vertically aligned numbers indicate notes played together, while numbers placed at successive horizontal positions are played one after another.
1. Double Stops: Two Notes Played Together
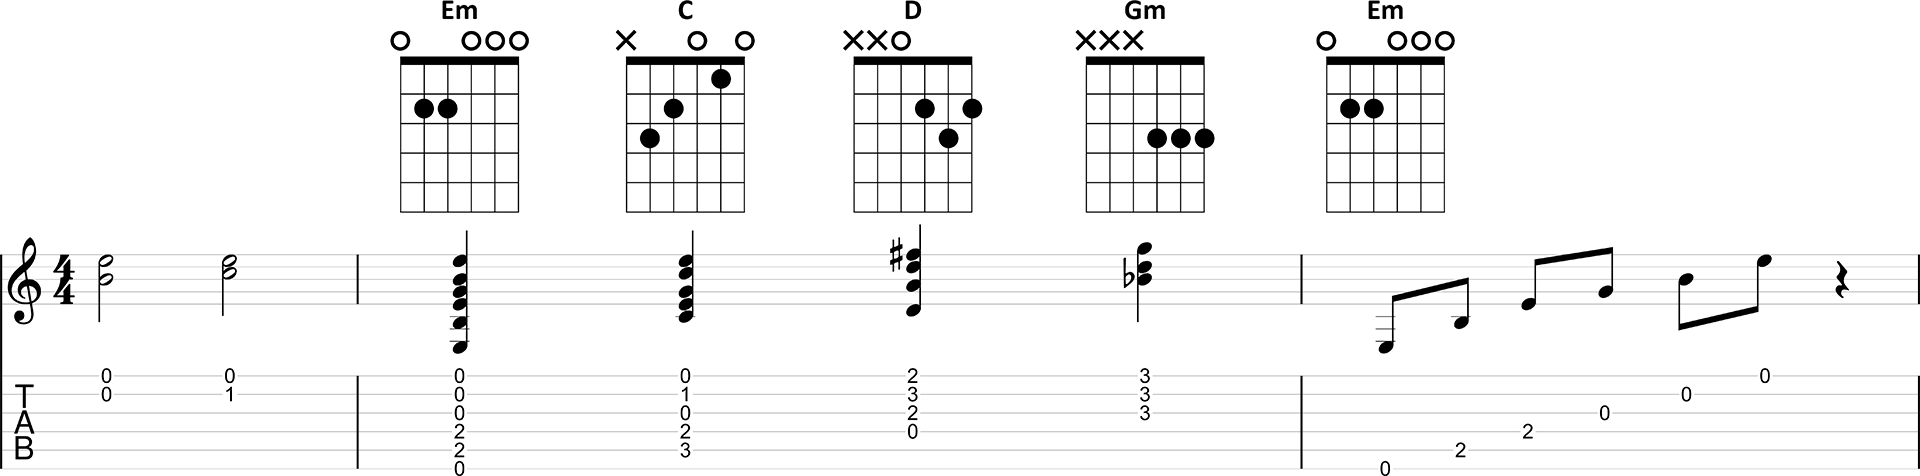
A double stop consists of two notes played simultaneously. In the first measure, the numbers are stacked vertically on the high E and B strings. First, play both strings open (0–0). Then play the open high E together with the first fret of the B string (0–1). Notice that the two notes are aligned vertically, not placed next to each other.
2. Full Chords: Multiple Notes at Once
The second measure shows four chord shapes: Em, C, D and Gm. Each vertical group of numbers represents a chord played as one musical event. The Em chord uses all six strings, C uses five strings, D uses four strings, and the Gm example uses the three highest strings. Read the groups from left to right to follow the chord changes.
You can also see chord diagrams above the traditional notation. These illustrate the chord shapes, while TAB shows the exact string and fret positions within the music. If a string has no fret number in a particular chord, don't play that string.
If you're not familiar with these chord shapes yet, start with our lesson on basic guitar chords before practising the TAB examples.
3. Arpeggios: Playing Chord Notes Separately
In the third measure, the E minor chord is played as an arpeggio. Instead of strumming all six strings together, play the notes individually: low E (0), A (2), D (2), G (0), B (0) and high E (0). The fret positions are exactly the same as in the open Em chord, but the numbers appear at successive horizontal positions. This tells you to play them one after another.
Once you understand how individual notes, double stops, chords and arpeggios are written, you can combine them into complete guitar riffs. That's what we'll explore next.
How to Read Guitar Riffs
A guitar riff is a short, recognisable musical phrase that often repeats throughout a song. Riffs can combine single notes, different strings, rhythmic patterns and playing techniques. Learning to read riffs in guitar TAB helps you understand how these elements work together.
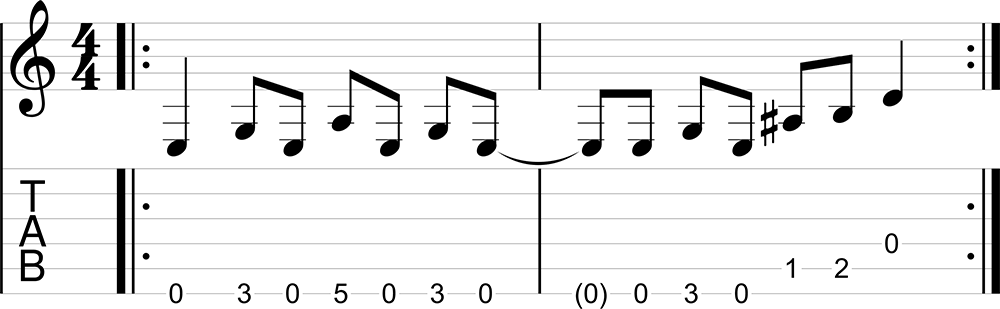
Let's examine a simple two-bar rock riff written in standard tuning. The example includes traditional sheet music above the TAB, so you can see both the musical rhythm and the exact fretboard positions.
Follow the Notes from Left to Right
Start with the first number on the bottom TAB line: 0 on the low E string. In the first measure, play the sequence 0–3–0–5–0–3–0 on that same string. Notice how the riff alternates between open-string notes and fretted notes. The traditional notation above the TAB shows the rhythm, including quarter notes and eighth notes.
Recognise String Changes in a Guitar Riff
In the second measure, the riff continues on the low E string before moving to the A string (5th string). The final three fretted positions are 0–2–1 on the A string. Remember to follow the numbers horizontally across all six TAB lines rather than reading each string separately.
Understanding Tied Notes and Repeat Signs
Notice the curved line connecting the last note of the first measure to the first note of the second. This is a tie: it connects two notes of the same pitch into one sustained sound. The (0) at the beginning of measure two is therefore not picked again. Hold the note for its combined duration.
You'll also see repeat signs at the beginning and end of the example. These tell you to return to the beginning and play the two-bar riff again. Unless otherwise indicated, the passage is played twice in total.
How to Practise Reading Guitar Riffs
Begin slowly and focus on playing the correct strings and frets. Practise the two measures separately before connecting them, paying special attention to the tied note and the change from the low E to the A string. Once the notes feel comfortable, practise with a steady beat using the Smart Click Metronome . Start at a comfortable tempo and gradually increase the speed without sacrificing accuracy or timing.
As you explore more guitar riffs, you'll encounter additional TAB symbols for techniques such as hammer-ons, pull-offs, slides, bends and palm muting. Let's look at the most common ones next.
Common Guitar TAB Symbols
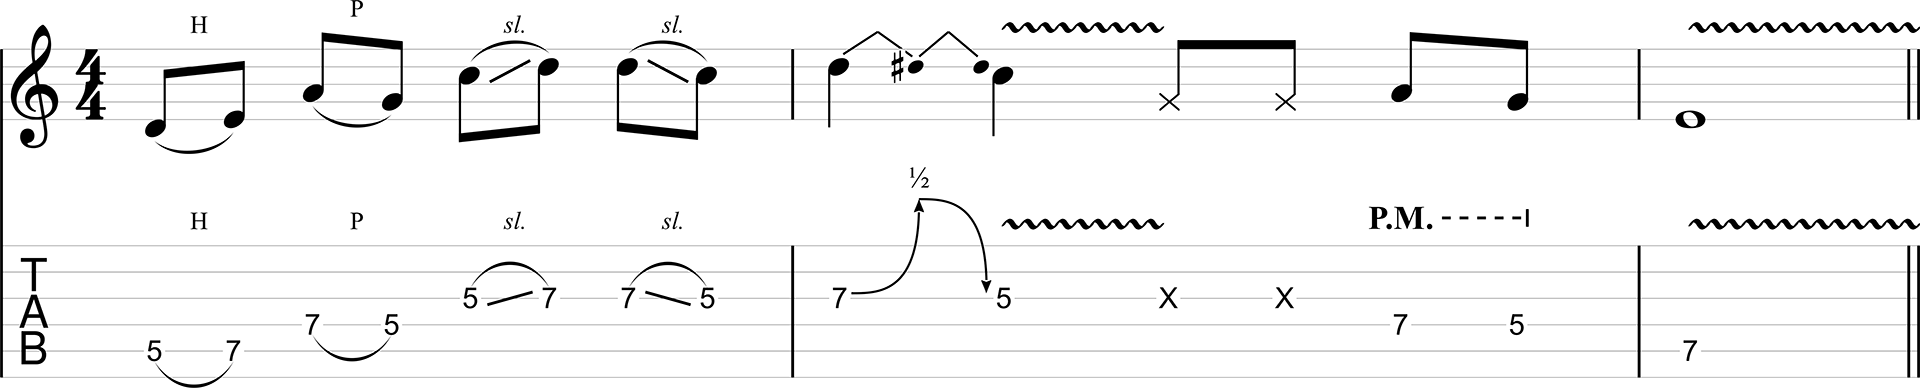
Besides strings and fret numbers, guitar TAB uses symbols to indicate playing techniques. Hammer-ons, pull-offs, slides, bends, vibrato and muting can all be represented with specific markings. These symbols explain how a note should be performed, not just where to play it.
The Guitar Pro example below demonstrates these techniques from left to right, combining traditional notation with TAB.
Understanding the Symbols in This Example
- Hammer-on: Play fret 5, then hammer onto fret 7 without picking the second note. The curved line connects both notes. In text-based TAB, this is often written as 5h7.
- Pull-off: Play fret 7, then pull off to fret 5 without picking again. The notes are connected by a curve. Text-based TAB may show 7p5.
- Slide up: Play fret 5 and slide your finger up to fret 7 without lifting it. The ascending diagonal line indicates the direction of the slide.
- Slide down: Play fret 7 and slide down to fret 5. The descending diagonal line indicates the movement towards the headstock.
- Bend and release: The upward arrow indicates a string bend: push or pull the string to raise its pitch. The ½ marking indicates a half-step bend. The downward arrow indicates the release, allowing the pitch to fall again.
- Vibrato: The wavy line following the bend-and-release passage indicates vibrato: repeated, controlled pitch variations that add expression to a sustained note.
- Muted notes (X): The two X markings represent two percussive, muted notes without a clearly defined pitch. These are often called dead notes.
- Palm muting (P.M.): The dashed line indicates which notes should be palm-muted. Lightly rest the side of your picking hand near the bridge while playing the notes.
- Vibrato: The final sustained note also has a wavy line, indicating that vibrato should be applied.
You don't need to master every technique immediately. For now, focus on recognising the symbols and understanding their purpose. We'll cover these techniques in greater detail in a separate guitar TAB symbols guide.
Next, let's explore something equally important: how to read rhythm and timing in guitar tablature.
Three Beginner Guitar TAB Exercises
Ready to test your guitar TAB reading skills? Let's practise with three recognisable rock songs: Psycho by Muse, Enter Sandman by Metallica and Run to You by Bryan Adams. Each example introduces a different aspect of reading guitar tablature, from single-note riffs and pull-off to string changes and arpeggios. Focus on reading the TAB correctly before worrying about speed.

Exercise 1: Psycho – Muse
Start with the first riff on the left. Follow the fret numbers from left to right and pay attention to the pull-offs. Play the fretted note, then pull off to the open string without picking again. The curved lines indicate the legato technique. The original song uses Drop D tuning, but you can practise reading and playing the TAB in standard tuning too. Just remember that it won't sound at exactly the same pitch as the original recording.
Exercise 2: Enter Sandman – Metallica
The middle example introduces notes across different strings. Identify the string and fret for each note, then follow the sequence from left to right. Remember that TAB is read horizontally, even when the notes move between different strings. Start slowly and concentrate on clean, accurate string changes.
Exercise 3: Run to You – Bryan Adams
The final example introduces an arpeggiated guitar pattern. Instead of strumming a chord, you pick individual strings in sequence. Notice the let ring instruction: this means you should allow the notes to keep ringing rather than stopping each string as soon as you play the next one. This creates the overlapping, sustained sound of the arpeggio.
In the original recording, the guitar uses a capo on the second fret. You don't need the capo just to practise reading the TAB, but use it if you want to match the original recording.
Reading TAB becomes easier with practice, especially when you learn to recognise the mistakes beginners commonly make. Let's look at those next.
