fb-pixel Skip to main content

Guitar Training Studio

Free Guitar Lesson · Chords Part 2

Open Guitar Chords – Part 2: 6th and 7th Chord Exercises

Already comfortable with the essential open guitar chords? It's time to expand your chord vocabulary. In this second lesson, you'll learn new chord shapes including Em7, Bm7, G6, C6 and D7, while improving your chord changes, finger control and playing accuracy.

Discover how 6th and 7th chords add new colors to your guitar playing. Combine these shapes with familiar chords such as A, F, Am and Em. With clear chord diagrams, guitar TAB, two practical open guitar chord exercises and three guided video workouts, you'll develop smoother transitions, better coordination and more confident chord playing.

Explore the Exercises →

Guitarist playing a Bm7 guitar chord with fingers positioned on the fretboard
Expand your chord vocabulary with Em7, Bm7, G6, C6 and D7, and learn to switch smoothly between different guitar chord shapes.
Quick Answer

What guitar chords will you learn in part 2?

In this second lesson on open guitar chords, you'll expand your chord vocabulary with Em7, Bm7, G6, C6 and D7. You'll discover how adding or changing a note creates a different chord sound. Then you'll combine these new shapes with familiar basic chords in two practical guitar chord exercises.

1. Explore new chord sounds

Learn how to play Em7, Bm7, G6, C6 and D7. Discover how 6th and 7th chords sound different from familiar major and minor chords.

2. Improve your chord changes

Pay attention to shared notes and fingers that can remain in place during chord changes. Avoid unnecessary movements and practice each transition slowly and accurately.

3. Practice two chord progressions

Combine the new chord shapes with A, F, Am and Em. Use the chord diagrams and guitar TAB to improve your finger placement, chord transitions and timing.

Remember: Knowing more chords doesn't automatically make you a better guitarist. What matters is playing new chord shapes cleanly, recognizing their sounds and switching between them smoothly. Focus on accuracy first, then gradually increase your playing speed.

Open guitar chord exercises: Em7, Bm7, G6, C6 and D7

In part 1 of our open guitar chords lessons, you learned the most important basic chord shapes. Now it's time to expand your chord vocabulary with Em7, Bm7, G6, C6 and D7. These chords give you more options for adding different harmonic colors to your guitar playing.

A 6th chord adds a sixth to the basic triad, while a 7th chord adds a seventh. These additional notes create different chord sounds commonly found in pop, rock, blues and jazz.

You don't need to master all the music theory behind these chords yet. Start by focusing on correct fingering, clean chord sounds and efficient chord changes. In the following exercises, you'll combine the new shapes with chords you already know.

Quick reminder: what do the triangles mean?

The black triangles between the chord diagrams indicate how many fingers can remain on the same string and fret during a chord change. The number 1 means one finger can stay in place, while 3 means three fingers can remain in position. Keep these anchor fingers in place and move only the fingers needed to form the next chord.

Exercise 1: Am, C6, D7 and Em

In the first open guitar chord exercise, you'll play the progression Am – C6 – Am – D7 – Am – Em. This combines the new C6 and D7 chord shapes with the familiar Am and Em minor chords.

Pay particular attention to the Am to C6 transition. You can keep three fingers in exactly the same position and simply add your pinky. When changing back to Am, remove your pinky again. This teaches you to make smoother chord changes with minimal finger movement.
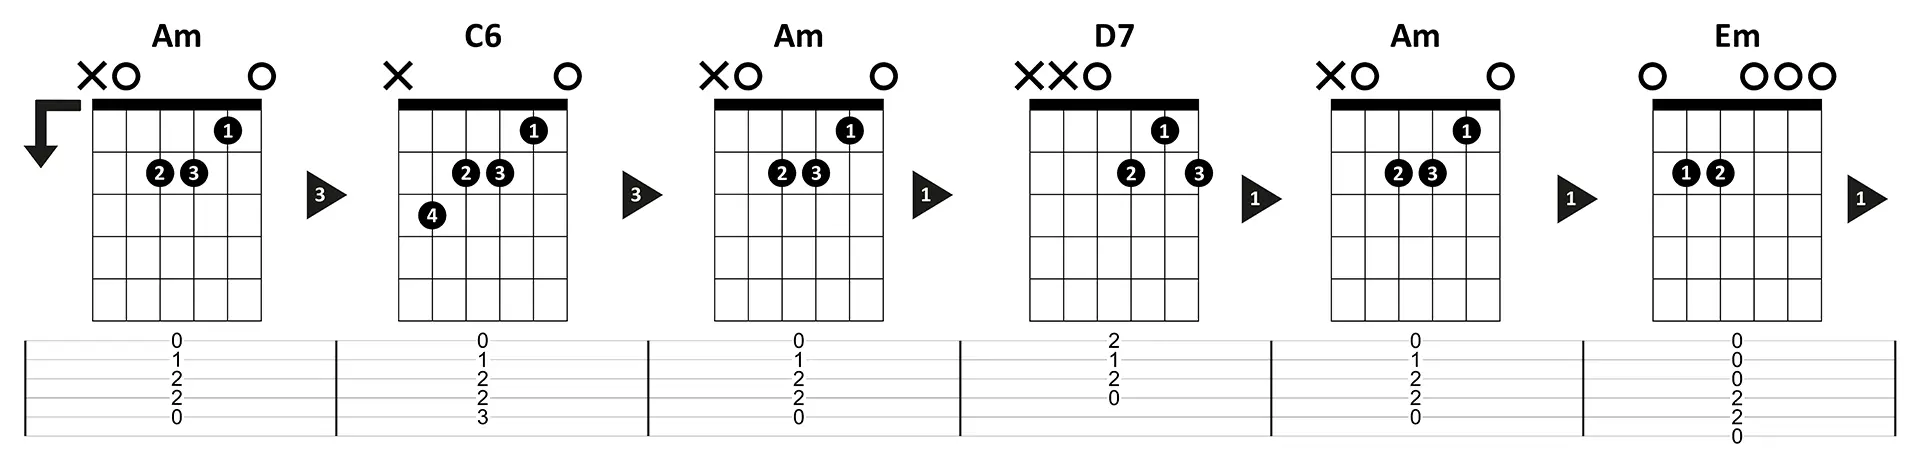
Guitar chord diagrams and TAB for Am, C6, Am, D7, Am and Em with anchor finger indicators

← Swipe horizontally to view all chord diagrams →

Exercise 1: Am – C6 – Am – D7 – Am – Em. Use common finger positions to practice smoother and more efficient chord changes.

Exercise 2: Em7, Bm7, G6, A and F

The second chord progression is Em7 – Bm7 – G6 – Bm7 – A – F. You'll combine three new chord shapes with the familiar A and F chords.

Focus especially on the transition from Bm7 to G6 and back again. The triangles show which fingers can serve as anchors. Try to move the remaining fingers as efficiently as possible, without creating unnecessary tension in your fretting hand.
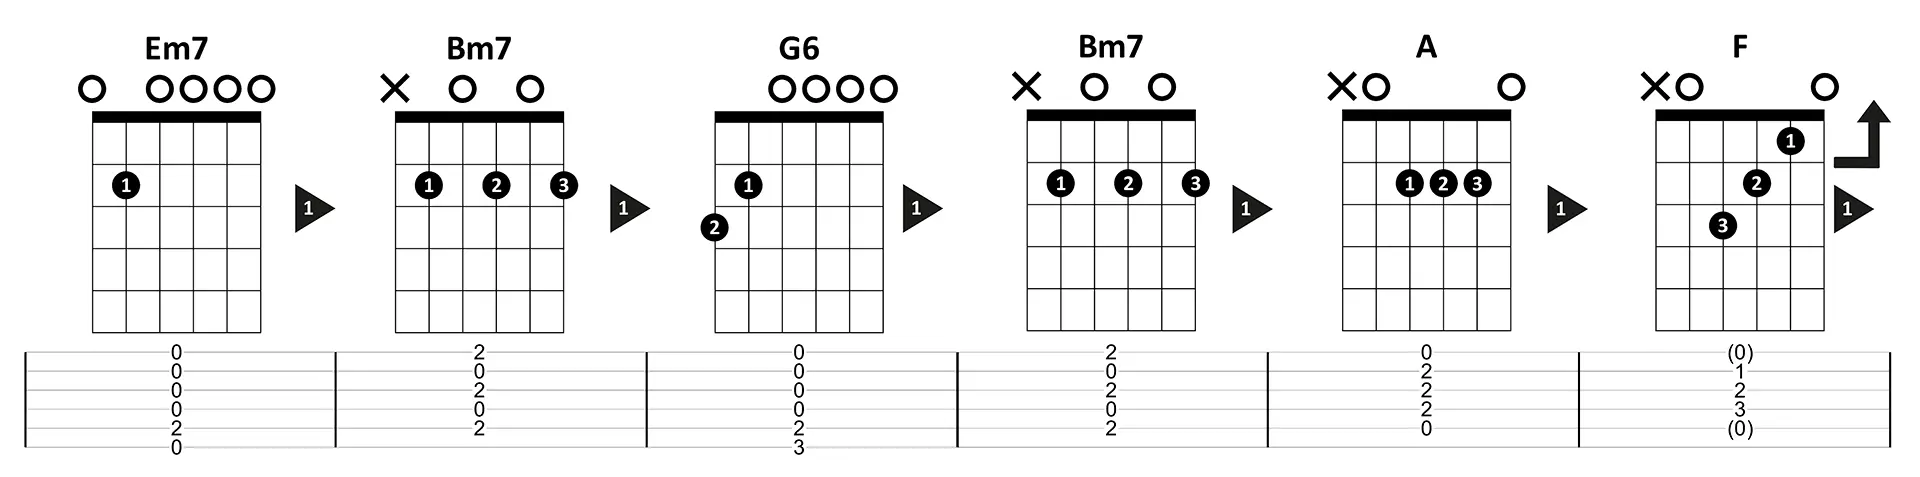
Guitar chord diagrams and TAB for Em7, Bm7, G6, Bm7, A and F with finger positions and anchor finger indicators

← Swipe horizontally to view all chord diagrams →

Exercise 2: Em7 – Bm7 – G6 – Bm7 – A – F. Pay attention to your anchor fingers and practice each transition slowly and accurately.

Note about the F chord: this exercise uses a simplified F chord shape without a barre. The open strings shown in parentheses in the TAB are optional. If you include the open high E string, the chord produces an Fmaj7 sound.

How to practice new guitar chord shapes efficiently

  • Learn each new chord shape separately. Play Em7, Bm7, G6, C6 and D7 individually and make sure every intended string rings out clearly.
  • Use anchor fingers. Identify which fingers can remain in place during a chord change. Avoid lifting them unnecessarily.
  • Isolate difficult chord changes. Practice switching between Bm7 and G6 or Am and C6 several times before playing the complete chord progression.
  • Minimize unnecessary movement. Keep your fingers close to the strings and avoid unnecessary tension in your hand and wrist.
  • Focus on timing. Play the chords slowly at first. Increase the tempo only when your chord changes become smooth and every chord rings clearly.

Want to improve your chord changes even further? Practice these progressions with the Smart Click online metronome to develop more consistent timing and smoother transitions.

Your goal for part 2: play both chord progressions with correct finger placement and a clean, clear sound. Use anchor fingers to avoid unnecessary movement, then work toward playing the complete exercises with steady timing and smooth chord changes.

Open guitar chord workouts – Part 2

Now that you've learned the new chord shapes Em7, Bm7, G6, C6 and D7, it's time to put them into practice. With these three GuitarWorkout.club videos, you'll develop better finger control, smoother chord changes and more consistent timing.

The first two workouts are 5 minutes each. Then you'll combine both chord sequences in a longer 10-minute combo workout. The chord order is deliberately designed to train efficient finger movement and the use of anchor fingers.

Just like in Part 1, we'll use the Hold & Change method. You start by holding each chord briefly, giving yourself plenty of time to prepare the next chord. In each successive phase, you'll let the chord ring longer, gradually reducing the time available for changing chords.

How does the Hold & Change method work?

The exercises use a 4/4 time signature at 60 BPM. That means four beats per measure, with one beat every second.

Strum each chord on beat 1 and let it ring for a specific number of beats. Use the remaining beats to move your fingers into position for the next chord.

1 beat Hold the chord. 3 beats to change.
2 beats Hold the chord. 2 beats to change.
3 beats Hold the chord. 1 beat to change.
Maximum Hold as long as possible. Change as late as possible.

During the final phase, try to let each chord ring for almost four beats. Leave just enough time to prepare the next chord and strum it precisely on beat 1 of the following measure.

The most important rule: use your anchor fingers, eliminate unnecessary movement and stay in time. If you make a mistake, don't stop. Keep playing and focus on the next chord change.

Workout 4 of 10 · Part 3 · 5 minutes

Open Chords 1.1.4 – Part 3

We'll start with the chords from Exercise 1. You'll play Am, C6, D7 and Em in a fixed sequence. The transition between Am and C6 is particularly useful: three fingers can remain in position while you simply add or remove your pinky.

||: Am | C6 | Am | D7 | Am | Em :||

Play along with the video and follow the complete progression. Pay attention to which fingers can stay in position during each chord change. Try to let every chord ring progressively longer without losing your timing.

Practice goal: play all six chord positions in the correct order. Focus on the shared finger positions between Am and C6, and aim to perform every chord change smoothly, accurately and on time.

Workout 5 of 10 · Part 4 · 5 minutes

Open Chords 1.1.5 – Part 4

In the second workout, you'll practice the new Em7, Bm7 and G6 chord shapes alongside the A chord. This sequence requires greater control over finger placement and transitions between different chord shapes.

||: Em7 | Bm7 | G6 | Bm7 | A | Bm7 :||

Focus especially on changing from Bm7 to G6 and back again. Identify which fingers can remain in place and move the others as efficiently as possible.

Note: the chord diagrams in Exercise 2 end on F, while this individual video workout ends on Bm7. Follow the chord progression shown above when playing along with this video.

Practice goal: play the entire chord sequence without unnecessary finger movements. Use your anchor fingers, keep your fretting hand relaxed and aim to strum each new chord precisely on beat 1, even during more challenging transitions.

Workout 6 of 10 · Combo 2 · 10 minutes

Open Chords 1.1.6 – Combo 2

Ready for the full challenge? In this 10-minute combo workout, you'll combine the chord sequences from the previous two exercises. This trains not only your chord knowledge, but also your concentration, finger coordination and endurance.

||: Am | C6 | Am | D7 | Am | Em | Em7 | Bm7 | G6 | Bm7 | A | F :||

In this combo, the second chord sequence ends on F, as shown in the guitar TAB. This also lets you practice the transition from F back to Am when the complete progression begins again.

You'll work through all four phases of the Hold & Change method again, this time with twelve consecutive chord positions. Let each chord ring for as long as possible and keep your hands relaxed, even as the available changing time becomes shorter.

The challenge: play the complete chord progression from beginning to end without stopping. If you make a mistake, keep following the beat. Your goal is to perform every chord change with control and arrive at the next chord precisely on time.

Want more guitar workouts?

These three videos are part of a 10-workout training series focused on open guitar chords. Every two individual chord workouts are followed by a combo workout. Workout 10 combines the entire training sequence into one longer final session.

At GuitarWorkout.club, you'll find more structured workouts for chord changes, technique and timing. Pro members can access the accompanying TAB, PDF and Guitar Pro files through Patreon.

Explore more workouts on Patreon →

When have you mastered these chord workouts?

You've built a solid foundation when you can:

  • Play all five new chord shapes, Em7, Bm7, G6, C6 and D7, independently and cleanly.
  • Follow the chord progressions from Part 3 and Part 4 without constantly looking at the diagrams.
  • Strum the correct chord precisely on beat 1 at 60 BPM.
  • Use anchor fingers to minimize unnecessary movement during chord changes.
  • Let each chord ring progressively longer without losing the timing of the next chord change.
  • Play the complete 10-minute Combo 2 workout without interruptions.

Not quite there yet? Repeat Part 3 and Part 4 individually. Focus on the most difficult chord transitions and return to the full combo once the shorter workouts feel comfortable.

What's the next step?

These workouts develop a combination of chord knowledge, finger coordination, efficient movement and timing. Once you're comfortable with the new chord shapes, you can start using them in different strumming patterns and complete songs.

For more guidance, check out our lesson on right-hand picking and strumming technique . To improve the timing of your chord changes, practice with the Smart Click metronome .

Listen to famous songs with 6th and 7th guitar chords

Now that you've practiced Em7, Bm7, G6, C6 and D7, it's time to recognize these chord sounds in real music. Extended chords can add warmth, tension and harmonic color to familiar chord progressions.

Listen to these seven songs and pay attention to how 6th and 7th chords connect with regular major and minor chords. You may also encounter other chord variations, such as Cmaj7.

Sweet Caroline

Neil Diamond

|| G | G6 | D7 | C | D ||

Pre-chorus – around 0:43 – Capo: 4th fret

Jingle Bell Rock

Bobby Helms

|| C Cmaj7 | C6 C ||

Verse – around 0:08

APT.

ROSÉ & Bruno Mars

|| G | A | Bm7 | D ||

Pre-chorus – around 0:31 – Capo: 1st fret

Summer of '69

Bryan Adams

|| Bm7 | A | D | G ||

Pre-chorus – around 0:30

Hey Jude

The Beatles

|| G | Em7 | A | D | D7 ||

Bridge – around 0:54 – Capo: 3rd fret

Kiss Me

Sixpence None the Richer

|| Em A | D Bm7 | Em A | D D7 ||

Chorus – around 0:39 – Capo: 1st fret

Listening tip: These chord progressions are listening and practice examples, not complete song transcriptions. Some recordings use a capo or transposed chord shapes, so the original pitch may differ from what you play. Start by listening for the harmonic movement and the distinctive sounds of the 6th and 7th chords.

Common mistakes when practicing new open guitar chords

In Part 2, you'll work with new chord shapes such as Em7, Bm7, G6, C6 and D7. The challenge isn't just learning how to play these chords correctly, but also switching efficiently between different finger positions. Here are eight common guitar chord mistakes that can slow your progress and how to avoid them.

1. Lifting every finger during chord changes

Many guitarists automatically lift all their fingers off the fretboard when switching to the next chord. This creates unnecessary movement and wastes valuable time. Use anchor fingers indicated by the black triangles between the chord diagrams. Keep fingers that can remain on the same string and fret in position, and move only the fingers that need to change.

2. Building new chord shapes one finger at a time

When learning a new chord, you might place your first finger, then your second, followed by the remaining fingers. This is normal when you're first learning the shape, but it slows down chord changes. Train your fingers to move into position together whenever possible. Practice the transition from Bm7 to G6 slowly until the movement becomes more natural and automatic.

3. Unnecessary finger movement between Am and C6

The transition from Am to C6 is an excellent example of an efficient chord change. You can keep three fingers in exactly the same position and simply add your pinky. However, many beginners lift the entire chord shape. Keep your existing fingers in position and move only your pinky. When returning to Am, simply remove it again.

4. Misunderstanding the numbers in chord names

The numbers in chords such as Em7, G6 and D7 are not fret numbers or finger numbers. They refer to the musical structure of the chord. A 6th chord contains an added sixth, while a 7th chord includes a seventh. Learn to connect each chord name with its corresponding shape so you can recognize different chord types more quickly.

5. Strumming the wrong or unintended strings

Not every chord shape uses the same strings. For example, with Bm7, Am and C6, you normally avoid the low E string. With D7, you generally play only the highest four strings. Check the X and O symbols above the chord diagrams. Then pick each intended string individually to make sure every note rings out clearly.

6. Changing chords too early during Hold & Change

As soon as you know which chord comes next, you may feel tempted to move your fingers immediately. This cuts the previous chord short and creates unnecessary gaps in the music. The Hold & Change method teaches you to let each chord ring progressively longer. Use the available changing time as efficiently as possible and make sure the next chord is ready precisely on beat 1.

7. Stopping whenever you make a mistake

During a video workout, you might occasionally miss a chord change. Many guitarists immediately stop to correct their fingering. Unfortunately, this interrupts their timing and rhythmic flow. Keep playing in time, even when you make a mistake. Recover on the next chord change and continue following the beat. Practice difficult transitions separately after the workout.

8. Using too much tension during difficult chord changes

New chord shapes sometimes require greater finger control. As a result, you might press harder than necessary or tense your entire hand. This slows down your movements and reduces accuracy. Use only as much pressure as necessary and keep your fingers close to the strings. Start slowly, relax your hand between exercises and never force a movement that causes pain.

Remember: when learning new open guitar chords, progress depends primarily on accuracy, anchor fingers, minimal movement and consistent timing. Practice difficult chord transitions separately before using the Hold & Change workouts to make your movements smoother and more automatic. Let each chord ring for as long as possible and always stay in time.

Practice your guitar chords with our music tools

Accurate tuning and consistent timing are essential when practicing new guitar chord shapes and chord changes. With these Guitar Training Studio tools, you can tune your guitar, improve chord transitions with a metronome, and find the tempo of your favorite songs.

Recommended for this lesson

Smart Click

Practice your new guitar chord progressions with an accurate online metronome. Set Smart Click to 60 BPM and train your Hold & Change technique. Learn to let each chord ring for as long as possible and switch precisely on beat 1 of the next measure.

Open Smart Click →

Tune your guitar

PITCHR

Your guitar chords will only sound right when your guitar is properly tuned. Use PITCHR to tune all six strings accurately. You can also check individual notes when a chord sounds out of tune, for example when pressing too hard or accidentally pulling a string sideways.

Open PITCHR →

Find the tempo of songs

Tap Tempo

Want to use your new chords to play along with your favorite songs? Tap along with the beat to find the tempo in BPM. Then use that value in Smart Click to practice chord progressions at the appropriate tempo.

Open Tap Tempo →

Frequently asked questions about open guitar chords – part 2

What new guitar chords will you learn in part 2?

In this follow-up lesson, you'll learn Em7, Bm7, G6, C6 and D7. You'll combine these new chord shapes with familiar basic chords such as Am, Em, A and F. This helps you expand your chord vocabulary and become comfortable with different chord sounds and finger positions. If you haven't mastered the basic chords yet, start with open guitar chords for beginners .

What do the numbers 6 and 7 mean in guitar chords?

These numbers refer to the musical structure of a chord. In G6 and C6, a major sixth is added to the major triad. In Em7 and Bm7, a minor seventh is added to the minor triad. D7 is a dominant seventh chord: a major triad with an added minor seventh. These additional notes give each chord a different sound.

What do the triangles between the chord diagrams mean?

The triangles help you make more efficient guitar chord changes. A black triangle indicates that at least one finger can remain on the same string and fret during a chord change. The number shows how many fingers can stay in place. A white triangle means there are no shared finger positions between the two chord shapes. Use fingers that can remain in position as anchor points to avoid unnecessary movement.

How can you switch faster between Am and C6?

With the chord shapes used in this lesson, you can keep three fingers in exactly the same position when changing from Am to C6. Simply add your pinky to complete the C6 chord. When returning to Am, remove your pinky again. By practicing this movement slowly and repeatedly, you'll develop smoother and more efficient guitar chord changes.

Why does the Em7 and Bm7 workout end on Bm7, while the combo ends on F?

The individual Open Chords 1.1.5 workout uses the chord progression Em7 – Bm7 – G6 – Bm7 – A – Bm7. In the Combo 2 workout, the final Bm7 is replaced by F, as shown in the guitar TAB. This also lets you practice the transition from F back to Am when the complete combo progression starts again. Always follow the chord sequence shown for the corresponding video.

How does the Hold & Change method work with these chords?

The Hold & Change method uses a tempo of 60 BPM in 4/4 time. Each workout has four phases. First, you hold the chord for one beat and use the remaining three beats to change to the next chord. Next, you hold the chord for two beats, then three beats, and finally almost four beats. This gradually reduces the time available for chord changes. The goal is to let each chord ring for as long as possible while playing the next chord precisely on beat 1.

What is the best way to practice these new guitar chords?

Start by learning each new chord shape separately and make sure all the intended strings ring out clearly. Then isolate difficult transitions such as Am–C6 and Bm7–G6. Use anchor fingers and keep your fretting hand relaxed. Next, play along with Open Chords 1.1.4 and 1.1.5, each lasting five minutes. Once you can play both workouts smoothly, combine everything in the 10-minute Open Chords 1.1.6 – Combo 2. Keep playing in time, even if you make a mistake.

Wouter Baustein - Guitar Coach

Guitar Training Studio

Ready to Make Real Progress on Guitar?

Build better technique, timing and musicianship with structured guitar training, practical tools and personal coaching.