fb-pixel Skip to main content

Guitar Training Studio

Free Guitar Lesson · Beginner Chords

Open Guitar Chords for Beginners: Learn the Essential Chords

With just a handful of guitar chords, you can play thousands of songs. In this free guitar lesson, you'll learn essential open guitar chords, proper finger placement, and the techniques you need to make every note ring clearly.

Discover how to read guitar chord diagrams, position your fingers correctly, and play essential open chords such as Em, Am, C, G, D, and A. With clear diagrams, step-by-step exercises, and simple chord progressions, you'll build a solid foundation for playing your first songs.

Explore the Exercises →
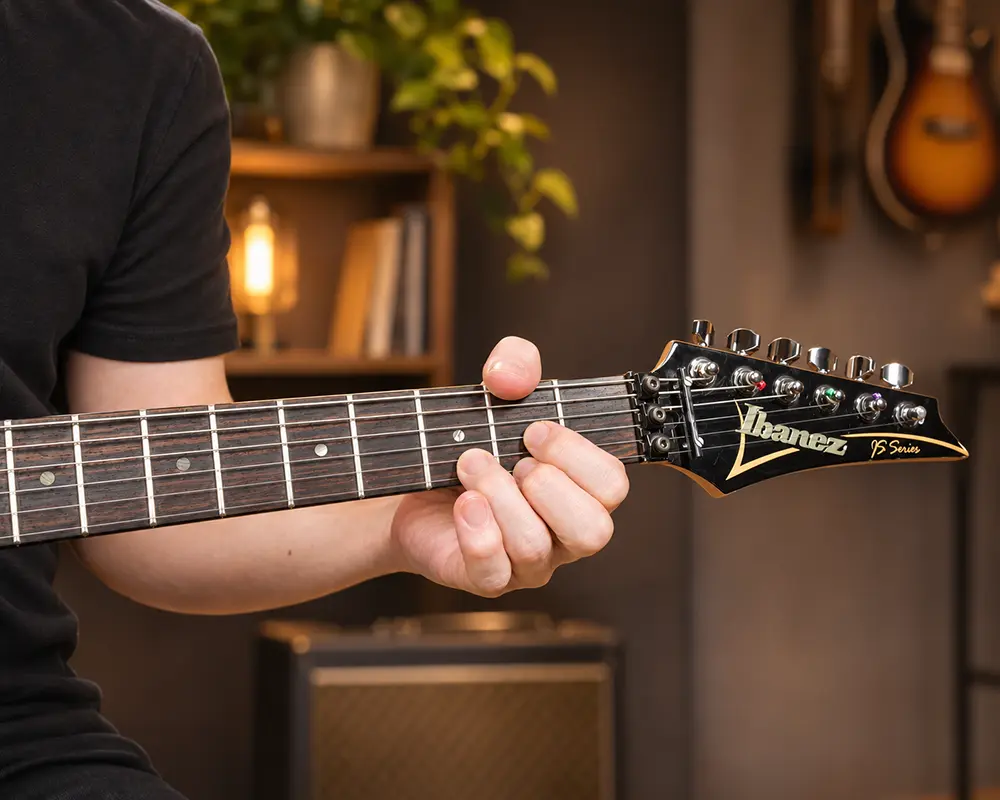
Guitarist demonstrating an open guitar chord with proper finger placement on an electric guitar
Learn essential open guitar chords with proper finger placement and a clear, ringing sound.
Quick Answer

What Are Open Guitar Chords and How Do You Play Them?

Open guitar chords are chords that include one or more open strings, which ring out without being pressed down on the fretboard. They form the foundation of thousands of popular songs. If you're just starting out, you can learn to accompany your first songs with a few essential chords, such as Em, Am, C, G, D, and A.

1. Learn to Read Chord Diagrams

A guitar chord diagram shows which strings and frets to use. The dots indicate where to place your fingers, an O represents an open string, and an X means you should avoid playing that string.

2. Position Your Fingers Correctly

Press the strings just behind the frets, using only as much pressure as needed. Make sure each string rings clearly without accidentally muting neighboring strings.

3. Practice Simple Open Chords

Start with Em and Am, then gradually add C, G, D, and A. Focus on making each chord sound clean and clear before practicing simple chord progressions.

Remember: You don't need to memorize hundreds of guitar chords. With a handful of essential open chords, proper finger placement, and consistent practice, you'll build a solid foundation for playing thousands of songs.

How Do Guitar Chords Work?

A guitar chord consists of several notes played together. When you strum multiple strings at the same time, you create harmony. Chords are the foundation of most popular music and are commonly used to accompany melodies and vocals.

The good news? You don't need to memorize hundreds of chord shapes. With just a handful of basic open guitar chords, you can already play thousands of songs.

Guitar Chord Names and Root Notes

Guitar chords are named using the letters A, B, C, D, E, F, and G. Each letter represents the root note on which the chord is built.

Example: In an Am chord, A is the root note. The lowercase m stands for minor. Without the lowercase m, the chord is understood to be major. For example, A is A major, while Am is A minor.

Throughout this lesson, we'll use standard international chord notation. You'll find the same system in modern music books, guitar lessons, chord charts, and online tutorials.

How to Read Guitar Chord Diagrams

A guitar chord diagram is a visual representation of the guitar fretboard. It shows exactly where to place your fingers to play a chord. Imagine looking directly at the front of the guitar neck, with the headstock pointing upward.

  • Vertical lines: Represent the six guitar strings, from the thick low E string on the left to the thin high E string on the right.
  • Horizontal lines: Represent the frets on the guitar neck.
  • Black dots: Show where to press the strings against the fretboard.
  • Finger numbers: 1 = index finger, 2 = middle finger, 3 = ring finger, 4 = pinky, and T = thumb.
  • O above a string: Play the string open, without pressing it down.
  • X above a string: Do not play that string, or mute it to prevent it from ringing.
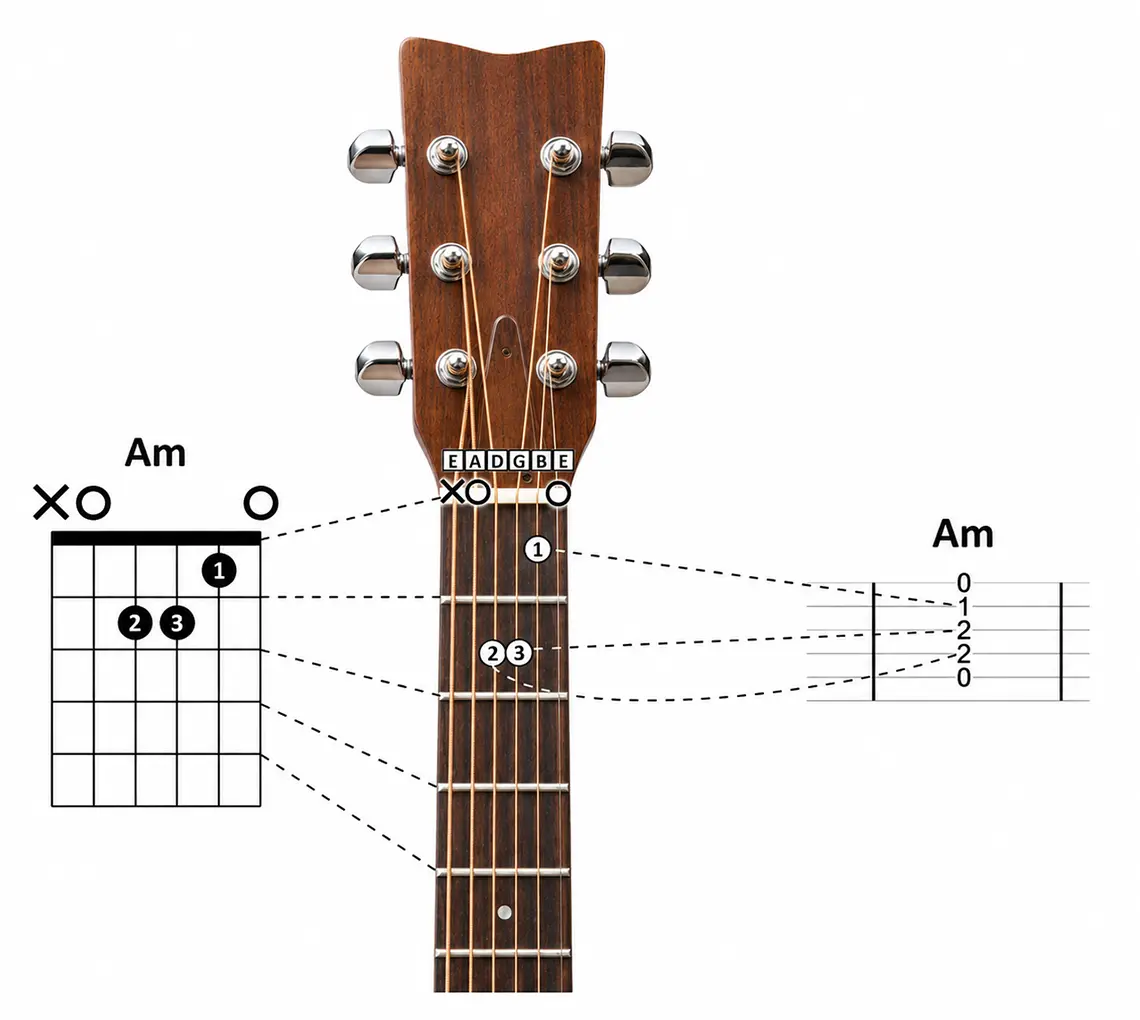
A minor guitar chord diagram showing finger positions, fretboard placement, and guitar TAB
The A minor (Am) chord: how the chord diagram, finger placement on the fretboard, and guitar TAB relate to each other.

Once you understand these basic symbols, you can read almost any guitar chord diagram. You don't need to know how to read traditional sheet music. If you'd also like to learn riffs and melodies, guitar tablature (TAB) is a useful next step. Explore more playing techniques in our free guitar lessons .

Learn Your First Essential Open Guitar Chords

Let's start with eight essential guitar chords: C, D, Dm, Em, F, G, A, and Am. These basic chord shapes will help you play and accompany a wide variety of popular songs.

An open guitar chord includes at least one open string that rings out without being fretted. Most open chord shapes are played near the nut, making them an excellent starting point for beginners. The simplified F chord used in this lesson is a practical addition to these shapes.

In the following exercises, we'll use chord diagrams from Chord Mastery. Practice each shape slowly and make sure every intended string rings clearly before moving on to the next chord.

What Do the Triangles Between the Chords Mean?

You'll notice small triangles between the chord diagrams. These show how efficiently you can move from one chord shape to the next by keeping certain fingers in place.

  • ▶ Black triangle: At least one finger can stay on the same string and fret when changing to the next chord. This is called an anchor finger.
  • Number inside the triangle: Shows how many fingers can remain in place during the chord change. For example, 2 means that two fingers can stay on their original strings and frets.
  • ▷ White triangle: No fingers remain in the same position. You'll need to move all your fingers to form the next chord.

Why does this matter? The less unnecessary movement you make, the easier and faster your chord changes will become. Instead of focusing only on individual chord shapes, pay attention to the triangles and look for opportunities to keep your fingers in place.

Chord Exercise 1: C, F, Am, and Em

Start by playing the chord progression C – F – C, followed by Am – C – Em. Use the fingerings shown in the chord diagrams.

Pay close attention to the black triangles between the chords. Whenever a finger can remain on the same string and fret, avoid lifting it unnecessarily. Take your time and focus on clean, accurate chord changes.
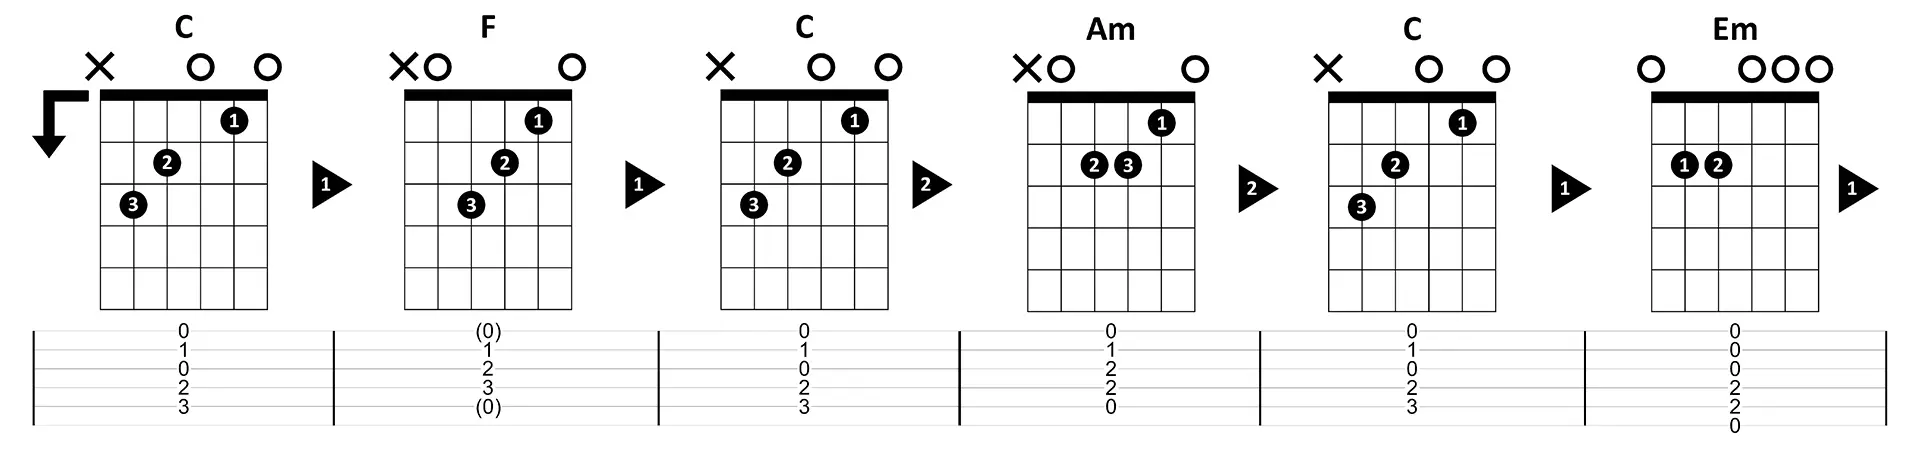
Guitar chord diagrams and TAB for C, F, Am, and Em showing anchor fingers and chord transitions

← Swipe horizontally to view all chord diagrams →

Chord exercise 1: C–F–C and Am–C–Em. The triangles show how many fingers can remain in place during each chord change.

Important note about the F chord: In this exercise, we're using a simplified F chord shape without a barre. The strings shown in parentheses in the TAB are optional. If you also play the open high E string, the chord becomes Fmaj7 (F major seventh).

Chord Exercise 2: G, D, Dm, F, and A

In the second exercise, you'll play G – D – Dm and F – A – F. These chord progressions introduce additional finger positions and help you recognize the difference between major and minor chords.

Again, use the triangles to identify which fingers can remain in place. Try to form each new chord in one smooth, controlled movement without shifting your hand more than necessary.
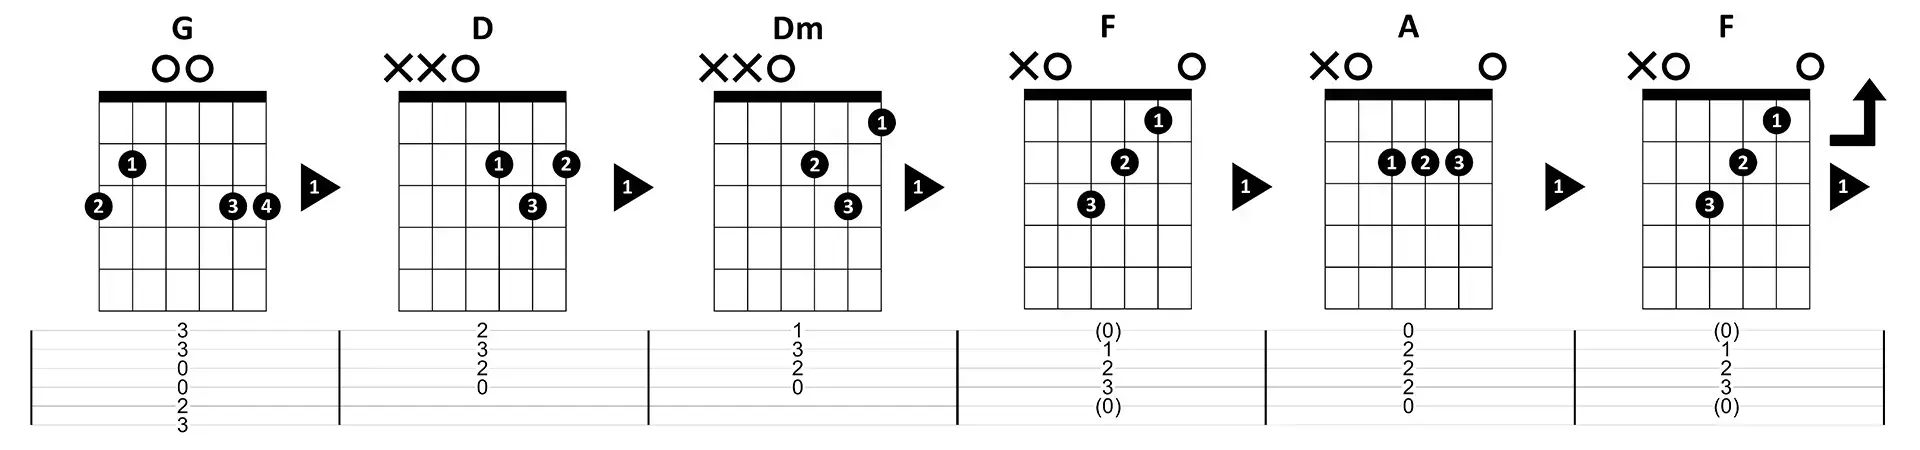
Guitar chord diagrams and TAB for G, D, Dm, F, and A with anchor finger indicators

← Swipe horizontally to view all chord diagrams →

Chord exercise 2: G–D–Dm and F–A–F. Compare the fingerings and minimize unnecessary finger movements between chords.

How to Play Open Guitar Chords Cleanly

  • Place your fingers just behind the frets. This reduces the pressure needed and helps prevent buzzing strings.
  • Use only as much pressure as necessary. Press firmly enough to produce a clear note without squeezing the guitar neck too hard.
  • Check each string individually. Pick the strings of each chord one at a time and listen carefully. Every intended note should ring clearly.
  • Pay attention to the X and O symbols. Avoid strumming strings that aren't part of the chord and let the indicated open strings ring.
  • Practice slowly and accurately. Playing clean chords matters more than how quickly you can move your fingers.

Struggling with finger placement or accidentally muting strings? Review our guide to proper left-hand guitar technique before continuing.

Your first goal: Play every chord shape from both exercises with a clean, ringing sound. Check each string individually and keep the indicated anchor fingers in place during chord changes. Focus on accuracy and relaxed movements before working on speed.

Once you can play these open guitar chords cleanly on their own, you're ready for the next step: learning to switch between chords smoothly and in time. Start with slow transitions, minimize unnecessary finger movements, and gradually build your speed without sacrificing sound quality.

Open Guitar Chord Exercises: Three Video Workouts at 60 BPM

Now that you've learned the essential open guitar chord shapes, it's time to put them into practice. These three Guitar Workout Club videos help you improve your finger placement, timing, and ability to switch between chords efficiently.

Each workout uses the Hold & Change method. The goal isn't to switch chords as quickly as possible. Instead, you'll learn to let each chord ring for as long as possible before moving to the next one.

How Does the Hold & Change Method Work?

All exercises are played at 60 BPM in 4/4 time. This means there are four beats per measure, with each beat lasting exactly one second.

Strum the chord on beat 1 and let it ring for a specified number of beats. Use the remaining time to move your fingers into position for the next chord.

1 Beat Let the chord ring. 3 beats to change.
2 Beats Let the chord ring. 2 beats to change.
3 Beats Let the chord ring. 1 beat to change.
Maximum Hold as long as possible. Change as late as possible.

In the final stage, try to let each chord ring for almost four full beats. Of course, you still need just enough time to prepare the next chord and strum it precisely on beat 1.

The most important rule: let each chord ring as long as possible, minimize unnecessary finger movements, and make sure the next chord is ready exactly on the first beat of the following measure.

Workout 1 · Part 1

Open Chords 1.1.1 — Part 1

We'll start with six chord positions using the C, F, Am, and Em shapes from the first exercise sequence. The order matches the first chord diagram image in the previous section.

||: C | F | C | Am | C | Em :||

The repeat signs at the beginning and end indicate that you should play the progression again. Follow along with the video and work through all four Hold & Change stages. Pay attention to the anchor fingers that can remain in place between chord changes.

Practice goal: play all six chord positions in the correct order. Try to make each chord change progressively later without missing the first beat of the next measure.

Workout 2 · Part 2

Open Chords 1.1.2 — Part 2

In the second workout, you'll practice the chord shapes from the second diagram image in the previous section. This exercise introduces more challenging finger movements and chord transitions.

||: G | D | Dm | F | A | Dm :||

Unlike the chord diagram exercise, this video workout ends on Dm instead of F. This allows the progression to repeat continuously as shown in the video.

Practice goal: perform the more challenging chord changes smoothly and without unnecessary tension in your fretting hand. Focus on maintaining accurate timing as the available transition time becomes shorter.

Workout 3 · Full Combo

Open Chords 1.1.3 — Full Combo

Ready for the full challenge? This workout combines the previous two exercises into one longer chord progression. You'll practice all the chord shapes together while maintaining a steady tempo.

||: C | F | C | Am | C | Em | G | D | Dm | F | A | Dm | F :||

After the A chord, play Dm followed by an additional F chord at the end. This also gives you the opportunity to practice the transition from F back to C when the entire sequence repeats.

You'll work through all four stages of the Hold & Change method again, but this time with every chord position played in sequence. Try to complete the entire workout without stopping.

The challenge: play the complete chord progression without stopping. Let each chord ring for as long as possible and maintain accurate timing throughout.

Want More Guitar Practice Workouts?

These three free videos introduce the training approach used by Guitar Workout Club. Want to improve your chord changes, timing, and guitar technique with additional structured workouts? Explore the full workout library on Patreon.

Explore More Workouts on Patreon →

How Do You Know You've Mastered These Chord Workouts?

You've built a solid foundation when you can:

  • Play all the chord shapes cleanly without assistance.
  • Follow all three chord progressions without looking at the diagrams.
  • Strum the correct chord on beat 1 at 60 BPM in every measure.
  • Delay your chord changes progressively without losing the beat.
  • Complete the entire Full Combo workout from beginning to end without stopping.

Not there yet? Repeat Part 1 and Part 2 separately. Move on to the Full Combo only when you can play the shorter exercises comfortably and with consistent timing.

What's the Next Step After Learning Open Guitar Chords?

These workouts develop three essential guitar skills: accurate chord shapes, efficient finger movements, and reliable timing. Once you can play these open chords smoothly, the next step is to add different strumming patterns and rhythms.

Start with our lesson on right-hand guitar technique and strumming . To apply your chord changes in a real musical context, you can also practice the four-chord progression in our Ed Sheeran four-chord guitar lesson .

Listen to famous songs using open guitar chords

You've now learned several basic open guitar chords and practiced changing between them. But these chord progressions aren't just exercises. You can hear similar patterns in countless famous songs.

Listen to the following recordings and try to recognize the chord changes. Compare the progressions with the shapes you've already learned.

Perfect

Ed Sheeran

|| C | Am | F | G ||

Capo: 1st fret

I'm Yours

Jason Mraz

|| G | D | Em | C ||

Capo: 4th fret

Zombie

The Cranberries

|| Em | C | G | D ||

Recognize the repeating chord progression.

Faded

Alan Walker

|| Am | F | C | G ||

Capo: 6th fret

Patience

Guns N' Roses

|| C | C | G | G | A | A | D | D ||

Listen for the longer chord changes.

Wish You Were Here

Pink Floyd

|| C | D | Am | G | D | C | Am | C ||

Verse – around 1:34

Listening tip: The chord progressions shown here are practice references. The original recordings may sound higher or lower because of capo placement or transposition. For now, focus on recognizing the chord sequence and hearing when the harmony changes. You'll learn how to adjust chord shapes to different keys later.

8 Common Open Guitar Chord Mistakes (and How to Fix Them)

Playing guitar involves three-dimensional finger control. You need to consider where your fingers sit in relation to the frets (X-axis), whether you accidentally push or pull the strings sideways (Y-axis), and how much pressure you apply (Z-axis). Even a small mistake in one of these directions can make a chord sound out of tune, muted, or unclear. Here are eight common beginner guitar chord mistakes and how to avoid them.

1. Incorrect Finger Placement (X-Axis)

If your finger is positioned too far behind the fret, you'll need more pressure and the string may buzz. If your finger is directly on top of the metal fret wire, the note may sound muted. Place your fingertip just behind the fret without touching the fret wire itself.

2. Too Much or Too Little Finger Pressure (Z-Axis)

Too little pressure can cause a string to buzz or prevent the note from ringing clearly. Too much pressure creates unnecessary muscle tension and can pull notes sharp, making the chord sound out of tune. Use only enough pressure to produce a clean, ringing note.

3. Accidentally Bending Strings Sideways (Y-Axis)

When you unintentionally push or pull a string sideways while fretting a note, you increase its tension. This raises the pitch and makes the note sound sharp, even if your guitar is perfectly tuned. Press the string straight toward the fretboard without bending it sideways.

4. Accidentally Muting Neighboring Strings

When your fingers touch adjacent strings, some notes may sound muffled or fail to ring out at all. Pick each string individually to identify which notes aren't sounding clearly. Adjust your finger placement until every intended string rings freely.

5. Strumming the Wrong Strings

Not every open guitar chord uses all six strings. For example, a standard D major chord is normally played using only the four highest strings. Check the X and O symbols in the chord diagram and start your strum on the correct string.

6. Lifting Every Finger During Chord Changes

Many beginners automatically lift all their fingers off the fretboard when switching to another chord. This wastes time and movement. Look for the black triangles between the chord diagrams. They show which fingers can stay on the same strings and frets. Use these anchor fingers to make your chord transitions smoother and more efficient.

7. Playing Too Fast or Changing Chords Too Early

Playing too quickly often leads to sloppy chord shapes. Changing chords too early creates unnecessary gaps between them. Start slowly and let each chord ring for as long as possible. Use the Hold & Change workouts at 60 BPM to practice changing chords progressively later without missing the first beat of the next measure.

8. Practicing with Tense or Painful Hands

A tense fretting hand limits your freedom of movement and makes chord changes slower. Mild muscle fatigue may occur, but pain is a warning sign. Stay relaxed and never force your fingers. Take regular short breaks and focus on using the least amount of pressure and movement necessary. Stop practicing if you experience pain.

Remember the three dimensions of guitar playing: position your fingers just behind the frets (X), avoid pushing or pulling the strings sideways (Y), and apply only the necessary finger pressure (Z). Then check that every intended string rings clearly. Precision, relaxation, and minimal movement matter far more than strength or speed.

Practice Open Guitar Chords with Our Free Tools

Accurate tuning and consistent timing are essential when learning open guitar chords. These free Guitar Training Studio tools help you tune your guitar, improve your chord changes with a metronome, and find the tempo of your favorite songs.

Recommended for This Lesson

Smart Click

Practice your open guitar chords with a precise online metronome. Set Smart Click to 60 BPM and work on your Hold & Change technique. Learn to let each chord ring for as long as possible before changing, and strum the next chord exactly on beat 1 of the following measure.

Open Smart Click →

Tune Your Guitar

PITCHR

Open guitar chords sound their best when your instrument is properly tuned. Use PITCHR to tune all six strings accurately. You can also check individual notes when a chord sounds out of tune, for example, if you're pressing too hard or accidentally bending a string sideways.

Open PITCHR →

Find the Tempo of Songs

Tap Tempo

Want to use your new guitar chords to play along with your favorite songs? Tap along to the beat to find the song's tempo in BPM. Then use that tempo in Smart Click to practice your chord progressions at the right speed.

Open Tap Tempo →

Frequently Asked Questions About Open Guitar Chords

Which Guitar Chords Should Beginners Learn First?

Start with simple open guitar chords such as Em and Am. Then gradually add C, G, D, and A. Once you're comfortable with these shapes, move on to Dm and a simplified F chord. These essential beginner guitar chords will help you play a wide variety of popular songs.

How Many Guitar Chords Do You Need to Know?

You don't need to memorize hundreds of chord shapes. With just a handful of open guitar chords, you can already accompany thousands of songs. What matters most isn't how many chords you know, but whether you can play them cleanly and switch between them smoothly.

Why Do My Guitar Chords Sound Muted or Out of Tune?

Common causes include placing your fingers too far behind the frets, applying too much or too little pressure, or accidentally touching neighboring strings. Also make sure your guitar is properly tuned. Pick each string individually to identify buzzing, muted, or out-of-tune notes.

Should You Strum All Six Strings for Every Guitar Chord?

No. For chords such as Em and G, you can normally strum all six strings. However, a standard D major chord uses only the four highest strings. Check the X and O symbols in the chord diagram to see which strings to play, leave open, or avoid.

What Do the Triangles Between the Chord Diagrams Mean?

A black triangle indicates that at least one finger can remain on the same string and fret during a chord change. The number inside the triangle shows how many fingers can stay in place. These are called anchor fingers. A white triangle means that all your fingers need to move to new positions.

What Is the Best Way to Practice Open Guitar Chords?

Start by practicing each chord individually, making sure every intended string rings clearly. Then work on short chord progressions. Our Hold & Change workouts at 60 BPM teach you to let each chord ring longer and change chords as late as possible without losing the beat. Focus on accuracy, relaxed finger movements, and consistent timing before increasing your speed.

Wouter Baustein - Guitar Coach

Guitar Training Studio

Ready to Make Real Progress on Guitar?

Build better technique, timing and musicianship with structured guitar training, practical tools and personal coaching.