fb-pixel Skip to main content

Guitar Training Studio

Free Guitar Lesson · Warm-Up · Both Hands

Guitar Hand Synchronization: 3 Exercises for Both Hands

These guitar warm-up exercises for both hands help improve synchronization between your fretting and picking hands. You'll develop finger control, picking technique, coordination, and timing so that every note sounds at exactly the right moment.

In this free guitar lesson, you'll practice three recognizable guitar passages with TAB: Thunderstruck, a Ritchie Blackmore guitar lick, and Paint It Black. You'll combine alternate picking, accurate finger changes, and string changes to develop better coordination between both hands.

Focus: Both Hands Technique: Synchronization Exercises: 3 Picking: Alternate Includes: Guitar TAB
Guitarist practicing hand synchronization between the picking and fretting hands on an electric guitar
Quick Answer

How do you improve guitar hand synchronization?

To improve synchronization between your picking and fretting hands, practice slowly with a pick and make sure each pick stroke happens at exactly the same moment as the corresponding finger movement on the fretboard. Start with simple patterns on a single string and use alternate picking to develop an even attack. Only increase the tempo when every note sounds clear and uninterrupted. The three guitar hand synchronization exercises below help you develop finger control, hand coordination, timing, and accurate string changes. You'll practice recognizable guitar passages: Thunderstruck by AC/DC (Angus Young), a Ritchie Blackmore guitar lick, and Paint It Black by The Rolling Stones. These exercises will help you coordinate both hands more accurately.

Guitar Hand Synchronization: 3 Warm-Up Exercises with TAB

These guitar warm-up exercises for both hands improve synchronization between your fretting and picking hands. You'll develop finger control, alternate picking, accurate note attacks, string changes, and rhythmic precision.

We'll use three musical exercises: Thunderstruck by AC/DC (Angus Young), a Ritchie Blackmore guitar lick, and Paint It Black by The Rolling Stones. Each exercise introduces a new technical challenge, from basic finger changes to pedal tones and string skipping.

3 Exercises Both Hands Downpicking Alternate Picking TAB + Finger Numbers Your Own Tempo

How Do You Practice Guitar Hand Synchronization?

Start each exercise at a slow, comfortable tempo. First, study the notes and suggested fingering in the TAB. Then play the pattern using downstrokes only (downpicking). Once both hands are working together accurately, repeat the same exercise using alternate picking, alternating between downstrokes and upstrokes.

The TAB images also include fretting-hand finger numbers. These indicate which fingers to use: 1 = index finger, 2 = middle finger, 3 = ring finger, and 4 = pinky. Not familiar with these numbers? Start with our lesson on guitar finger numbers and fingering.

Practice with our Smart Click metronome or play along with drum patterns from GuitarWorkout. Choose a tempo at which every note sounds clear and rhythmically accurate. Only increase the BPM once you can play the exercise several times correctly and without tension.

Important: The goal is synchronization, not speed. Your fretting hand must press down the correct note at the right moment, while your picking hand must strike the string at exactly the same time. Use small, controlled movements. Always start with downpicking and introduce alternate picking once your fingering and timing are under control.

Exercise 1 · AC/DC · Hand Synchronization

1. Thunderstruck – AC/DC (Angus Young)

We'll begin with a recognizable passage from Thunderstruck by AC/DC. This exercise is excellent for developing coordination between your fretting and picking hands.

You'll continuously alternate between an open string and fretted notes. Your picking hand maintains a steady pattern while your fretting hand must repeatedly place and release the correct finger at the right time.
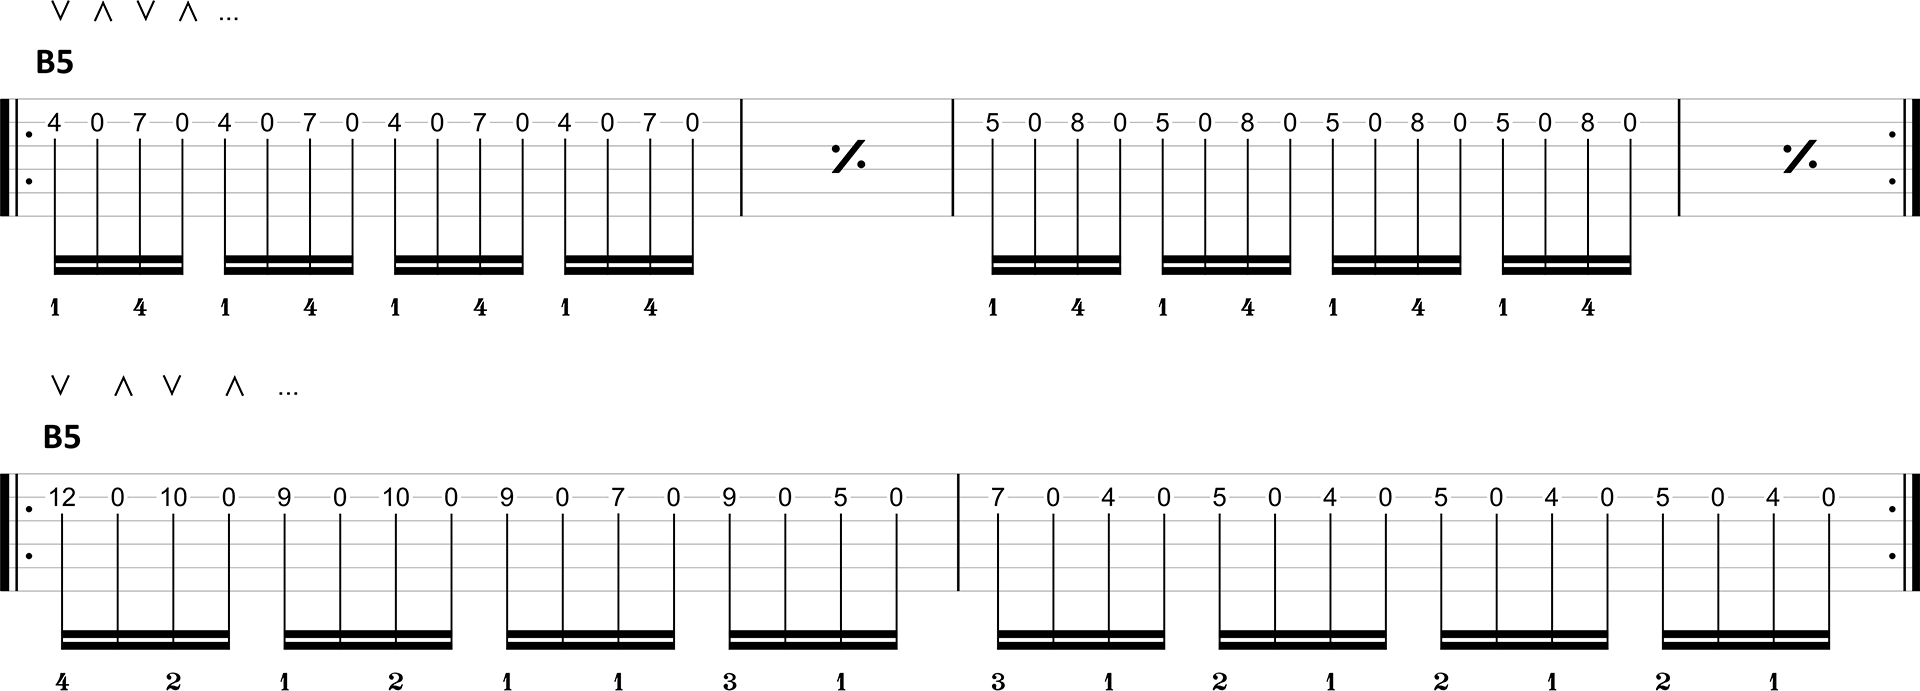
Thunderstruck by AC/DC guitar TAB with finger numbers for picking and fretting-hand synchronization
Thunderstruck – AC/DC: open strings and fretted notes, with fretting-hand finger numbers.

How to Practice Thunderstruck

  1. Start slowly. First, learn the pattern and the finger numbers indicated in the TAB.
  2. Play every note with downpicking. Use downstrokes only and make sure your fretting hand plays the correct notes at the right moment.
  3. Switch to alternate picking. Alternate between downstrokes and upstrokes without changing the timing.
  4. Pay attention to the open string. Open and fretted notes must follow a consistent rhythmic subdivision.
  5. Practice with a metronome or drums. Repeat the complete passage at a steady tempo and check whether every note is evenly spaced.
First: Downpicking
V V V V
Then: Alternate Picking
V Λ V Λ

The biggest challenge in Thunderstruck is rhythmic consistency. Don't let the open string tempt you to speed up. Every note must fall on the correct rhythmic subdivision. When the TAB indicates equal note values, your pick strokes must also be evenly spaced.

Use the Smart Click metronome to practice this. Choose a suitable subdivision and listen carefully to whether every note sounds at the right moment. You can also practice the same exercise with a drum groove from GuitarWorkout.

Remember: Don't lift your fingers excessively far away from the fretboard when playing an open string. Keep your fretting hand relaxed and minimize unnecessary movement. Above all, make sure that the open and fretted notes sound equally clear and rhythmically accurate.

Exercise 2 · Ritchie Blackmore · Finger Coordination

2. Ritchie Blackmore – Finger Changes and Synchronization

The second exercise features a Ritchie Blackmore guitar lick. Blackmore is best known for his work with Deep Purple and Rainbow. This exercise focuses on accurate finger changes, finger control, and hand synchronization.

Unlike Thunderstruck, you'll now play several consecutive fretted notes. Each finger must press down the correct string at exactly the right moment while your picking hand strikes the next note.
Ritchie Blackmore guitar lick TAB with finger numbers for accurate finger changes and hand synchronization
Ritchie Blackmore – Guitar Lick: accurate finger changes with suggested fingering.

How to Practice the Ritchie Blackmore Lick

  1. Study the finger numbers. Follow the fingering indicated in the TAB and try to use it consistently.
  2. Use one finger per fret. Within a comfortable hand position, assign each finger its own fret. Avoid unnecessarily shifting your entire hand.
  3. Keep your fingers as upright as comfortably possible. Use your fingertips and press the string just behind the fret without unnecessary tension.
  4. Start with downpicking. Pick every note separately and make sure your fretting hand presses the correct fret at the right moment.
  5. Switch to alternate picking. Alternate between downstrokes and upstrokes while maintaining the same fingering and rhythmic subdivision.
  6. Gradually increase the tempo. Play the pattern several times cleanly and without tension before increasing the BPM.
First: Downpicking
V V V V
Then: Alternate Picking
V Λ V Λ

Pay particular attention to finger independence. Each finger should be able to move without the others lifting unnecessarily far away from the strings. Keep your fingers close to the fretboard and try to make each movement as small as possible.

Finger pressure is also important. Use only enough pressure to produce a clear note. Squeezing too hard creates unnecessary tension and makes fast finger changes more difficult.

Want to improve your fretting-hand technique further? Check out our left-hand guitar warm-up and finger control exercises.

Remember: A common mistake is picking the string before the next finger is correctly positioned on the fretboard. This produces a muted or unclear note. Slow down and try to synchronize every finger movement precisely with the pick stroke.

Exercise 3 · The Rolling Stones · Pedal Tone & String Skipping

3. Paint It Black – The Rolling Stones

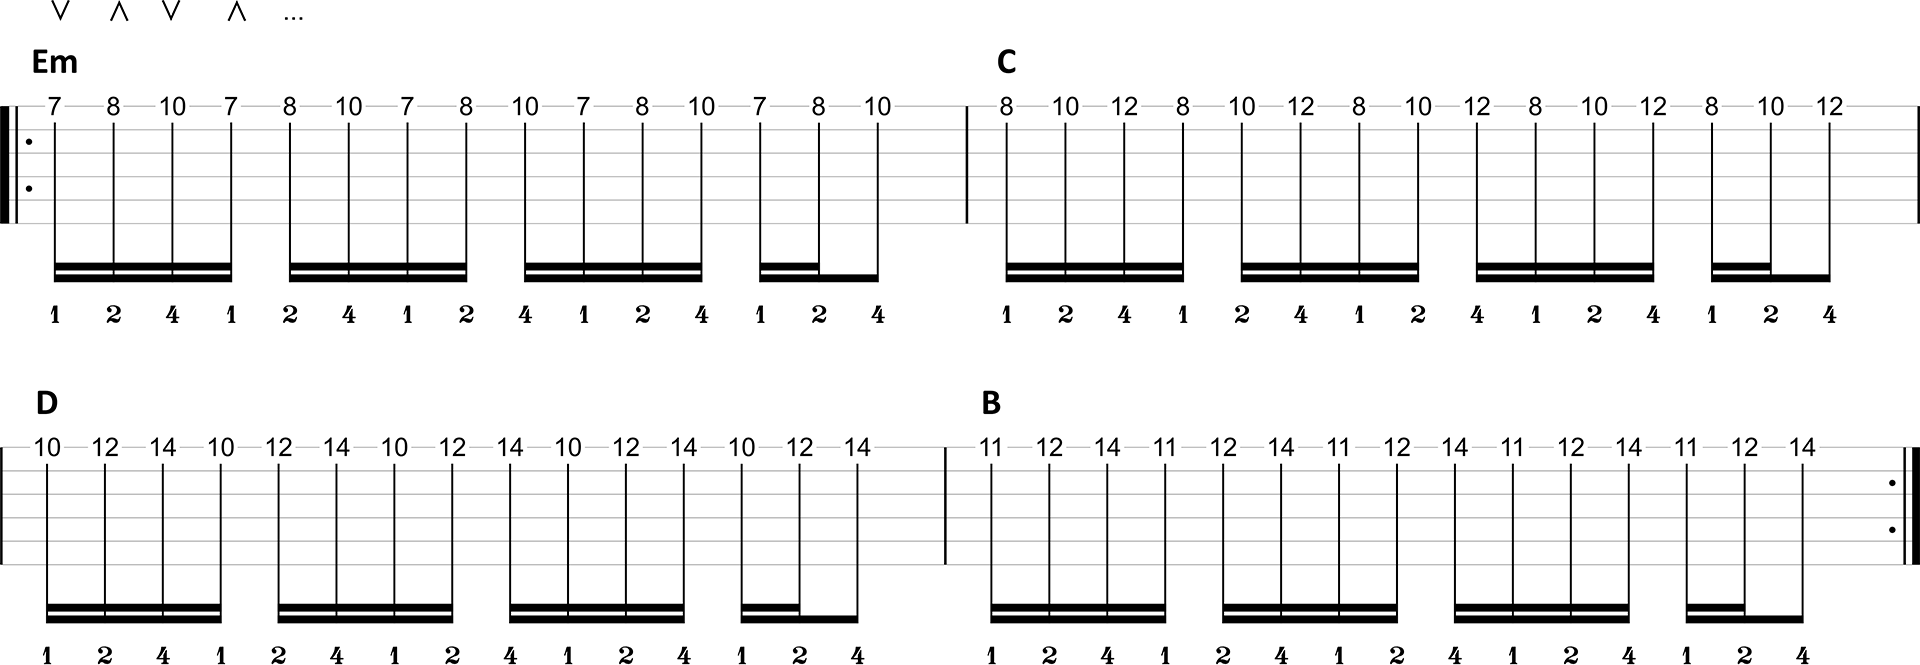
The third exercise is based on Paint It Black by The Rolling Stones. This passage combines melodic playing, pedal tones, string changes, and string skipping. Your picking hand faces an additional challenge here.

You'll play a melody while repeatedly returning to a pedal tone. A pedal tone is a recurring note that continues to appear while the other melody notes change.

Paint It Black by The Rolling Stones guitar TAB with finger numbers, picking directions, pedal tones and string skipping
Paint It Black – The Rolling Stones: pedal tones, string changes, string skipping, and suggested picking directions.

Part 1 – Pedal Tones and String Changes

In the first part, you'll alternate between melody notes and a recurring pedal tone on another string. In this arrangement, the pedal tone changes from D to A. Your picking hand must continue finding the correct strings while your fretting hand plays the melody.

  1. Learn the melody first. Study the notes and finger numbers, then play the melody slowly.
  2. Add the pedal tone. Follow the TAB and alternate between melody notes and the recurring pedal tone.
  3. Start with downpicking. Play all notes using downstrokes and concentrate on accurate string changes.
  4. Try alternate picking. Play the pattern using down-up first, then up-down.
  5. Compare both directions. Listen to your timing and notice which picking direction makes the string changes easier and more efficient.

Which Alternate-Picking Direction Should You Use?

When using alternate picking, guitarists often start with a downstroke followed by an upstroke. However, this exercise is an excellent opportunity to deliberately reverse the picking direction.

First: Downpicking
V V V V
Alternate Picking – Down-Up
V Λ V Λ
Reversed Alternate Picking – Up-Down
Λ V Λ V

Experiment with both variations. During these string changes, up-down (Λ V) may feel easier than the usual down-up movement. The direction in which your pick leaves a string can affect how easily it reaches the next string.

The TAB includes suggested picking directions. Try these first, but also compare them with the opposite direction. The goal is to discover which movement feels most relaxed, accurate, and efficient for you.

Part 2 – String Skipping

In the second part, the exercise becomes more challenging through string skipping. This means skipping one or more strings when changing from one string to another. Your pick must travel directly to a more distant string without accidentally striking the strings in between.

  1. Practice the string skips slowly. Start by picking the correct strings using downstrokes only.
  2. Use small movements. Move your pick only as far as necessary to reach the next string.
  3. Add alternate picking. Again, experiment with both down-up and up-down patterns.
  4. Pay attention to picking direction. Follow the markings in the TAB and compare how both directions feel when skipping the strings in between.
  5. Combine both parts. Play the complete passage at a steady tempo, without interruptions during string changes.

By experimenting with both picking directions, you'll learn how your pick moves between the strings. This is especially useful for string skipping, arpeggios, melodies, and more complex picking patterns.

Remember: With Paint It Black, the challenge isn't only playing the correct notes, but especially making efficient string changes. Reverse your alternate-picking direction and compare both approaches. A different starting stroke can make the entire passage easier to play. Avoid large movements and mute unused strings if they ring unintentionally.

What Should You Focus On During These Synchronization Exercises?

  • Always start slowly. Choose a tempo at which you can play every note clearly and accurately.
  • Start with downpicking. Practice each exercise with downstrokes first, then introduce alternate picking.
  • Follow the finger numbers. Use the suggested fingering in the TAB and avoid unnecessary hand movements.
  • Synchronize both hands. Make sure every finger placement coincides precisely with the correct pick stroke.
  • Keep your fingers close to the strings. Use one finger per fret whenever practical and avoid excessive finger pressure.
  • Experiment with picking directions. Especially in Paint It Black, up-down picking may feel easier than down-up.
  • Practice with consistent timing. Use a metronome or drum groove to maintain the correct rhythmic subdivision.
  • Increase the tempo gradually. Play each exercise correctly several times before increasing your speed.
  • Stay relaxed. Use small movements, avoid unnecessary tension, and stop if you experience pain.

These three exercises combine finger control, hand synchronization, alternate picking, string changes, and timing. Regular practice helps you move more efficiently and develop better control when playing melodies, riffs, scales, and guitar solos.

6 Common Mistakes When Synchronizing Both Hands on Guitar

A good guitar warm-up for both hands focuses on accurate hand coordination, controlled finger movements, and consistent timing. Your fretting and picking hands must work together to play every note at precisely the right moment. Technical mistakes become more noticeable, especially when the tempo increases or you change strings. Avoid these six common mistakes.

1. Practicing Too Fast and Ignoring the 90–100 BPM Threshold

One of the biggest mistakes in guitar hand synchronization is trying to play too fast. At a slow tempo, your fretting and picking hands may work perfectly together. But as you increase the speed, the movements can begin to fall out of sync. Your fretting hand may struggle to keep up with your picking hand, or vice versa.

A common breaking point is around 90–100 BPM. Many guitarists recognize this situation: below that tempo, an exercise may still sound reasonably controlled, but around 90–100 BPM, synchronization can suddenly begin to break down. You may hear missed notes, unclear attacks, and small rhythmic differences between both hands.

This breaking point becomes particularly noticeable when you gradually increase the tempo of the same picking pattern. Movements that feel easy at slower speeds can suddenly become inaccurate. Simply trying to play faster won't solve the problem. You need to improve synchronization at a lower tempo first.

Start very slowly, for example at 50 or 60 BPM. Use our Smart Click metronome or drum grooves from GuitarWorkout right from the first repetition. Check that every finger placement and pick stroke work together accurately.

Increase the tempo in small steps, such as 5 BPM. If you notice your hands falling out of sync around the 90–100 BPM threshold, lower the tempo again. Play the passage correctly several times before gradually rebuilding your speed. This helps you work beyond your current speed barrier, step by step.

2. Picking the String Before Your Finger Is in Position

With hand synchronization, your fretting and picking hands must work together precisely. If your pick strikes the string before the correct finger has pressed down the note, you'll hear an incorrect, muted, or unclear sound.

This is especially noticeable in the Ritchie Blackmore guitar lick, where several fretted notes follow one another. Your fretting hand must prepare each new note in time, while your picking hand performs the stroke at exactly the right moment.

Start with downpicking and play every note separately. Check that the correct finger is pressing down the string when you pick it. Then introduce alternate picking and try to maintain the same accuracy.

3. Using Incorrect or Inconsistent Fingering

Awkward fingering can make synchronization exercises unnecessarily difficult. Some guitarists repeatedly use the same fingers, shift their entire hand for every note, or constantly change their fingering.

Follow the finger numbers in the TAB and use one finger per fret whenever practical. Press the strings with your fingertips, keeping your fingers as upright as comfortably possible, and fret each note just behind the fret wire. This helps eliminate unnecessary movements and develop consistent fingering.

Not familiar with guitar finger numbering? Check out our lesson on guitar finger numbers.

4. Using Too Much Tension and Unnecessarily Large Movements

When guitarists attempt a challenging passage, they often start pressing the strings harder, gripping their pick more tightly, or lifting their fingers excessively far away from the fretboard.

This extra tension makes accurate and efficient hand movements more difficult. Especially during consecutive finger changes, every unnecessary movement can interfere with synchronization.

Keep your fingers close to the strings and use only enough finger pressure to produce a clear note. Maintain a relaxed pick grip and use small, controlled strokes. Don't force your hands, and stop if you experience pain.

5. Always Using the Same Alternate-Picking Direction

With alternate picking, guitarists usually begin with a downstroke followed by an upstroke: V Λ V Λ. That's a good starting point, but not every string change feels equally comfortable with the same starting stroke.

In Paint It Black by The Rolling Stones, you combine melody notes with pedal tones and later string skipping. This means your pick must continuously travel between different strings.

Start the exercise using downpicking only. Then try alternate picking with down-up (V Λ), followed by the reversed pattern: up-down (Λ V).

In this arrangement, up-down picking may feel considerably easier, because the pick's movement can make certain string changes more comfortable. Experiment with both directions and follow the suggested picking directions in the TAB.

6. Losing Your Timing During Open Strings and String Changes

In Thunderstruck by AC/DC, you constantly alternate between open strings and fretted notes. Some guitarists unconsciously play the open strings faster, then slow down when they need to place a finger on the fretboard.

A similar problem occurs in Paint It Black when changing between pedal tones or skipping strings. Your picking hand must travel a different distance, but the rhythm must remain unchanged.

Make sure every note falls on the correct rhythmic subdivision, regardless of your finger and picking movements. Use Smart Click to practice accurate subdivisions, or play along with drum grooves from GuitarWorkout to improve your timing.

Don't just listen for the correct notes. Pay particular attention to when each note sounds. Even a melody containing all the correct notes can sound uneven when the timing isn't under control.

Remember: With these three synchronization exercises, control comes before speed. Start very slowly with a metronome or drum groove, practice downpicking first, then introduce alternate picking. Follow the finger numbers in the TAB and experiment with reversed picking directions in Paint It Black. Pay particular attention to the common speed barrier around 90–100 BPM. If your hands begin to fall out of sync at that tempo, slow down and gradually build up again. Accurate synchronization matters more than speed.

Frequently Asked Questions About Guitar Hand Synchronization

How do you improve synchronization between your picking and fretting hands?

Start with slow guitar exercises where every finger placement coincides with the correct pick stroke. Begin with downpicking only, then switch to alternate picking. Practice with consistent timing and gradually increase the tempo. The three exercises in this lesson, Thunderstruck by AC/DC, a Ritchie Blackmore guitar lick, and Paint It Black by The Rolling Stones, develop different aspects of hand coordination, finger control, and accurate string changes.

Why do my picking and fretting hands fall out of sync around 90–100 BPM?

Around 90–100 BPM, many guitarists experience a common speed barrier in hand synchronization. A pattern that sounds perfectly controlled at a lower tempo may suddenly fall apart when played faster. For example, your picking hand may strike the next note before your fretting hand presses down the correct fret. Start very slowly, around 50 or 60 BPM, and increase the tempo in steps of approximately 5 BPM. Whenever your hands fall out of sync, return to a slower tempo. The exact breaking point also depends on the exercise and whether you're playing eighth or sixteenth notes.

Should you practice hand synchronization with downpicking or alternate picking?

Begin each exercise with downpicking, playing every note with a downward pick stroke. This allows you to focus on correct finger placement, timing, and string changes first. Once you can play the pattern accurately, switch to alternate picking, alternating between downstrokes and upstrokes. In Paint It Black, you can also experiment with down-up (V Λ) and the reversed pattern up-down (Λ V). The reversed direction may make certain string changes easier.

What do the finger numbers in guitar TAB mean?

The finger numbers in guitar TAB indicate which fingers of your fretting hand to use: 1 = index finger, 2 = middle finger, 3 = ring finger, and 4 = pinky. Follow the suggested fingering and use one finger per fret whenever practical. Press the strings with your fingertips, keeping your fingers as upright as comfortably possible, and fret each note just behind the fret wire. For more information, read our lesson on guitar finger numbers and fingering.

What are pedal tones and string skipping in Paint It Black?

A pedal tone is a note that repeatedly returns while you play other melody notes. In our Paint It Black by The Rolling Stones exercise, the pedal tone alternates between D and A. Your picking hand must move accurately between the strings. With string skipping, you skip one or more strings when moving from one string to another. Practice both techniques slowly and experiment with different alternate-picking directions to find the most efficient movement.

How do you practice guitar hand synchronization with a metronome?

Set a slow tempo, such as 50 or 60 BPM, and play every note according to the rhythmic subdivision shown in the TAB. Use our Smart Click metronome or practice with drum grooves from GuitarWorkout. Start with downpicking and introduce alternate picking once both hands work together accurately. Gradually increase the tempo, but keep listening to whether every finger placement and pick stroke remain perfectly synchronized. When mistakes occur, slow down and build up again.

Wouter Baustein - Guitar Coach

Guitar Training Studio

Ready to Make Real Progress on Guitar?

Build better technique, timing and musicianship with structured guitar training, practical tools and personal coaching.