
Replacing strings on acoustic, classical or electric guitar
The tension of strings versus the guitar neck
Snaren zorgen voor een spanning en druk op de gitaarhals. Soms lezen we op internet dat bij verkeerde handelingen zoals verwijderen of plaatsen van snaren een plotse overdruk kan optreden, waardoor de hals krom trekt. Indien je een oude of beschadigde gitaar hebt die jaren op zolder gelegen heeft, akkoord. In alle andere gevallen zal dit niet zo een extreme vaart lopen. Je kan voor alle zekerheid snaar per snaar vervangen. Maar een 2-tal keer per jaar is toch aangeraden van alle snaren te verwijderen en het fretboard eens grondig te reinigen (voor donker hout : gebruik daarvoor citroenolie / Lemon Oil). Het fretboard begint te kleven van het vet en zweet van je vingers. Schrik niet hoe vuil de hals is, en schrik vooral niet hoe mooi de hals er terug uitziet na een grondige poetsbeurt. Maar laat inderdaad je gitaar geen dagen liggen zonder snaren, doe dit in 1 trek.

When to replace strings
Strings can be replaced at any time, some do that every week, others only 1 time a year. Many guitarists swear by the sharp and metallic sound of new strings … But the other half of the guitarists hate that sharp and metallic sound of new strings. So replacing strings, it’s completely up to you! Nevertheless, there are some criteria that you should definitely take into account. For steel strings, it can generally be assumed that the strings are worn out when they start to rattle, if you notice that the elasticity has disappeared, if at the level of the frets the strings are worn out, or when you notice that the strings feel rough and turn black (oxidation). Note: strings that turn brown (rust), means that your guitar is stored in a too humid environment!
What do you need
A set of new strings (of course), nippers, string grinder or string winder (to save your wrists). For starters or beginners, I recommend placing your guitar on a chair or possibly on a table with a cushion under the guitar neck. An experienced guitarist can replace the strings with the guitar on their lap, but at first I would not recommend this as the guitar might get acquainted with the floor.
Step 1 : Remove strings
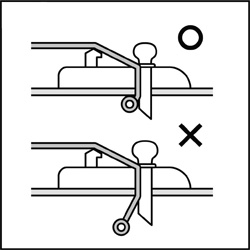
Draai de te vervangen snaar los, of indien je alle snaren tegelijk wil verwijderen en de neck wil reinigen, draai dan alle snaren los. Wanneer ze iets of wat los zijn, dan knip ik de snaren door om tijd te winnen. De snaren worden nu 1 voor 1 via de brugelementen langs de achterkant van de gitaar verwijderd. Dit kan verschillen van model tot model, bij onder andere Les Paul modellen van Gibson, ESP, etc moet men de snaren rechtstreeks door de brug duwen. Bij een klassieke gitaar moet je het knoopje losmaken van de snaar aan de brug, bij een akoestische gitaar moet je de brugpinnen voorzichtig uittrekken (zie afbeelding).
Step 2 : fretboard brushing
This is not necessary every week of course, but 2 times a year you can thoroughly clean the fretboard with a microfiber cloth. Please note, do not use just any cleaning product! For a dark neck, for example, it is best to use lemon oil / Lemon Oil. It is best to use oil only 1 or 2 times a year, otherwise the wood of the fretboard (fretboard) can become saturated and you make a greasy mess of it.
Step 3 : Placing strings
Then you insert the new strings (1 string at a time) along the back through the guitar or through the bridge, and with an acoustic guitar replace the bridge pins (see top image)
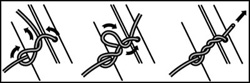
With a classical guitar with nylon strings, the strings must be tied to the bridge (see bottom image)
Make sure these are placed in the correct order: the thickest string will come at the top and thinnest at the bottom. Many brands of strings also work with colors at the end (ball ends) in order to use the correct order. Now set the tuner so that the hole is parallel to the neck, so you can slide the string through without bending.
Then take the string at least 5cm “too long”, so that you have enough length to wind the string around the tuner. With the thinner string I usually take measures than 5cm, with the thickest string this is less important. Ideal is 3 windings, which is best for the sound and best to keep your guitar in tune. But don’t give it too much importance : important is that you can place the strings properly without dropping your guitar, and last but not least, don’t think that you will become a better guitarist by aiming for these ideal 3 winds.
Step 4 : tie strings by making a loop

When you have given the nod, keep holding the short end with 1 hand, and the long end with the other hand, i.e. keep the string tense. Now insert the short short piece underneath, make a loop over the long end and turn around the tuner. This way you make a loop that clamps itself as soon as you start tightening the string. Importantly, still keep the short and long end tight! Now try to hold both ends with 1 hand, and with the other hand you can start to wind the string. After about 1 tour you can let go of the short end, because the loop has clamped itself. But still important, keep tightening the long end until the string has enough tension. Tune this string +- as it should be and now move on to the next string.
Step 5 : stretching strings … to stretch or not to stretch, that is the question!
After all strings have been replaced and roughly tuned, start stretching or pulling out all the strings first. According to many guitarists, this is definitely not done, because it affects the sound of your strings. However, I never noticed much of it, and don’t forget, strings that are not stretched cannot be bent or bent and you have to tune every 2 minutes. So, yes, it may be true that stretching has a minimal negative impact on the sound, but what can you do with a guitar that doesn’t get you tuned for the first few weeks? And besides, again, does that suddenly make you a better or worse guitarist? By the way, stretching the strings has an additional and very important function. You can pull the strings, don’t be afraid they won’t jump! Just kidding, yes, they can definitely break down … If it does, it means that the string was either poorly placed, or that a manufacturing defect occurred, and that this string would still jump during the next few days while playing. But I’d rather let the string jump ahead of time than on stage, wouldn’t you?
Step 6 : to cut or not to cut?
After stretching, tune your guitar again, and then cut off the loose ends. You often see guitarists who leave these ends hanging, because that’s pretty cool huh! No that’s not cool, that’s just stupid. Firstly, you can cut yourself on these sharp strings, and secondly, if 2 of those ends touch each other while playing/moving the guitar, you can get noises. So, cut off that trade!
Step 7 : tuning, stretching, tuning, stretching, tuning …
Then stretch again, and fine tune your guitar. You can repeat this a number of times when you notice that after stretching the strings the tone drops too much. And then, that’s it Kees … uh your guitar!
Step 8 : timing !
How long did it take you the first time? A full hour? No panic, that’s completely normal though. After a while, it only takes 5 to replace strings!